Correction status:qualified
Teacher's comments:看得出, 你一直在努力, 在坚持, 继续


参考课程内容,完成后台文章图片上传功能
首先需要设置符号链接:
在根目录运行命令行:
php artisan storage:link
运行后相当于对storage目录做了一个快捷方式到public目录,这样就可以在浏览器访问上传的资源。
需要注意的是其实文件是存在根目录的storage目录的,删除后,对于的public目录里面也会不在的。
add.blade.php文章保存添加页面的代码如下:
<!DOCTYPE html>
<head>
    <title>内容添加</title>
    <meta charset="utf-8">
    <meta name="renderer" content="webkit">
    <meta http-equiv="X-UA-Compatible" content="IE=edge,chrome=1">
    <meta name="viewport" content="width=device-width, initial-scale=1, maximum-scale=1">
    <meta name="apple-mobile-web-app-status-bar-style" content="black">
    <meta name="apple-mobile-web-app-capable" content="yes">
    <meta name="format-detection" content="telephone=no">
    <link rel="stylesheet" href="/static/css/style.css"  media="all">
    <script type="text/javascript" src="/static/js/jquery3.4.1.js"></script>
    <script type="text/javascript" src="/static/layer/layer.js"></script>
    <script type="text/javascript" src="/static/js/phpcn.js"></script>
    <!-- 配置文件 -->
    <script type="text/javascript" src="/static/ueditor/ueditor.config.js"></script>
    <!-- 编辑器源码文件 -->
    <script type="text/javascript" src="/static/ueditor/ueditor.all.js"></script>
</head>
<body>
<form class="phpcn-form phpcn-bg-fff phpcn-p-10 phpcn-clear">
    @csrf
    <input type="hidden" name="id" value="{{$id}}">
    <div class='phpcn-l phpcn-col-xs6 phpcn-box-sizing'>
        <div class="phpcn-form-item">
            <label class="phpcn-form-lable">标题</label>
            <div class="phpcn-input-inline">
                <input type="text" class="phpcn-input" name="title" value="{{$article['title']}}">
            </div>
        </div>
        <div class="phpcn-form-item">
            <label class="phpcn-form-lable">副标题</label>
            <div class="phpcn-input-inline">
                <input type="text" class="phpcn-input" name="subtitle" value="{{$article['subtitle']}}">
            </div>
        </div>
        <div class="phpcn-form-item">
            <label class="phpcn-form-lable">分类</label>
            <div class="phpcn-input-inline phpcn-form-select">
                <select name="cate_id" lay-filter="cate_id">
                    @foreach($lists as $item)
                    <option value="{{$item['id']}}" {{isset($article['cate_id']) && $article['cate_id']==$item['id']?'selected':''}}>{{$item['title']}}</option>
                    @endforeach
                </select>
            </div>
        </div>
        <div class="phpcn-form-item">
            <label class="phpcn-form-lable">封面图</label>
            <div class="phpcn-input-inline phpcn-form-file">
                <button class="phpcn-button" type='button' onclick="$('#file_upload').click();"><i class="phpcn-icon phpcn-icon-jindutiaodaishangchuan"></i>选择文件</button>

                <img id="pre_img"  style="height: 38px;" onmouseover="show_img()" onmouseleave="hide_img()" />
                <span style="color: gray;">封面图 为PNG/JPG/GIF 格式图片</span>
                <iframe name="frame1" id="frame1" style="display: none;"></iframe>
                <input type="hidden" name="cover_img" id="imgurl" value="">
            </div>
        </div>
        <div class="phpcn-form-item">
            <label class="phpcn-form-lable">seo标题</label>
            <div class="phpcn-input-inline">
                <input type="text" class="phpcn-input" name="seo_title" value="{{$article['seo_title']}}">
            </div>
        </div>
        <div class="phpcn-form-item">
            <label class="phpcn-form-lable">keyword</label>
            <div class="phpcn-input-inline">
                <input type="text" class="phpcn-input" name="keyword" value="{{$article['keyword']}}">
            </div>
        </div>
        <div class="phpcn-form-item">
            <label class="phpcn-form-lable">文章摘要</label>
            <div class="phpcn-input-inline">
                <input type="text" class="phpcn-input" name="descs" value="{{$article['descs']}}">
            </div>
        </div>
        <div class="phpcn-form-item">
            <label class="phpcn-form-lable">作者</label>
            <div class="phpcn-input-inline">
                <input type="text" class="phpcn-input" name="author" value="{{$article['author']}}">
            </div>
        </div>
        <div class="phpcn-form-item">
            <label class="phpcn-form-lable">来源</label>
            <div class="phpcn-input-inline">
                <input type="text" class="phpcn-input" name="from_site" value="{{$article['from_site']}}">
            </div>
        </div>
        <div class="phpcn-form-item">
            <label class="phpcn-form-lable">来源URL</label>
            <div class="phpcn-input-inline">
                <input type="text" class="phpcn-input" name="from_url" value="{{$article['from_url']}}">
            </div>
        </div>
        <div class="phpcn-form-item">
            <label class="phpcn-form-lable">评论</label>
            <div class="phpcn-input-inline phpcn-form-radio">
                <input type="radio" name="is_comment" value="1" title="开启" {{isset($article['is_comment']) && $article['is_comment']==1?'checked':''}}>
                <input type="radio" name="is_comment" value="0" title="关闭" {{isset($article['is_comment']) && $article['is_comment']==0?'checked':''}}>
            </div>
        </div>
        <div class="phpcn-form-item">
            <label class="phpcn-form-lable">状态</label>
            <div class="phpcn-input-inline phpcn-form-radio">
                <input type="radio" name="status" value="1" title="开启" {{isset($article['status']) && $article['status']==1?'checked':''}}>
                <input type="radio" name="status" value="0" title="关闭" {{isset($article['status']) && $article['status']==0?'checked':''}}>
            </div>
        </div>
    </div>
    <div class="phpcn-form-item phpcn-r">
        <div class="phpcn-input-block">
            <textarea placeholder="请输入内容" class="layui-textarea" id='content' name="contents">{{isset($content['contents'])?$content['contents']:''}}</textarea>
        </div>
    </div>
</form>
<form id="file_from" target="frame1" enctype="multipart/form-data" action="/admins/image/index" method="post" style="display: none;">
    @csrf
    <input type="file" name="file_upload" id="file_upload" onchange="upload_img()">
</form>
<div class="phpcn-form-item phpcn-bg-fff phpcn-clear">
    <div class="phpcn-tx-c">
        <button type="button" class="phpcn-button" onclick="content_save();">保存</button>
        <button type="button" class="phpcn-button phpcn-bg-black" onclick="cancel();">取消</button>
    </div>
</div>

<script type="text/javascript">
    //图片上传
    function upload_img() {
        $('#file_from').submit();
    }
    // 获取鼠标位置
    function getMousePos(event) {
        var e = event || window.event;
        var scrollX = document.documentElement.scrollLeft || document.body.scrollLeft;
        var scrollY = document.documentElement.scrollTop || document.body.scrollTop;
        var x = e.pageX || e.clientX + scrollX;
        var y = e.pageY || e.clientY + scrollY;
        return { 'x': x, 'y': y };
    }

    function show_img(obj){
        var pos=getMousePos();
        var x=pos.x;
        var y=pos.y;
        var url=$('#pre_img').attr('src');
        var html='<div id="div_preimg" style="background: #fff;position: absolute;border: 1px solid #e5e5e5;width: 200px;border-radius: 4px;left:'+x+'px;top:'+y+'px;"><img src="'+url+'" alt="" style="width: 100%"></div>';
        //将html添加到body里面
        $('body').append(html);
    }

    function hide_img() {
    //将ID为div_preimg的div移走
        $('#div_preimg').remove();
    }

    function upload_success(img_path) {
        $('#pre_img').attr('src',img_path);
        $('#imgurl').attr('value',img_path)
    }
    //文章保存
    function content_save() {
        $.post('/admins/content/save',$('.phpcn-form').serialize(),function (res) {
            if(res.code>0){
                layer.alert(res.msg,{icon:2});
            }else{
                layer.msg(res.msg,{icon:1});
                setTimeout(function(){window.location.href='/admins/content/index';},1000);
            }
        },'json')
    }

    // 取消
    function cancel(){
        history.go(-1);
    }

    init_editor();
    function init_editor() {
        var ue_width = $('.phpcn-col-xs6').width() - 20;
        var ue_height = $(window).height() - 180;
        var ue = UE.getEditor('content',{initialFrameWidth:ue_width,initialFrameHeight:ue_height});
    }
</script>
</body>
</html>
控制器Image代码如下:
<?php
namespace xpcms\Http\Controllers\admins;
use Illuminate\Http\Request;
use Illuminate\Support\Facades\Storage;
use xpcms\Http\Controllers\Controller;
class Image extends Controller{
    public function index(Request $req){
        $path=$req->file('file_upload')->store('public/avators');
        $url=Storage::url($path);
        $html='<script>parent.upload_success("'.$url.'");</script>';
        echo $html;
    }
}
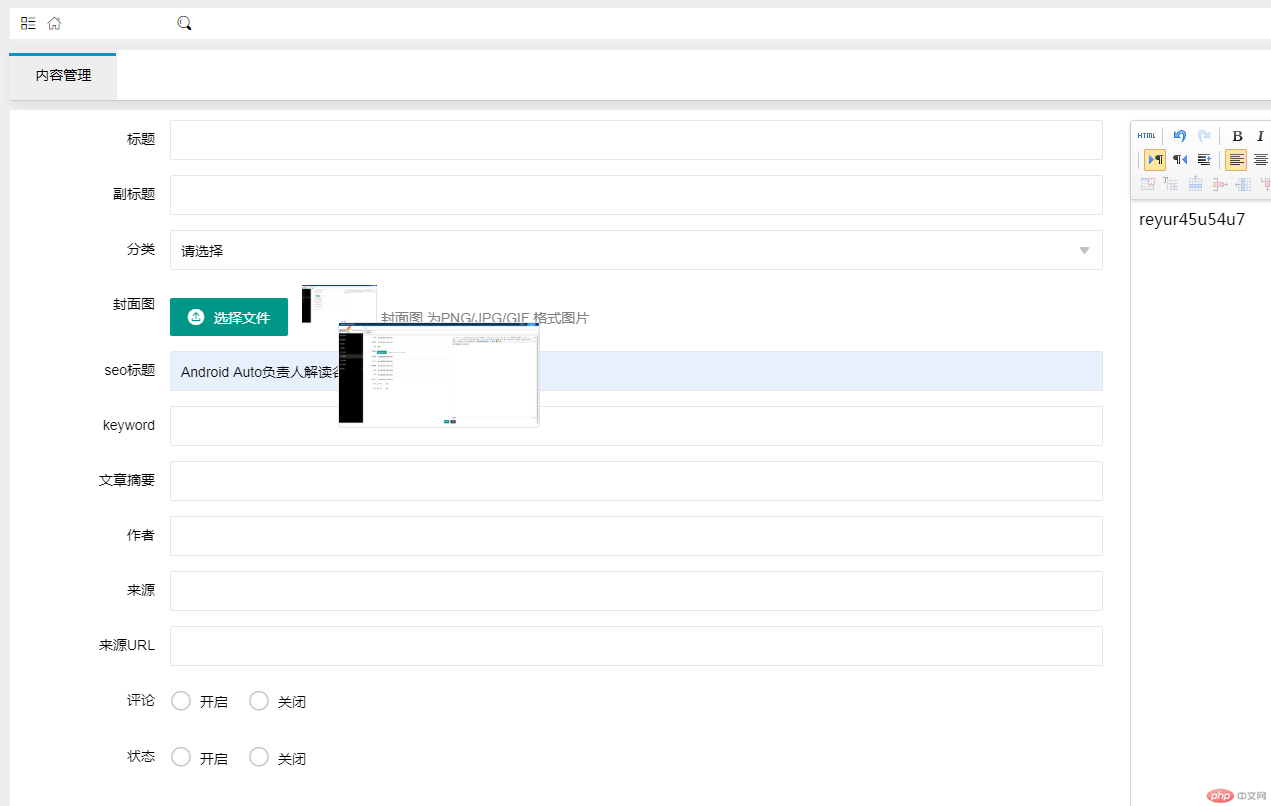
运行后结果如下图所示:

本作业的知识点主要是文件上传使用laravel框架如何操作,如何获取鼠标的位置,然后把对应的position位置传到div里面去。