Correction status:qualified
Teacher's comments:了解了基本属性后, 就应该找一些页面进行试水了


| 序号 | 简记 | 术语 |
|---|---|---|
| 1 | 二成员 | 容器和项目(container / item) |
| 2 | 二根轴 | 主轴与交叉轴(main-axis / cross-axis) |
| 3 | 二根线 | 起始线与结束线(` |
display属性| 序号 | 属性值 | 描述 | 备注 |
|---|---|---|---|
| 1 | flex; |
创建 flex 块级容器 | 内部子元素自动成为 flex 项目 |
| 2 | inline-flex; |
创建 flex 行内容器 | 内部子元素自动成为 flex 项目 |
| 序号 | 容器/项目 | 默认行为 |
|---|---|---|
| 1 | 容器主轴 | 水平方向 |
| 2 | 项目排列 | 沿主轴起始线排列(当前起始线居左) |
| 3 | 项目类型 | 自动转换”行内块级”元素,不管之前是什么类型 |
| 4 | 容器主轴空间不足时 | 项目自动收缩尺寸以适应空间变化,不会换行显示 |
| 5 | 容器主轴存在未分配空间时 | 项目保持自身大小不会放大并充满空间 |
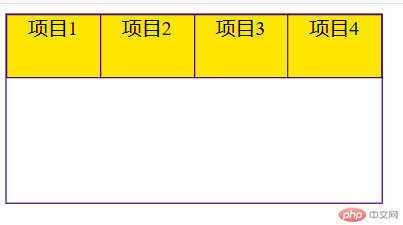
<!DOCTYPE html><html lang="en"><head><meta charset="UTF-8" /><meta name="viewport" content="width=device-width, initial-scale=1.0" /><title>Document</title><style>/* 容器 */.container {width: 300px;height: 150px;}/* 将容器/父元素设置为flex容器 */.container {display: flex;/* display: inline-flex; */}/* 项目/子元素 */.item {width: 100px;height: 50px;background-color: rgb(255, 230, 0);font-size: 1rem;text-align: center;}</style></head><body><div class="container"><div class="item">项目1</div><div class="item">项目2</div><div class="item">项目3</div><div class="item">项目4</div></div></body></html>
flex-direction属性| 序号 | 属性值 | 描述 |
|---|---|---|
| 1 | row默认值 |
主轴水平: 起始线居中,项目从左到右显示 |
| 2 | row-reverse |
主轴水平:起始线居右, 项目从右向左显示 |
| 3 | column |
主轴垂直: 起始线居上,项目从上向下显示 |
| 4 | column-reverse |
主轴垂直: 起始线居下,项目从下向上显示 |
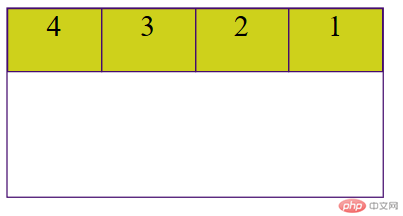
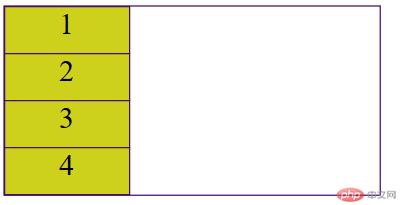
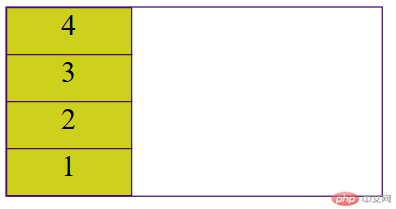
<!DOCTYPE html><html lang="en"><head><meta charset="UTF-8" /><meta name="viewport" content="width=device-width, initial-scale=1.0" /><title>主轴方向</title><style>/* 容器 */.container {width: 300px;height: 150px;}/* 将容器/父元素设置为flex容器 */.container {display: flex;/* display: inline-flex; */}/* 主轴方向:所有的项目必须沿主轴排列 */.container {/* 默认主轴为水平,行的方向 */flex-direction: row;/* 项目从右往左排列 */flex-direction: row-reverse;/* 项目垂直从小到大排列 */flex-direction: column;/* 项目垂直从大到小排列 */flex-direction: column-reverse;}/* 项目/子元素 */.item {width: 100px;height: 50px;background-color: rgb(206, 209, 27);font-size: 1.5rem;text-align: center;}</style></head><body><div class="container"><div class="item">1</div><div class="item">2</div><div class="item">3</div><div class="item">4</div></div></body></html>
flex-wrap属性| 序号 | 属性值 | 描述 |
|---|---|---|
| 1 | nowrap默认值 |
项目不换行: 单行容器 |
| 2 | wrap |
项目换行: 多行容器,第一行在上方 |
| 3 | wrap-reverse |
项目换行: 多行容器,第一行在下方 |
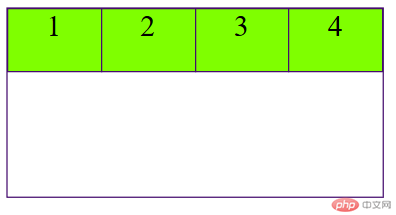
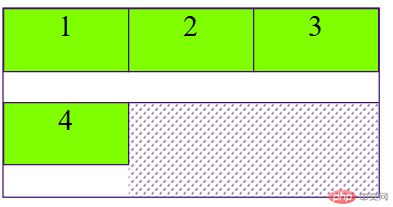
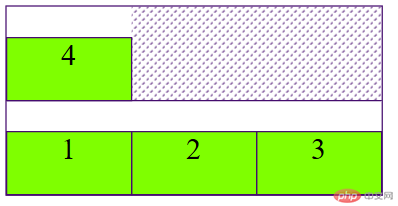
<!DOCTYPE html><html lang="en"><head><meta charset="UTF-8" /><meta name="viewport" content="width=device-width, initial-scale=1.0" /><title>主轴方向</title><style>.container {width: 300px;height: 150px;}/* 将容器、父元素设置为flex容器 */.container {display: flex;/* display: inline-flex */}/* 主轴方向:所有的项目必须沿主轴排列 */.container {/* 默认主轴为水平,行的方向 */flex: -diretion:row;}/* 主轴上的项目换行显示 */.container {flex-wrap: nowrap;/* 如果允许换行,当前容纳不下的项目会换行显示,此时创建的容器 */flex-wrap: wrap;/* 项目反向排列 */flex-wrap: wrap-reverse;}.item {width: 100px;height: 50px;background-color: chartreuse;font-size: 1.5rem;text-align: center;}</style></head><body><div class="container"><div class="item">1</div><div class="item">2</div><div class="item">3</div><div class="item">4</div></div></body></html>
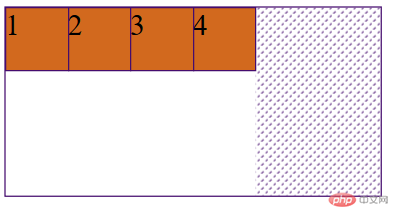
flex-flow属性flex-flow是属性flex-direction(当前的主轴方向)和flex-wrap(项目是否换行)的简写flex-flow: flex-direction flex-wrap| 属性值 | 描述 |
|---|---|
row nowrap默认值 |
主轴水平, 项目不换行 |
以后推荐只用它
<!DOCTYPE html><html lang="en"><head><meta charset="UTF-8" /><meta name="viewport" content="width=device-width, initial-scale=1.0" /><title>主轴方向与是否换行的简写</title><style>.container {width: 300px;height: 150px;}/* 将容器父元素设置为flex容器 */.container {display: flex;}/* 主轴方向:所有的项目必须沿主轴排列 */.container {/* `默认值 | 主轴水平, 项目不换行 */flex -flow:row nowrap;/* 主轴水平, 项目允许换行 */flex-flow:row wrap;/* 以列排列, 项目不允许换行 *//* flex-flow:column nowrap; *//* 以列排列, 项目允许换行 *//* flex-flow: column wrap; */}/* 简写 */.item {width: 100px;height: 50px;font-size: 1.5rem;background-color: chocolate;}</style></head><body><div class="container"><div class="item">1</div><div class="item">2</div><div class="item">3</div><div class="item">4</div></div></body></html>
justify-content属性当容器中主轴方向上存在剩余空间时, 该属性才有意义
| 序号 | 属性值 | 描述 |
|---|---|---|
| 1 | flex-start默认 |
所有项目与主轴起始线对齐 |
| 2 | flex-end |
所有项目与主轴终止线对齐 |
| 3 | center |
所有项目与主轴中间线对齐: 居中对齐 |
| 4 | space-between |
两端对齐: 剩余空间在头尾项目之外的项目间平均分配 |
| 5 | space-around |
分散对齐: 剩余空间在每个项目二侧平均分配 |
| 6 | space-evenly |
平均对齐: 剩余空间在每个项目之间平均分配 |
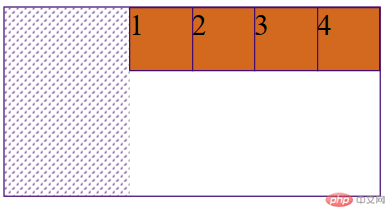
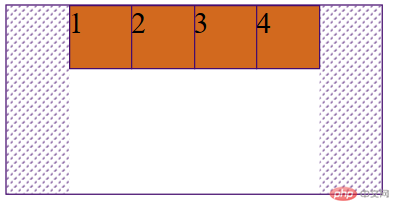
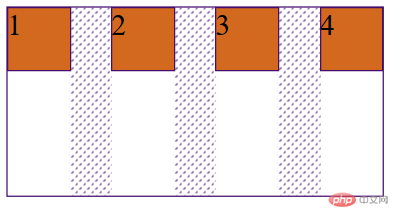
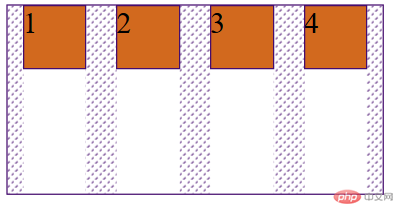
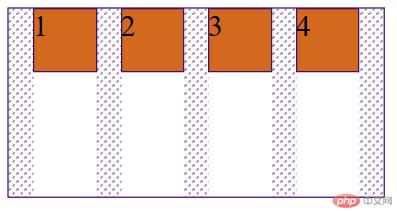
<!DOCTYPE html><html lang="en"><head><meta charset="UTF-8" /><meta name="viewport" content="width=device-width, initial-scale=1.0" /><title>主轴项目对齐方式</title></head><style>.container {width: 300px;height: 150px;}.container {display: flex;}.item {width: 50px;height: 50px;font-size: 1.5rem;background-color: chocolate;}.container {/* 主轴起始线对齐 */justify-content: flex-start;/* 终止线对齐 */justify-content: flex-end;/* 居中对齐 */justify-content: center;/* 两端对齐 */justify-content: space-between;/* 分散对齐 */justify-content: space-around;/* 平均对齐 */justify-content: space-evenly;}</style><body><div class="container"><div class="item">1</div><div class="item">2</div><div class="item">3</div><div class="item">4</div></div></body></html>
align-items属性| 序号 | 属性值 | 描述 |
|---|---|---|
| 1 | flex-start默认 |
与交叉轴起始线对齐 |
| 2 | flex-end |
与交叉轴终止线对齐 |
| 3 | center |
与交叉轴中间线对齐: 居中对齐 |
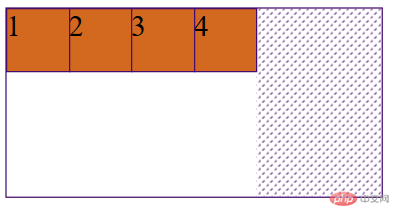
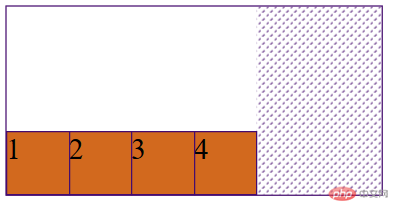
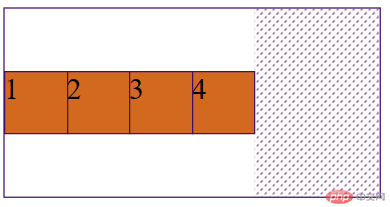
<!DOCTYPE html><html lang="en"><head><meta charset="UTF-8" /><meta name="viewport" content="width=device-width, initial-scale=1.0" /><title>交叉轴项目对齐</title><style>.container {width: 300px;height: 150px;}.container {display: flex;}.container {/* 默认与交叉轴起始线对齐 */align-items: flex-start;/* 与交叉轴终止线对齐 */align-items: flex-end;/* 与交叉轴中间线居中对齐 */align-items: center;}.item {width: 50px;height: 50px;background-color: chocolate;font-size: 1.5rem;}</style></head><body><div class="container"><div class="item">1</div><div class="item">2</div><div class="item">3</div><div class="item">4</div></div></body></html>
align-content属性| 序号 | 属性值 | 描述 |
|---|---|---|
| 1 | stretch默认 |
项目拉伸占据整个交叉轴 |
| 1 | flex-start |
所有项目与交叉轴起始线(顶部)对齐 |
| 2 | flex-end |
所有项目与交叉轴终止线对齐 |
| 3 | center |
所有项目与交叉轴中间线对齐: 居中对齐 |
| 4 | space-between |
两端对齐: 剩余空间在头尾项目之外的项目间平均分配 |
| 5 | space-around |
分散对齐: 剩余空间在每个项目二侧平均分配 |
| 6 | space-evenly |
平均对齐: 剩余空间在每个项目之间平均分配 |
提示: 多行容器中通过设置
flex-wrap: wrap | wrap-reverse实现
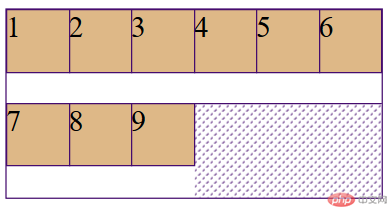
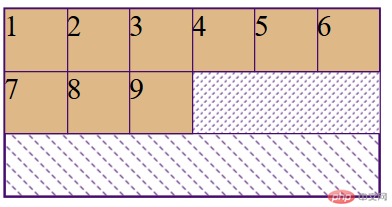
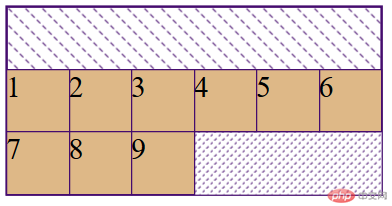
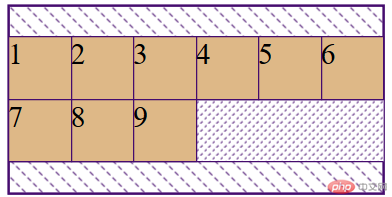
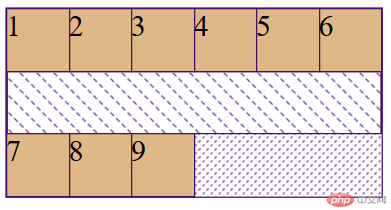
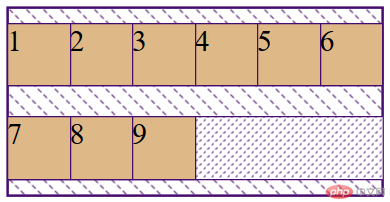
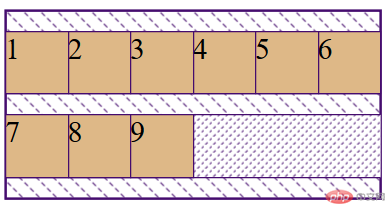
<!DOCTYPE html><html lang="en"><head><meta charset="UTF-8" /><meta name="viewport" content="width=device-width, initial-scale=1.0" /><title>交叉轴项目对齐方式</title><style>.container {width: 300px;height: 150px;}.item {width: 50px;height: 50px;font-size: 1.5rem;background-color: burlywood;}.container {display: flex;}.container {flex-flow: row wrap;/* 自动拉伸 默认*/align-content: stretch;/* 所有项目与交叉轴起始线(顶部)对齐 */align-content: flex-start;/* 所有项目与交叉轴终止线对齐 */align-content: flex-end;/* 所有项目与交叉轴中间线对齐: 居中对齐 */align-content: center;/* 两端对齐: 剩余空间在头尾项目之外的项目间平均分配 */align-content: space-between;/* 分散对齐: 剩余空间在每个项目二侧平均分配 */align-content: space-around;/* 平均对齐: 剩余空间在每个项目之间平均分配 */align-content: space-evenly;}</style></head><body><div class="container"><div class="item">1</div><div class="item">2</div><div class="item">3</div><div class="item">4</div><div class="item">5</div><div class="item">6</div><div class="item">7</div><div class="item">8</div><div class="item">9</div></div></body></html>
align-self属性align-items, 用以自定义某个项目的对齐方式| 序号 | 属性值 | 描述 |
|---|---|---|
| 1 | auto默认值 |
继承 align-items 属性值 |
| 2 | flex-start |
与交叉轴起始线对齐 |
| 3 | flex-end |
与交叉轴终止线对齐 |
| 4 | center |
与交叉轴中间线对齐: 居中对齐 |
| 5 | stretch |
在交叉轴方向上拉伸 |
| 6 | baseline |
与基线对齐(与内容相关用得极少) |
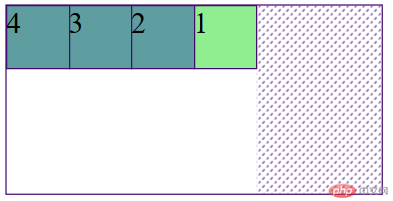
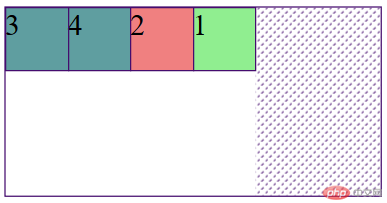
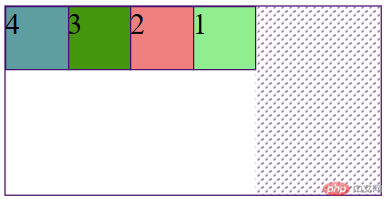
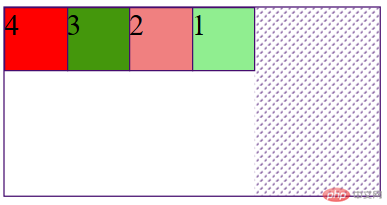
<!DOCTYPE html><html lang="en"><head><meta charset="UTF-8" /><meta name="viewport" content="width=device-width, initial-scale=1.0" /><title>项目顺序</title><style>.container {width: 300px;height: 150px;}.item {width: 50px;height: 50px;font-size: 1.5rem;background-color: cadetblue;order: 0;}.container {display: flex;}.item:first-of-type/*分组的第一个子元素*/ {order: 4;background-color: lightgreen;}.item:nth-of-type(2)/*分组后的任意位置第二位*/ {background-color: lightcoral;order: 3;}.item:nth-of-type(3)/*分组后的任意位置第三位*/ {background-color: rgb(68, 151, 12);order: 2;}.item:last-of-type/*分组最后的一位*/ {order: 1;background-color: red;}</style></head><body><div class="container"><div class="item">1</div><div class="item">2</div><div class="item">3</div><div class="item">4</div></div></body></html>
flex-grow属性flex-grow才有意义| 序号 | 属性值 | 描述 |
|---|---|---|
| 1 | 0默认值 |
不放大,保持初始值 |
| 2 | initial |
设置默认值,与0等效 |
| 3 | n |
放大因子: 正数 |
<!DOCTYPE html><html lang="en"><head><meta charset="UTF-8" /><meta name="viewport" content="width=device-width, initial-scale=1.0" /><title>项目放大因子</title><style>.container {width: 300px;height: 150px;}.container {display: flex;}.item {width: 50px;height: 50px;font-size: 1.5rem;background-color: lightsalmon;/* 默认不放大 */flex-grow: initial;flex-grow: 0;}/*主轴剩余空间 300 - 50*3 = 150px;当前每个项目的放大因子是1, 一共3个项目,所以因子之和是3, 150 / 3 = 50每一个项目分到了50px再将每个项目在原宽度基础上增加50px, 得到新的宽度*/.item:first-of-type /*分组中的第一个*/ {background-color: lightgreen;flex-grow: 1;}.item:nth-of-type(2)/*分组中的任意位置第二位*/ {background-color: lightcoral;flex-grow: 2;}.item:last-of-type/*分组中的最后一位*/ {background-color: wheat;flex-grow: 3;}/*150px要分配给每个项目放大因子之和: 150 / (1+2+3) = 25px;每个项目根据自己的放大因子来分配第一个因子是1, 分到1 * 25 =25, 50 + 25 = 75px第二个因子是2, 分到2 * 25 = 50 , 50 +50 = 100px第三个因子是3, 分到3*25 = 75px, 50 + 75px = 125px;*/</style></head><body><div class="container"><div class="item">1</div><div class="item">2</div><div class="item">3</div></div></body></html>
flex-basis属性min-width/min-height值覆盖| 序号 | 属性值 | 描述 |
|---|---|---|
| 1 | auto |
默认值: 项目原来的大小 |
| 2 | px |
像素 |
| 3 | % |
百分比 |
优先级: 项目大小 <
flex-basis<min-width/height
<!DOCTYPE html><html lang="en"><head><meta charset="UTF-8" /><meta name="viewport" content="width=device-width, initial-scale=1.0" /><title>项目在主轴上的计算宽度</title><style>.container {width: 300px;height: 150px;}.container {display: flex;flex-flow: row wrap;}.item {width: 50px;height: 50px;font-size: 1.5rem;background-color: cyan;}.item {/* auto==width */flex-basis: 70px;flex-basis: 20%;flex: basis:5rem;/* min-width/max-width权重大于flex-basis */max-width: 100px;flex-basis:150px;/* width < flex-basis < min/max-width */}</style></head><body><div class="container"><div class="item">1</div><div class="item">2</div><div class="item">3</div></div></body></html>
flex-shrink属性flex-shrink才有意义| 序号 | 属性值 | 描述 |
|---|---|---|
| 1 | 1默认值 |
允许项目收缩 |
| 2 | initial |
设置初始默认值,与 1 等效 |
| 3 | 0 |
禁止收缩,保持原始尺寸 |
| 4 | n |
收缩因子: 正数 |
<!DOCTYPE html><html lang="en"><head><meta charset="UTF-8" /><meta name="viewport" content="width=device-width, initial-scale=1.0" /><title>项目收缩因子</title><style>.container {width: 180px;height: 150px;}.container {display: flex;/* 不换行 */flex-flow: row nowrap;}.item {width: 100px;height: 50px;font-size: 1.5rem;background-color: cyan;/* 禁止收缩 */flex-shrink: 0;}.item:first-of-type /* 第一个 */ {background-color: lightgreen;/* 默认值允许收缩 */flex-shrink: 1;}.item:nth-of-type(2) /* 第二个 */ {background-color: lightcoral;flex-shrink: 2;}.item:last-of-type {background-color: wheat;flex-shrink: 3;}/*当前三个项目宽度超出了主轴空间多少: 300 - 180 = 120px, 说明有120px要让三个项目消化掉三个项目的收缩因子之和: 6每一份就是: 120 /6 = 20第一个项目: 100 - 1 * 20 = 80px第二个项目: 100 - 2* 20 = 60px第三个项目: 100 - 2* 30 = 40px*/</style></head><body><div class="container"><div class="item">1</div><div class="item">2</div><div class="item">3</div></div></body></html>
flex属性flex属性,可以将以上三个属性进行简化:flex: flex-grow flex-shrink flex-basis| 序号 | 属性值 | 描述 |
|---|---|---|
| 1 | 第一个值: 整数 | flex-grow |
| 2 | 第二个值: 整数 | flex-shrink |
| 3 | 第三个值: 有效宽度 | flex-basis |
举例:
| 序号 | 案例 | 描述 |
|---|---|---|
| 1 | flex: 0 1 auto |
默认值: 不放大,可收缩, 初始宽度 |
| 2 | flex: 1 1 auto |
项目自动放大或收缩适应容器 |
| 3 | flex: 0 0 100px |
按计算大小填充到容器中 |
| 序号 | 属性值 | 描述 |
|---|---|---|
| 1 | 第一个值: 整数 | flex-grow |
| 3 | 第二个值: 有效宽度 | flex-basis |
举例:
| 案例 | 描述 |
|---|---|
flex: 0 180px |
禁止放大,按计算大小填充到容器中 |
| 序号 | 属性值 | 描述 | ||
|---|---|---|---|---|
| 1 | 整数 | flex-grow |
||
| 2 | 有效宽度 | flex-basis |
||
| 3 | 关键字 | `initial | auto | none` |
举例:
| 序号 | 案例 | 描述 |
|---|---|---|
| 1 | flex: 1 |
flex: 1 1 auto |
| 2 | flex: 180px |
flex: 1 1 180px |
| 3 | initial |
flex: 0 1 auto |
| 4 | auto |
flex: 1 1 auto |
| 5 | none |
flex: 0 0 auto |
推荐使用
flex, 就像推荐使用flex-grow设置主轴与换行一样
<!DOCTYPE html><html lang="en"><head><meta charset="UTF-8" /><meta name="viewport" content="width=device-width, initial-scale=1.0" /><title>flex</title><style>/* 容器 */.container {width: 300px;height: 150px;}/* 将容器/父元素设置为flex容器 */.container {display: flex;}/* 项目/子元素 */.item {width: 100px;height: 50px;background-color: cyan;font-size: 1.5rem;}.item:first-of-type {background-color: lightgreen;/* 默认:不放大,允许收缩, 以项目的width为准 */flex: 0 1 auto;flex: 1 1 auto;/* flex: 0 1 80px; */}.item:nth-of-type(2) {background-color: lightcoral;flex: 0 100px;}.item:last-of-type {background-color: wheat;flex: auto;flex: 1;flex: none;flex: 0 0 auto;flex: 0 0 250px;}</style></head><body><div class="container"><div class="item">1</div><div class="item">2</div><div class="item">3</div></div></body></html>