Correction status:qualified
Teacher's comments:如果不要源码, 自己能否顺利写出来,这很重要


var xhr = new XMLHttpRequest();
xhr.onreadystatechange = function () {if (xhr.readyState === 4 && xhr.status === 200) {console.log(xhr.responseText);}
xhr.open("GET", "test1.php", true);xhr.send(null);
post请求方式:多一步:设置请求头,模拟表单类型的数组进行发送,application/x-www-form-urlencoded默认,还有其它类型
代码演示:
<script>// 1. 创建Ajax对象var xhr = new XMLHttpRequest();// 2. 监听请求xhr.onreadystatechange = function () {if (xhr.readyState === 4 && xhr.status === 200) {console.log(xhr.responseText);}};// 3. 初始化请求参数xhr.open("GET", "test1.php", true);// 4. 发送请求xhr.send(null);</script>
application/x-www-form-urlencoded,默认代码实例演示:
<script>// 1. 创建Ajax对象var xhr = new XMLHttpRequest();// 2. 监听请求xhr.onreadystatechange = function () {if (xhr.readyState === 4 && xhr.status === 200) {console.log(xhr.responseText);}};// 3. 初始化请求参数xhr.open("POST", "test2.php", true);// 4. 设置请求头,模拟表单类型的数组进行发送,application/x-www-form-urlencoded默认xhr.setRequestHeader("content-type", "application/x-www-form-urlencoded");var user = {name: "minh",email: "minh@texhong.con",password: "123456",};// 5. 将js对象转为json// 前后端数据传递只能是字符串var data = JSON.stringify(user);// 6. 发送请求xhr.send(data);</script>
演示效果:

application/json;charset=utf-8代码实例演示:
<script>// 1. 创建Ajax对象var xhr = new XMLHttpRequest();// 2. 监听请求xhr.onreadystatechange = function () {if (xhr.readyState === 4 && xhr.status === 200) {console.log(xhr.responseText);}};// 3. 初始化请求参数xhr.open("POST", "test3.php", true);// 4. 设置请求头xhr.setRequestHeader("content-type", "application/json;charset=utf-8");var user = {email: "admin@php.cn",password: "123456",};// 将js对象转为jsonvar data = JSON.stringify(user);// 5. 发送请求xhr.send(data);</script>
演示效果:

代码实例演示:
<script>// 1. 创建Ajax对象var xhr = new XMLHttpRequest();// 2. 监听请求xhr.onreadystatechange = function () {if (xhr.readyState === 4 && xhr.status === 200) {console.log(xhr.responseText);}};// 3. 初始化请求参数xhr.open("POST", "test4.php", true);// FormDatavar data = new FormData();// 封装数据// data.append("键", "值");data.append("username", "admin");data.append("password", "admin888");// 5. 发送请求xhr.send(data);</script>
演示效果:

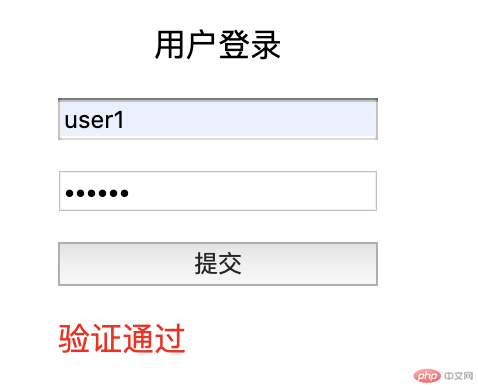
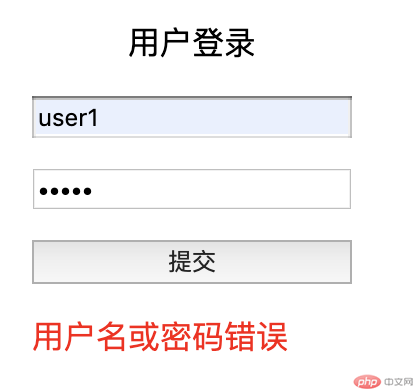
代码实例演示:
<!DOCTYPE html><html lang="en"><head><meta charset="UTF-8"><title>Ajax-POST-FormData</title></head><style>p { text-align: center;}form {display: grid;gap: 15px;width: 160px;margin: auto;}</style><body><p>用户登录</p><!-- onsubmit="return false": 禁用表单的默认提交,改为自定义的Ajax提交 --><form action="" method="POST" onsubmit="return false"><input type="text" name="name" placeholder="name" required autofocus/><input type="password" name="password" placeholder="******" required /><button>提交</button></form><script>// 1. 获取表单和按钮var form = document.querySelector("form");var btn = document.querySelector("form button");// 2. 给按钮绑定点击事件,进行Ajax请求btn.onclick = function () {// 1. 创建Ajax对象var xhr = new XMLHttpRequest();// 2. 监听请求xhr.onreadystatechange = function () {if (xhr.readyState === 4 && xhr.status === 200) {// console.log(xhr.responseText);// 将jsonl转js对象var res = JSON.parse(xhr.responseText);// console.log(res.message);switch (res.status) {case 0:case 1:error = res.message;break;default:error = "未知错误";}// console.log(error);// 将提示显示到表单中var span = document.createElement("span");span.innerHTML = error;span.style.color = "red";form.appendChild(span);}};// 3. 初始化请求参数xhr.open("POST", "test5.php", true);// FormDatavar data = new FormData(form);data.append("login_time", new Date().getTime());// 5. 发送请求xhr.send(data);};// 清除提示信息var inputs = document.querySelectorAll("input");for (var i = 0; i < inputs.length; i++) {inputs[i].oninput = function () {if (btn.nextElementSibling !== null)form.removeChild(btn.nextElementSibling);};}</script></body></html>
后端处理代码:
<?php$pdo = new PDO('mysql:host=localhost;dbname=phpedu', 'root', 'root');$stmt = $pdo->prepare("SELECT COUNT(`id`) FROM `users` WHERE `name`=? && `password`=?");$stmt->execute([$_POST['name'], sha1($_POST['password'])]);$user = $stmt->fetch(PDO::FETCH_NUM);if ($user[0] == 1) echo json_encode(['status'=>1, 'message'=>'验证通过']);else echo json_encode(['status'=>0, 'message'=>'用户名或密码错误']);
演示效果:


1、AJAX 代表前后端异步操作。
2、AJAX 数据传递方式:GET、POST(模拟表单、Json格式、FormDta)。
3、AJAX 的基本操作感觉就是:固定的套路,背下来就好。