


![[Web front-end] Node.js quick start](https://img.php.cn/upload/course/000/000/067/662b5d34ba7c0227.png)


 天蓬老师
天蓬老师Correction status:qualified
Teacher's comments:其实xhr对象是一个非常古老的东西了, 但是很经典, 有空了解一下fetch API


通过 JSON.parse() 解析数据,这些数据会成为 JavaScript 对象。
将JSON转化为js对象
var jsonStr ='{"name":"Peter Zhu",\"age":29,\"isMarried":true,\"course":{"name":"JavaScript","grade":99}}';// json -> js对象var obj = JSON.parse(jsonStr);console.log(obj);
示例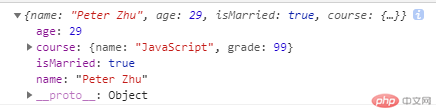
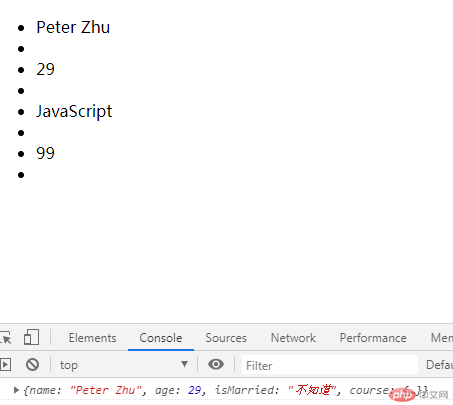
处理对象中的值和将值渲染到浏览器中
// 处理对象中的某一个值var obj = JSON.parse(jsonStr,function(key,value){if(key === 'isMarried'){return '不知道';}//返回全部值return value;});console.log(obj);// 引用OBJ对象的值var person = {name :obj.name,age : obj.age,courseName : obj.course.name,couresGrade: obj.course.grade,};// 创建列表元素ulvar ul=document.createElement('ul');var res = "";// 遍历对象for (var key in person){res += '<li>' + person[key]+ '<\li>';}// 添加到列表中ul.innerHTML =res;// 将列表添加到页面中document.body.appendChild(ul);
以前端请求,后端响应为例
异步最常用的处理形式就是回调函数
XMLHttpRequest是浏览器提供的,处理异步请求的宿主对象,而非 JS 内置对象new XMLHttpRequest()onreadystatechangeopen(请求类型,请求地址,是否异步)send()POST请求,以上步骤略有不同new XMLHttpRequest()onreadystatechange()open(请求类型,请求地址,是否异步)setRequestHeader()var data = ...send(data)JSONJSON.parse()解析 JSON 字符串
// - `XMLHttpRequest`是浏览器提供的,处理异步请求的宿主对象,而非 JS 内置对象// - 基本流程:// 1. 创建请求对象: `new XMLHttpRequest()`var xhr = new XMLHttpRequest();// 2. 监听请求回调: `onreadystatechange`xhr.onreadystatechange =function(){// status返回状态有200:ok,403:Forbidden,404:Not Found;if(xhr.readyState === 4 && xhr.status === 200){// 响应的数据存储在responseXML中console.log(xhr.responseText);}};// 3. 初始化请求参数: `open(请求类型,请求地址,是否异步)`xhr.open("GET","test1.php",true);// 4. 发送请求: `send()`xhr.send(null);
<?php$user['name'] = 'admin';$user['email'] = 'admin@qq.com';// 将数组转为json字符串, 不能用retrun, 必须用打印语句,如echoecho json_encode($user);

JSON后端:
$_POST 接收json 数组就是以 JSON 发送, php://input 流文件方式接收
// - `XMLHttpRequest`是浏览器提供的,处理异步请求的宿主对象,而非 JS 内置对象// - 基本流程:// 1. 创建请求对象: `new XMLHttpRequest()`var xhr =new XMLHttpRequest();// 2. 监听请求回调: `onreadystatechange`xhr.onreadystatechange = function () {if(xhr.readyState === 4 && xhr.status === 200){console.log(xhr.responseText);}};// 3. 初始化请求参数: `open(请求类型,请求地址,是否异步)`xhr.open('POST','test2.php',true);// 4. 设置请求头,模拟表单类型的数组进行发送,application/x-www-form-urlencoded默认xhr.setRequestHeader("content-type","application/x-www-form-urlencoded");var user ={email :"admin@qq.com",password : "admin",};// js对象转为JSON对象var date = JSON.stringify(user)xhr.send(date);
<?php// print_r($_POST);// 转化为字符串$data = key($_POST);echo $data;// 将$data转为php可处理数据$user =json_decode($data);print_r($user);// 转为数组方式$user =json_decode($data,true);print_r($user);
示例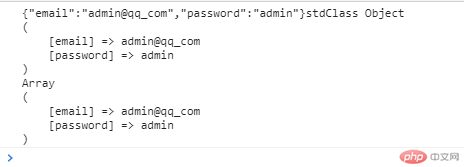
方法二
xhr.setRequestHeader("content-type","application/x-www-form-urlencoded");改为JSON格式xhr.setRequestHeader("content-type","application/json;charset=utf-8");
<?php// print_r($_POST);// 使用php://input来接收数据流// file_get_contents将数据流改为文件流$data= file_get_contents('php://input');$user = json_decode($data);print_r($user);$user =json_decode($data,true);print_r($user);

// 1. 创建请求对象: `new XMLHttpRequest()`var xhr = new XMLHttpRequest();// 2. 监听请求回调: `onreadystatechange`xhr.onreadystatechange =function(){if(xhr.readyState ===4 && xhr.status ===200){console.log(xhr.responseText);}}// 3. 初始化请求参数: `open(请求类型,请求地址,是否异步)`xhr.open('POST','test4.php',true);// 创建对象var data = new FormData();// data.append(键,值);data.append("username","admin");data.append("password","admin");// 4. 发送请求: `send()`xhr.send(data);
<?phpprint_r($_POST);
示例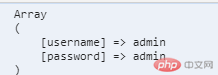
使用FormData实现用表单用户登录验证
<!DOCTYPE html><html lang="en"><head><meta charset="UTF-8"><meta name="viewport" content="width=device-width, initial-scale=1.0"><title>Document</title></head><body><p>登录</p><form action="" method="POST" onsubmit="return false"><input type="email" name="email" placeholder="ee@qq.com" required autofocus><input type="password" name="password" placeholder="****" required ><button>提交</button></form><script>// 获取表单和按钮var form = document.querySelector("form");var btn = document.querySelector("form button");// 点击事件,进行Ajax请求btn.onclick = function(){// 创建请求对象:`new XMLHttpRequest()`var xhr = new XMLHttpRequest();// 2. 监听请求回调: `onreadystatechange`xhr.onreadystatechange =function(){if(xhr.readyState === 4 && xhr.status === 200){console.log(xhr.responseText);// 将解析后端数据并保存在对象resvar res=JSON.parse(xhr.responseText);console.log(res);// 从后端获取status值switch(res.status){case 0:error = res.message;break;case 1:window.location.href="http://www.baidu.com";break;default:error = "未知错误";}var span = document.createElement('span');span.innerHTML=error;span.style.color="red";form.appendChild(span);};};// 3. 初始化请求参数: `open(请求类型,请求地址,是否异步)`xhr.open("POST","test4.php",true);// 传入表单数据var data =new FormData(form);// 在数据中加入时间戳data.append("login_time",new Date().getTime());// 4. 发送请求: `send()`xhr.send(data);};var input =document.querySelectorAll('input');for (var i = 0 ;i <input.length;i++){input[i].oninput =function(){if(btn.nextElementSibling !== null)form.removeChild(btn.nextElementSibling);};}</script></body></html>
<?php// print_r($_POST);// 链接数据库$pdo = new PDO('mysql:host=localhost;dbname=phpedu', 'root', 'root');$stmt = $pdo->prepare("SELECT COUNT(`id`) FROM `users` WHERE `email`=? AND `password`=? LIMIT 1");$stmt->execute([$_POST['email'], $_POST['password']]);$user = $stmt->fetch(PDO::FETCH_NUM);// print_r($user);// 判断数据,并向前端发送if($user[0] == 1 ) echo json_encode(['status'=>1,'message'=>'验证通过']);else echo json_encode(['status'=>0,'message'=>'验证不通过']);
JSON.parse()的使用。POST请求,GET请求天蓬老师