Correction status:qualified
Teacher's comments:轮播图有多种实现方式, 其实还有许多要完善的地方, 例如, 图片的切换添加渐隐渐显, 图片的无缝滑动等, 这里都比较有意思的, 你可以想一下, 应该如何办到?


代码:
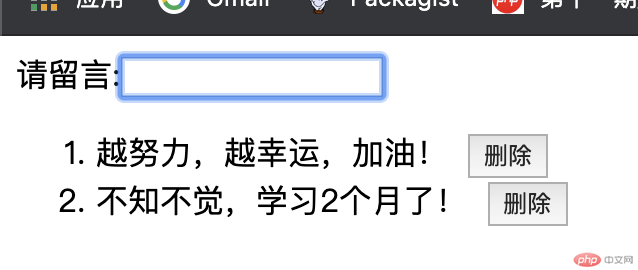
<!DOCTYPE html><html lang="en"><head><meta charset="UTF-8"><title>Todolist案例-留言与删除</title><style>ul {display: flex; flex-direction: column;}li button {margin-left: 10px;}</style></head><body>请留言:<input type="text" name="content"><ol></ol></body><script>// 获取表单var inpt = document.querySelector("input");// 留言区var ol = document.querySelector("ol");inpt.addEventListener("keyup", function (ev) {// console.log(ev.key);if (ev.key === "Enter") {// 1、检查内容是否为空if(inpt.value.length === 0){alert("留言内容不能为空");}else {// 1、创建元素var li = document.createElement("li");// 2、填充内容li.innerHTML = inpt.value + '<button onclick="del(this)">删除</button>';// ol.appendChild(li):挂载内容到父节点下// 3、将最新留言始终显示在第一个:如果没有留言-->ol子元素数量为0if (ol.childElementCount === 0) ol.appendChild(li);// insertBefore:将某个节点添加到另一个节点前面else ol.insertBefore(li, ol.firstElementChild);// 4、清空留言区inpt.value = null;}}},false);// 删除评论的函数function del(ele) {return confirm('是否删除?') ? ol.removeChild(ele.parentElement) : false;}</script></html>
演示效果图:

代码:
<!DOCTYPE html><html lang="en"><head><meta charset="UTF-8"><title>轮播图</title><style>ul,li {margin: 0;padding: 0;list-style: none;}.box {/*定位父级*/position: relative;width: 1000px;height: 350px;margin: 0 auto;}.box .slider {width: 1000px;height: 350px;display: none;}.box .slider.active {display: block;}.box .point-list {position: absolute;/*绝对定位的环境下的水平居中方式*/left: 50%;margin-left: -38px;top: 310px;}.box .point-list .point {display: inline-block;width: 12px;height: 12px;margin: 0 5px;background-color: white;border-radius: 100%;}.box .point-list .point.active {background-color: black;}.box .point-list .point:hover {cursor: pointer;}.skip {position: absolute;top: 140px;display: inline-block;width: 40px;height: 80px;text-align: center;line-height: 80px;background-color: lightgray;color: white;opacity: 0.2;font-size: 36px;}.box .prev {left: 0;}.box .next {right: 0;}.box .skip:hover {cursor: pointer;opacity: 0.5;color: black;}</style></head><body><div class="box"><img src="banner/banner1.jpg" alt="" class="slider active" data-index="1"><img src="banner/banner2.jpg" alt="" class="slider" data-index="2"><img src="banner/banner3.jpg" alt="" class="slider" data-index="3"><img src="banner/banner4.jpg" alt="" class="slider" data-index="4"><!-- 小按钮 --><div class="point-list"><!-- <span class="point active"></span><span class="point"></span><span class="point"></span> --></div><!-- 左页翻页按钮 --><span class="skip prev"><</span><span class="skip next">></span></div></body><script>// 1、获取所有图片var imgs = document.querySelectorAll('img');// 2、获取小圆点的父节点var pointList = document.querySelector('.point-list');// 3、动态生成小圆点:圆点和图片对应,通过遍历图片动态生成imgs.forEach(function (img, index) {var span = document.createElement('span');// 默认显示第一张图片,所以第一个小圆点应该是激活,就是有一个黑背景if (index === 0) {span.classList.add('point', 'active');}// 给圆点添加样式span.classList.add('point');// 将小圆点与当前的图片进行关联span.dataset.index = img.dataset.index;// 将小圆点添加到页面中pointList.appendChild(span);});// 4、为小圆点添加点击事件// 获取所有的小圆点var points = document.querySelectorAll('.point');// 事件代理/委托;为每个小圆点添加点击事件pointList.addEventListener("click", function (ev) {console.log(ev.target);imgs.forEach(function (img) {if (img.dataset.index === ev.target.dataset.index) {imgs.forEach(function (img) {// 去掉原来图片激活样式img.classList.remove("active");});// 设置当前图片的激活样式img.classList.add("active");// 公共函数: 设置小圆点当前的高亮, 必须与图片一一对应, 同步setPointActive(img.dataset.index);}});}, false);// 公共函数:setPointActive;设置小圆点高亮function setPointActive(imgIndex) {// 清除之前的小圆点的激活状态points.forEach(function (point) {// 先移除之前圆点激活状态point.classList.remove('active');// 如果圆点和图片对应,设置为激活if (point.dataset.index === imgIndex) point.classList.add('active');});}// 获取翻页按钮var skip = document.querySelectorAll('.skip');// 添加事件skip.item(0).addEventListener('click', skipImg, false);skip.item(1).addEventListener('click', skipImg, false);// 翻页显示图片的函数function skipImg(ev) {// 获取当前正在显示的图片var currentImg = null;imgs.forEach(function (img) {// 当前图片是否有'active'if (img.classList.contains('active')) {currentImg = img;}});// 1. 判断点击的是显示前一张的按钮,显示前一张图片if (ev.target.classList.contains('prev')) {// 去掉当前图片的激活状态currentImg.classList.remove('active');// 获取前一张图片currentImg = currentImg.previousElementSibling;// 如果存在前一张if (currentImg !== null && currentImg.nodeName === 'IMG') {currentImg.classList.add('active');} else {// 如果不存在前一张currentImg = imgs[imgs.length - 1];currentImg.classList.add('active');}}// 2. 判断点击的是显示前后张的按钮,显示后一张图片if (ev.target.classList.contains('next')) {// 去掉当前图片的激活状态currentImg.classList.remove('active');// 获取后一张图片currentImg = currentImg.nextElementSibling;// 如果存在后一张if (currentImg !== null && currentImg.nodeName === 'IMG') {currentImg.classList.add('active');} else {// 如果不存在前一张currentImg = imgs[0];currentImg.classList.add('active');}}// 设置小圆点的高亮setPointActive(currentImg.dataset.index);}// 定时器自动播放var box = document.querySelector('.box');var timer = null;// 创建鼠标移入事件的监听器box.addEventListener('mouseover', function(){// 清除定时器clearInterval(timer);}, false);// 移出时自动播放轮播图box.addEventListener('mouseout', function (){// 创建一个事件模拟器var clickEvent = new Event('click');timer = setInterval(function(){skip.item(1).dispatchEvent(clickEvent);}, 2000);}, false);</script></html>
演示效果图:

1、轮播图很难,代码很多,变量、对象很多,涉及知识也很多。
2、总得来说还是写出来了。
3、轮播图案例需要、也值得反复练习。