Correction status:qualified
Teacher's comments:总得来说写的很错,继续加油!


知识点:float, overflow:hidden/auto; clear:both,
<!DOCTYPE html>
<html lang="en">

<head>
    <meta charset="UTF-8" />
    <meta name="viewport" content="width=device-width, initial-scale=1.0" />
    <title>浮动元素的高度塌陷与解决方案</title>
    <style>
        .container {
            border: 2px dashed red;
        }

        .item {
            width: 150px;
            height: 150px;
        }
        /* 使用伪类顺序选择 */

        .item:nth-child(1) {
            background-color: blueviolet;
        }

        .item:nth-child(2) {
            background-color: brown;
        }

        .item:nth-child(3) {
            background-color: cadetblue;
        }
        /* 将三个子元素全部浮动 */

        .item {
            float: left;
        }
        /* 父元素包不住子元素,高度塌陷 */
        /* =============================== */
        /* 解决方案1:给父元素也添加一个高度 */
        /* .container {
        height: 150px;
        该方案没办法做到自适应,如果item改变高度,那这个父元素也要随着改动,很麻烦
      } */
        /* ============================== */
        /* 解决方案2:把父元素也浮动起来 */
        /* .container {
        float: left;
        该方案如果还有父级元素的话,就要逐级向上把父元素也浮动,添加很麻烦
        该现象叫浮动传导效应
      } */
        /* 解决方案3:添加一个专用清浮动的元素 */
        /* .clear {
        clear: both;
        由于要改动前端页面结构,影响后端数据渲染。所以不推荐使用。
      } */
        /* 解决方案4:通过添加一个伪元素来解决 */
        /* 在.container最后添加一个伪元素 */
        /* .container::after {
        内容为空
        content: "";
        样式为块
        display: block;
        清浮动
        clear: both;
      } */
        /* 解决方案5:(最为常用)用到 BFC(块级格式化上下文) */

        .container {
            /* 常用 */
            overflow: hidden;
            /* 也可以用到 */
            /* overflow: auto; */
        }
    </style>
</head>

<body>
    <div class="container">
        <div class="item">1</div>
        <div class="item">2</div>
        <div class="item">3</div>
        <!-- <div class="clear"></div> -->
    </div>
</body>

</html>点击 "运行实例" 按钮查看在线实例

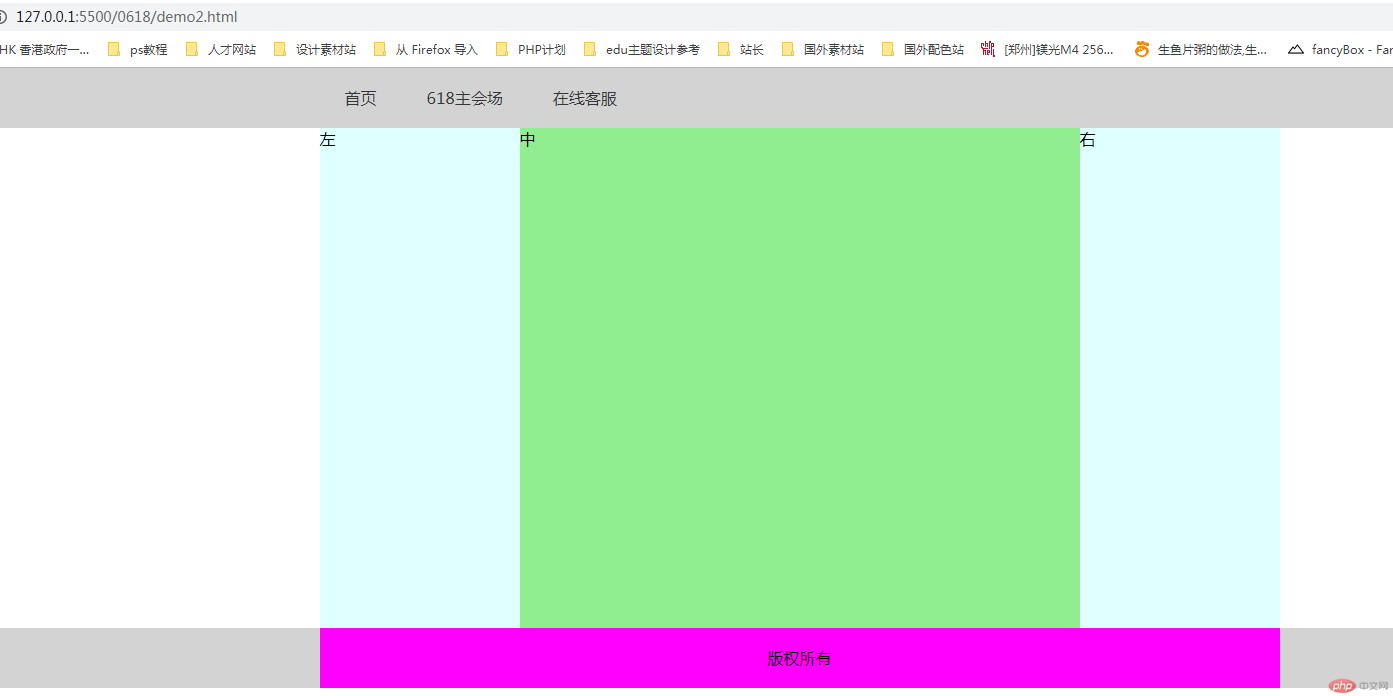
2.使用浮动完成一个三列经典布局
知识点:float,
<!DOCTYPE html>
<html lang="en">

<head>
    <meta charset="UTF-8" />
    <meta name="viewport" content="width=device-width, initial-scale=1.0" />
    <title>布局实例:使用浮动来完成一个通用三列布局</title>
    <style>
        /* 初始化 */

        * {
            margin: 0;
            padding: 0;
            box-sizing: border-box;
        }

        li {
            list-style: none;
        }

        a {
            text-decoration: none;
            color: lightslategrey;
        }

        .header,
        .footer {
            height: 60px;
            background-color: limegreen;
        }
        /* 页眉页脚的内容区 */

        .content {
            width: 960px;
            margin: auto;
            background-color: magenta;
        }

        .content ul li {
            float: left;
            line-height: 60px;
            padding: 0 25px;
        }
        /* 导航条鼠标悬停 */

        .content ul li:hover {
            background-color: mediumblue;
        }
        /* 页脚样式 */

        .content p {
            text-align: center;
            line-height: 60px;
        }
        /* 主体用定位 */

        .container {
            width: 960px;
            margin: auto;
            background-color: mediumslateblue;
            /* 最小高度为500px */
            min-height: 500px;
            /* 防止浮动元素的高度塌陷 */
            overflow: hidden;
        }

        .container>.left {
            width: 200px;
            background-color: olive;
            min-height: 500px;
            /* 浮动 */
            float: left;
        }

        .container>.right {
            width: 200px;
            background-color: olive;
            min-height: 500px;
            /* 浮动*/
            float: left;
        }

        .container>.main {
            background-color: orange;
            min-height: 500px;
            width: 560px;
            /* 浮动*/
            float: left;
        }
    </style>
</head>

<body>
    <!-- 页眉 -->
    <div class="header">
        <div class="content">
            <ul>
                <li><a href="">首页</a></li>
                <li><a href="">618主会场</a></li>
                <li><a href="">在线客服</a></li>

            </ul>
        </div>
    </div>
    <!-- 主体 -->
    <div class="container">
        <div class="left">左</div>
        <div class="main">中</div>
        <div class="right">右</div>
    </div>
    <!-- 页脚 -->
    <div class="footer">
        <div class="content">
            <p>版权所有</p>
        </div>
    </div>
</body>

</html>点击 "运行实例" 按钮查看在线实例
3.使用绝对定位来完成一个通用三列布局
知识点:position: absolute/relative
<!DOCTYPE html>
<html lang="en">

<head>
    <meta charset="UTF-8" />
    <meta name="viewport" content="width=device-width, initial-scale=1.0" />
    <title>布局实例:使用绝对定位来完成一个通用三列布局</title>
    <style>
        /* 初始化 */

        * {
            margin: 0;
            padding: 0;
            box-sizing: border-box;
        }

        li {
            list-style: none;
        }

        a {
            text-decoration: none;
            color: rgb(50, 52, 54);
        }

        .header,
        .footer {
            height: 60px;
            background-color: limegreen;
        }
        /* 页眉页脚的内容区 */

        .content {
            width: 960px;
            margin: auto;
            background-color: magenta;
        }

        .content ul li {
            float: left;
            line-height: 60px;
            padding: 0 25px;
        }
        /* 导航条鼠标悬停 */

        .content ul li:hover {
            background-color: mediumblue;
        }
        /* 页脚样式 */

        .content p {
            text-align: center;
            line-height: 60px;
        }
        /* 主体用定位 */

        .container {
            width: 960px;
            margin: auto;
            background-color: mediumslateblue;
            /* 最小高度为500px */
            min-height: 500px;
            /* 转为定位元素,做为定位父级 */
            position: relative;
        }

        .container>.left {
            width: 200px;
            background-color: olive;
            min-height: 500px;
            /* 绝对定位 */
            position: absolute;
            top: 0;
            left: 0;
        }

        .container>.right {
            width: 200px;
            background-color: olive;
            min-height: 500px;
            /* 绝对定位 */
            position: absolute;
            top: 0;
            right: 0;
        }

        .container>.main {
            background-color: orange;
            min-height: 500px;
            width: 560px;
            /* 绝对定位 */
            position: absolute;
            top: 0;
            left: 200px;
        }
    </style>
</head>

<body>
    <!-- 页眉 -->
    <div class="header">
        <div class="content">
            <ul>
                <li><a href="">首页</a></li>
                <li><a href="">618主会场</a></li>
                <li><a href="">在线客服</a></li>
                <li><a href="">618主会场</a></li>
                <li><a href="">在线客服</a></li>
            </ul>
        </div>
    </div>
    <!-- 主体 -->
    <div class="container">
        <div class="left">左</div>
        <div class="main">中</div>
        <div class="right">右</div>
    </div>
    <!-- 页脚 -->
    <div class="footer">
        <div class="content">
            <p>版权所有</p>
        </div>
    </div>
</body>

</html>点击 "运行实例" 按钮查看在线实例
