Correction status:qualified
Teacher's comments:代码排版不对, 注意markdown的用法


一个简单的登陆界面:
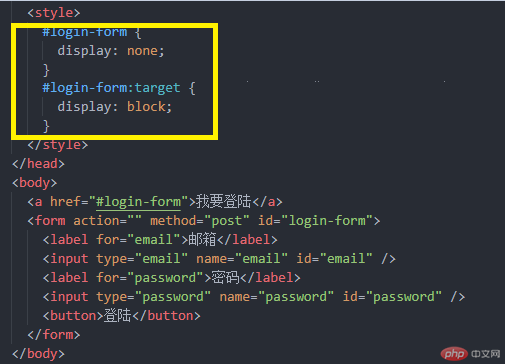
除了登陆按钮,还要有登陆时需要填写的信息,比如邮箱和密码,那么,要实现登陆前不显示邮箱和密码,点击“登陆”按钮才显示出邮箱和密码框,就需要填加下面两项:
这样,点击后就会出现如下界面:
如果不用 a 标签,用button,也可以实现a href的功能,把原来的
<a href="#login-form">我要登陆</a>,改成
<button onclick="location='#login-form'">我要登陆</button>
其余不变。
:focus 当获取焦点的时候
在我上面所做的登陆界面中,如果要实现在输入邮箱和密码的时候,有背景色:
<style>
#login-form {display: none;}#login-form:target {display: block;}input:focus {background-color: burlywood;}</style>
</head>
<body>
<button onclick="location='#login-form'">点击登陆</button>
<form action="" method="post" id="login-form">
<label for="email">邮箱</label>
<input type="email" name="email" id="email" />
<label for="password">密码</label>
<input type="password" name="password" id="password" />
<button>登陆</button>
</form>
</body>
::selection
要把填进邮箱和密码设置前景色和背景色:
<style>
#login-form {display: none;}#login-form:target {display: block;}input:focus {background-color: greenyellow;}input::selection {color: white;background-color: blue;}</style>
</head>
<body>
<button onclick="location='#login-form'">点击登陆</button>
<form action="" method="post" id="login-form">
<label for="email">邮箱</label>
<input type="email" name="email" id="email" />
<label for="password">密码</label>
<input type="password" name="password" id="password" />
<button>登陆</button>
</form>
</body>
做一个列表:
<body>
<ul class="list">
<li>item1</li>
<li>item2</li>
<li>item3</li>
<li>item4</li>
</ul>
</body>

将列表的前三个颜色设为红色

在我之前创建的列表前面加一个“购物车”:
<style>
.list::before {
content: “购物车”;
}
</style>
<body>
<ul class="list">
<li>item1</li>
<li>item2</li>
<li>item3</li>
<li>item4</li>
</ul>
</body>
</head>
</html>
这里面用到的::before, 就是在浏览器原有的伪元素之中创建的文本“购物车”,这个就是伪元素。
在我之前创建的“购物车”下方添加一个“结算”
<style>
.list::before {
content: “购物车”;
color: blue;
font-size: 1.5rem;
border-bottom: 1px solid #000;
}
/ ::after /
.list::after {
content: “结算”;
color: red;
font-size: 1.1rem;
}
</style>
<body>
<ul class="list">
<li>item1</li>
<li>item2</li>
<li>item3</li>
<li>item4</li>
</ul>
</body>
注意:伪类前面都是单冒号(:),伪元素前面都是双冒号“::”。