Correction status:qualified
Teacher's comments:写的很认真仔细!


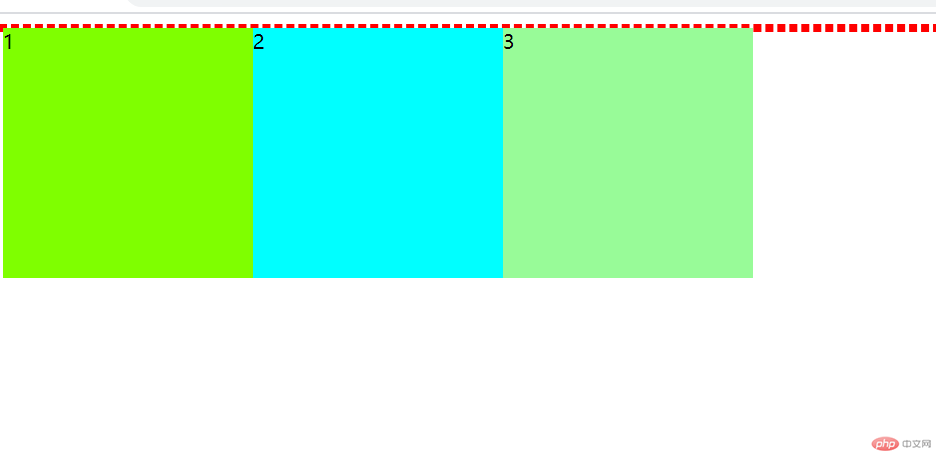
一个或多个元素使用了浮动,那便意味着该元素已经脱离了文档流,释放了该元素在文档流中的位置,父级元素将不能把子级漂浮元素包裹住,从而后面的元素代替了前面漂浮的元素释放了位置,造成因为浮动导致后面的元素顶替变成布局错乱。这便是高度坍塌。例如:
<!DOCTYPE html><html lang="en"><head><meta charset="UTF-8"><meta name="viewport" content="width=device-width, initial-scale=1.0"><title>Document</title><style>.day-float {border: 3px dashed red;}.float {width: 200px;height: 200px;float: left;}.float:first-of-type {background-color: chartreuse;}.float:nth-child(2) {background-color: cyan;}.float:last-of-type {background-color: palegreen;}</style></head><body><div class="day-float"><div class="float">1</div><div class="float">2</div><div class="float">3</div></div></body></html>

当把元素漂浮以后,便会发现父级div无法将子级div包裹,原因是所有的子级元素全部已经设置漂浮,脱离了文档流。要解决高度坍塌我们需要让父级div包裹住所有浮动的子元素,这样后面的元素才不会跑到被文档流释放的位置。要解决高度坍塌有2种最快捷方便的方法。
我们需要用到::after伪元素,::after是在元素后添加一些由浏览器生成的内容,
不会被选中,也不会在html的dom结构内。具体解决方法如下:
<!DOCTYPE html><html lang="en"><head><meta charset="UTF-8"><meta name="viewport" content="width=device-width, initial-scale=1.0"><title>Document</title><style>.day-float {border: 3px dashed red;}.float {width: 200px;height: 200px;float: left;}.float:first-of-type {background-color: chartreuse;}.float:nth-child(2) {background-color: cyan;}.float:last-of-type {background-color: palegreen;}/*这里我们在漂浮div的父级元素中添加::after,不在浏览器中打印内容,设置为块状,清除全部浮动。*/.day-float::after {content: "";display: block;clear: both;}</style></head><body><div class="day-float"><div class="float">1</div><div class="float">2</div><div class="float">3</div></div><div>123456789</div></body></html>
效果如下:
由图可见,浮动元素的父级div已经将全部浮动元素包裹起来,下面的元素与元素内容不会跑到被释放的空间上面去。这是第一种清楚高度坍塌的方法,下面为大家介绍第二种。
需要用到css属性的overflow: auto;(因为这玩意涉及到高级css原理,及其深奥,所以我也只会用不会说,想了解的自行百度即可)代码如下:
<!DOCTYPE html><html lang="en"><head><meta charset="UTF-8"><meta name="viewport" content="width=device-width, initial-scale=1.0"><title>Document</title><style>.day-float {border: 3px dashed red;}.float {width: 200px;height: 200px;float: left;}.float:first-of-type {background-color: chartreuse;}.float:nth-child(2) {background-color: cyan;}.float:last-of-type {background-color: palegreen;}/* .day-float::after {content: "";display: block;clear: both;} *//*直接将overflow: auto;作用到浮动元素的父级div上即可*/.day-float {overflow: auto;}</style></head><body><div class="day-float"><div class="float">1</div><div class="float">2</div><div class="float">3</div></div><div>123456789</div></body>
效果如下:
这样也可以解决高度坍塌的问题!
以上就是两种就是可以最快捷便利解决高度坍塌的方法!