前端 - JS - 实战案例
一、选项卡
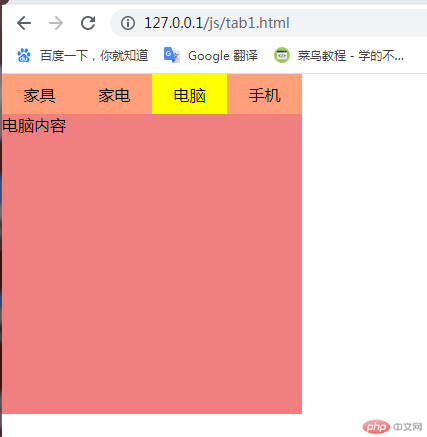
1.使用css样式来进行激活导航栏、显示列表样式2.使用html data-*属性建立每一个导航栏与每一个显示列表相同的索引,每当点击导航栏时就会激活相同索引的显示列表3.对导航栏使用事件委托
<!DOCTYPE html><html lang="zh_hans"> <head> <meta charset="UTF-8" /> <meta name="viewport" content="width=device-width, initial-scale=1.0" /> <title>Document</title> <style> * { margin: 0; padding: 0; box-sizing: border-box; } .box { width: 300px; height: 340px; } .nav-box { height: 40px; background-color: lightsalmon; } .nav-box ul { list-style: none; display: flex; justify-content: space-between; } .nav-box ul li { width: 75px; height: 40px; display: flex; align-items: center; justify-content: center; } .list-box { height: 300px; background-color: lightcoral; } /*导航栏的激活样式*/ .u01 .active { background-color: yellow; } /*显示区块默认都是隐藏的*/ .d { display: none; } /*显示区块的激活样式*/ .list-box .d.active { display: block; } </style> </head> <body> <div class="box"> <div class="nav-box"> <ul class="u01"> <!--第一个导航列表默认是激活的--> <li class="active" data-index="1">家具</li> <li data-index="2">家电</li> <li data-index="3">电脑</li> <li data-index="4">手机</li> </ul> </div> <div class="list-box"> <!--第一个显示区块默认是激活的--> <div class="d active" data-index="1">家具内容</div> <div class="d" data-index="2">家电内容</div> <div class="d" data-index="3">电脑内容</div> <div class="d" data-index="4">手机内容</div> </div> </div> </body> <script> // 1. 获取导航栏:利用事件委托触发子节点的onclick事件 var u01 = document.getElementsByClassName("u01")[0]; // 2. 获取显示区块 var div = document.getElementsByClassName("d"); // 3. 给导航栏添加click事件:每当点击导航栏中的每一个列表项时显示对应的区块 u01.addEventListener("click", show, false); // 4. 给导航栏添加mouseover事件:每当点击导航栏中的每一个列表项时显示对应的区块 u01.addEventListener("mouseover", show, false); //事件回调函数 function show(ev) { // 1. 每当点击时先清空导航栏原有激活样式 Array.from(ev.target.parentNode.children).forEach(function (item) { item.classList.remove("active"); }); // 2. 再对点击的节点激活样式 ev.target.classList.toggle("active"); // 3. 导航栏之后再清空显示区块的原有激活样式 Array.from(div).forEach(function (item) { item.classList.remove("active"); }); // 4. 在显示区块中查询data-index与导航栏的data-index相等的内容,将它设置为激活 Array.from(div).forEach(function (item) { if (item.dataset.index === ev.target.dataset.index) { item.classList.add("active"); } }); } </script></html>

二、轮播图
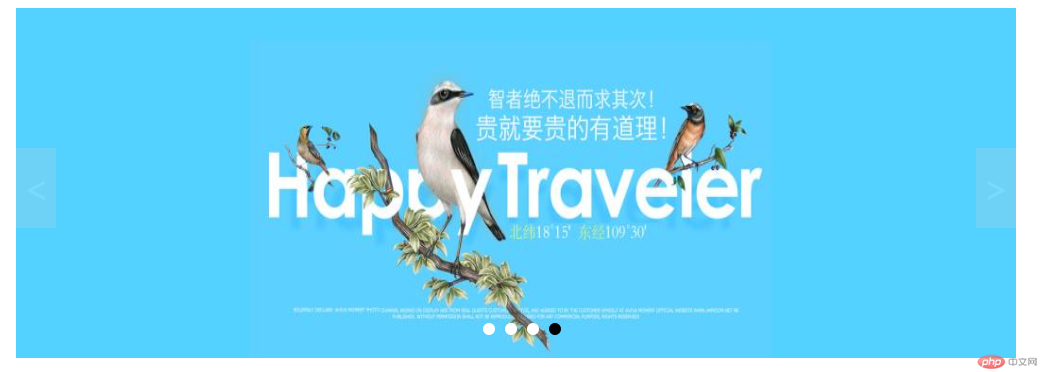
1.原点随图片数量动态生成2.使用css样式来进行激活原点、显示对应图片样式3.使用html data-*属性建立每一个原点与每一个显示图片相同的索引,每当点击原点时就会激活相同索引的显示图片4.使用事件委托机制为每一个小圆点添加点击事件5.翻页按钮利用触发激活原点进行翻页的机制6.使用定时器实现移入移出轮播图区域暂停和继续翻页效果
<!DOCTYPE html><html lang="zh_hans"> <head> <meta charset="UTF-8" /> <meta name="viewport" content="width=device-width, initial-scale=1.0" /> <title>轮播图</title> <style> /*父容器属性*/ .car-box { position: relative; margin: 0 auto; width: 1000px; height: 350px; } .car-box .slider { width: 1000px; height: 350px; display: none; } .car-box .slider.active { display: block; } /*原点列表样式*/ .car-box .point-list { position: absolute; left: 50%; margin-left: -38px; top: 310px; } .car-box .point-list .point { display: inline-block; width: 12px; height: 12px; margin: 0 5px; background-color: white; border-radius: 100%; } .car-box .point-list .point:hover { cursor: pointer; } .car-box .point-list .point.active { background-color: black; } /*跳转按钮样式*/ .skip { position: absolute; top: 140px; display: inline-block; width: 40px; height: 80px; text-align: center; line-height: 80px; background-color: lightgray; color: white; opacity: 0.2; font-size: 36px; } .car-box .prev { left: 0; } .car-box .next { right: 0; } .car-box .skip:hover { cursor: pointer; opacity: 0.5; color: black; } </style> </head> <body> <div class="car-box"> <!--图片--> <img src="./images/banner1.jpg" alt="" class="slider active" data-index="1" /> <img src="./images/banner2.jpg" alt="" class="slider" data-index="2" /> <img src="./images/banner3.jpg" alt="" class="slider" data-index="3" /> <img src="./images/banner4.jpg" alt="" class="slider" data-index="4" /> <!--原点列表--> <div class="point-list"> <!--应该随图片数量动态生成 <span class="point active" data-index="1"></span> <span class="point" data-index="2"></span> <span class="point" data-index="3"></span> <span class="point" data-index="4"></span>--> </div> <!--跳转按钮--> <span class="skip prev"><</span> <span class="skip next">></span> </div> </body> <script> //获取图片 var imgs = document.querySelectorAll(".slider"); //获取原点列表 var plist = document.querySelector(".point-list"); //动态生成原点 imgs.forEach(function (item, index) { var span = document.createElement("span"); span.classList.add("point"); //第一个默认是激活样式 if (index === 0) { span.classList.add("active"); } //添加索引,和图片索引进行关联 span.dataset.index = item.dataset.index; plist.appendChild(span); }); //获取所有小圆点 var point = document.querySelectorAll(".point"); //使用事件委托为每一个小圆点添加点击事件 plist.addEventListener( "click", function (ev) { //如果点击的小圆点的索引值和图片的索引值一样则激活样式 imgs.forEach(function (item) { if (item.dataset.index === ev.target.dataset.index) { //清除图片原有激活样式 imgs.forEach(function (item) { item.classList.remove("active"); }); //设置图片激活 item.classList.add("active"); //清除小圆点原有激活样式和设置小圆点激活 setPorintActive(item.dataset.index); } }); }, false ); //公共函数:设置小圆点激活 function setPorintActive(imgIndex) { //清除小圆点原有激活样式 point.forEach(function (item) { item.classList.remove("active"); }); //设置小圆点激活 point.forEach(function (item) { if (item.dataset.index === imgIndex) { item.classList.add("active"); } }); } //获取翻页按钮 var skips = document.querySelectorAll(".skip"); //给翻页按钮添加点击事件 skips.item(0).addEventListener("click", skipImg, false); skips.item(1).addEventListener("click", skipImg, false); //翻页函数 function skipImg(ev) { // 1. 找到当前正在显示的图片 var currentImg = null; imgs.forEach(function (img) { if (img.classList.contains("active")) { currentImg = img; } }); // 2. 判断是否点击了前一页 if (ev.target.classList.contains("prev")) { // 1. 先清空当前图片的激活样式 currentImg.classList.remove("active"); // 2. 再把当前页设置为前一页 currentImg = currentImg.previousElementSibling; // 3. 把当前页激活,为防止越界,先判断前一页存不存在 if (currentImg !== null && currentImg.nodeName === "IMG") { //存在则激活 currentImg.classList.add("active"); } else { //不存在则直接跳转到最后一页 currentImg = imgs[imgs.length - 1]; currentImg.classList.add("active"); } } // 3. 判断是否点击了后一页 if (ev.target.classList.contains("next")) { // 1. 先清空当前图片的激活样式 currentImg.classList.remove("active"); // 2. 再把当前页设置为后一页 currentImg = currentImg.nextElementSibling; // 3. 把当前页激活,为防止越界,先判断后一页存不存在 if (currentImg !== null && currentImg.nodeName === "IMG") { //存在则激活 currentImg.classList.add("active"); } else { //不存在则直接跳转到第一页 currentImg = imgs[0]; currentImg.classList.add("active"); } } // 4. 关联小圆点高亮 setPorintActive(currentImg.dataset.index); } //获取轮播图容器 var box = document.querySelector(".car-box"); //定义一个定时器,用来清空定时器 var timer = null; // 1. 当鼠标移出轮播图区域时,启动定时器 box.addEventListener("mouseout", startTimer, false); // 2. 当鼠标移入轮播图区域时,清空定时器 box.addEventListener("mouseover", clearTimer, false); //启动定时器函数 function startTimer() { //定义一个点击事件 var click = new Event("click"); //间歇式执行,间隔为2秒 setInterval(function () { //使用事件派发向翻页按钮派发点击事件,触发翻页函数 skips.item(1).dispatchEvent(click); }, 2000); } //清除定时器函数 function clearTimer() { clearInterval(timer); } </script></html>

四、课程总结
- 今天进行了 JavaScript 的实战,通过上课认真听讲和认真完成老师布置的作业,使得我对 js经典案例比如选项卡和轮播图 的理解和运用更加深入和熟悉。最主要的知识点是明白和掌握了操作DOM和事件处理的特点以及基本用法。


![[Web front-end] Node.js quick start](https://img.php.cn/upload/course/000/000/067/662b5d34ba7c0227.png)


