

redis
Redis是一个开源的、基于内存的数据结构存储器,可以用作数据库、缓存和消息中间件。
What??? 这玩意把数据放在内存,还想当数据库使?为什么是“data structure store”,而不是“data store”?还能用作消息中间件??你这么牛,你咋不上天?
是的,Redis就是这么牛 ( ̄▽ ̄)~*
我们只需从Redis最常用的功能——缓存
1、下载-redis
https://redis.io/download
2、上传到服务器
或者直接用命令
wget http://download.redis.io/releases/redis-6.0.5.tar.gz
3、解压
tar zxf redis-6.0.5.tar.gz
4、删除压缩文件
rm -rf redis-6.0.5.tar.gz
5、安装gcc编译环境
yum -y install gcc
6、打开文件夹
cd /redis-6.0.5/src
ls
7、直接编译,大概2分钟
make install
出现错误提示
server.c:5168:15: error: ‘struct redisServer’ has no member named ‘maxmemory’
if (server.maxmemory > 0 && server.maxmemory < 10241024) {
^
server.c:5168:39: error: ‘struct redisServer’ has no member named ‘maxmemory’
if (server.maxmemory > 0 && server.maxmemory < 10241024) {
^
server.c:5169:176: error: ‘struct redisServer’ has no member named ‘maxmemory’
serverLog(LL_WARNING,”WARNING: You specified a maxmemory value that is less than 1MB (current value is %llu bytes). Are you sure this is what you really want?”, server.maxmemory);
^
server.c:5172:31: error: ‘struct redisServer’ has no member named ‘server_cpulist’
redisSetCpuAffinity(server.server_cpulist);
^
server.c: In function ‘hasActiveChildProcess’:
server.c:1476:1: warning: control reaches end of non-void function [-Wreturn-type]
}
^
server.c: In function ‘allPersistenceDisabled’:
server.c:1482:1: warning: control reaches end of non-void function [-Wreturn-type]
}
^
server.c: In function ‘writeCommandsDeniedByDiskError’:
server.c:3790:1: warning: control reaches end of non-void function [-Wreturn-type]
}
^
server.c: In function ‘iAmMaster’:
server.c:4964:1: warning: control reaches end of non-void function [-Wreturn-type]
}
^
make: * [server.o] Error 1
gcc -v
升级到gcc 9.3:
yum -y install centos-release-scl
yum -y install devtoolset-9-gcc devtoolset-9-gcc-c++ devtoolset-9-binutils
scl enable devtoolset-9 bash
需要注意的是scl命令启用只是临时的,退出shell或重启就会恢复原系统gcc版本。
如果要长期使用gcc 9.3的话:
echo “source /opt/rh/devtoolset-9/enable” >>/etc/profile
这样退出shell重新打开就是新版的gcc了
以下其他版本同理,修改devtoolset版本号即可。
8、创建目录,-p循环创建,否则只创建到redis,后面下级的bin和etc同级文件不会创建或者报错
mkdir -p /etc/redis/{bin,etc}
9、src中的部分文件移到新建的bin目录中
cp -a mkreleasehdr.sh redis-benchmark redis-cli redis-server /etc/redis/bin
10、返回上层目录,将redis-6.0.5文件夹zhon中的redis.conf文件复制到/etc/redis/etc
cp -a redis.conf /etc/redis/etc
cd /etc/redis/etc
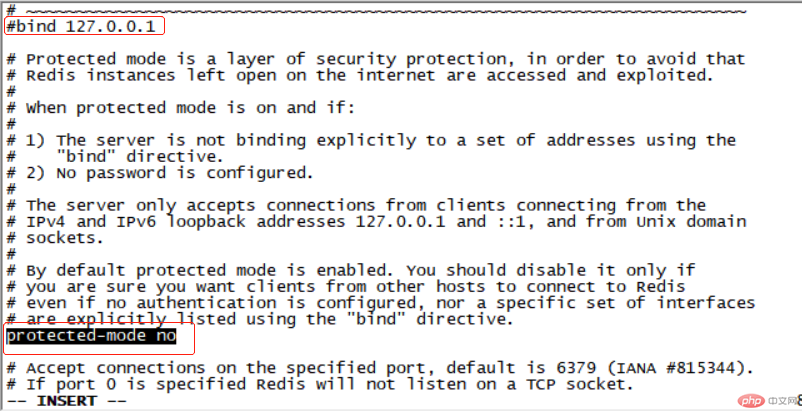
编辑文件redis.conf
a、注释下面这行命令
bind 127.0.0.1
b、protected-mode yes改protected-mode no(取消保护,直接无密码登录,如果对外暴露设置密码要把这个改回yes)
c、port默认是6379
d、daemonize no改为daemonize yes(这是个守护进程改成no不会后台运行,启动它会打印很多启动日志,中途control c或者exit暂停,那会造成启动redis失败。改成yes,启动会在后台启动,不会因为误操作造成启动失败)
e、databases 16(默认16,内置数据库16个,可以手动更改库的数量,暂不修改,取决硬盘大小)
:wq
11、进入同级bin文件夹
cd ../bin
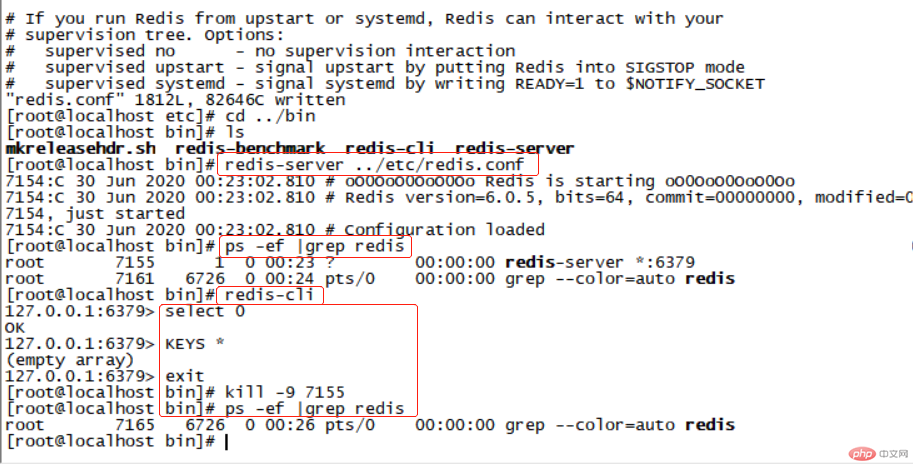
12、启动redis,并制定配置文件
redis-server ../etc/redis.conf
查看进程
ps -ef |grep redis
登录redis
redis-cli
切换到0数据库(一共16个库,0是第一个库)
select 0
查看该库下面键信息(新库,空的)
KEYS *
退出
exit
结束进程
kill -9 7155