Correction status:qualified
Teacher's comments:作业中不要放站外链接, 直接上截图就可以了


盒模型 对于盒模型应该是耳熟能详了,但是通过朱老师讲课,更能体会到盒模型更深入的知识,我在老师基础上结合我平时的疑问进行了测试,得到相对比较全面的总结。
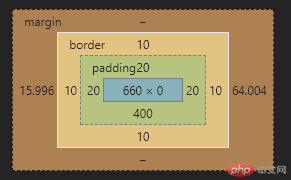
盒模型组成:外边距margin 、边框border、内边距padding和内容content四个部分组成

/* 下面探讨都是针对下面而言 */<body style="height: 800px"><div class="header"><div class="box"></div></div></body>
- 盒模型的宽度和高度计算依据是box-sizing ,默认是content-box ,即等于内容宽度和高度。
- 而在布局时border和padding撑开盒模型空间导致布局不稳定,建议设置为border-box ,即宽度和高度包括border和padding。
- 盒模型宽度和高度是不包括margin。
.box { box-sizing: border-box; width: 500px; height: 500px; background-color: seagreen; }
边框border可设置:宽度、样式和颜色。而内边距padding是透明的,只能设置宽度
.box { border: 10px solid violet; padding: 20px; }
单独探讨margin是因为它的右边距和下边距延伸特性。
- margin的左或上边距始终生效,相对于父元素的左上角。右或下边距在右侧或下方有其它元素时有效,若右侧或下方没有其它元素则延伸,对元素布局不影响。
- margin可以设置绝对值、百发比和auto。绝对值和百分比是按第一条规则布局的,但是百分比要注意横向和竖向百分比的计算规则,可见下面详解
- 取值auto时,竖向为0,横向是一个元素时则平均分容器宽度减去元素宽度得到的值,若是多个元素时则为0。
.box { margin: auto auto; }.header { width: 800px; height: 500px; position: relative; background-color: darkcyan; }
默认值是border-box,背景色或背景图延伸到边框;为padding-box延伸到内边距;为content-box延伸到内容
.box {border-style: dashed;/* 设置边框样式为虚线,可以看到padding-box和border-box的区别 */background-clip: content-box;/* background-clip: padding-box; *//* background-clip: border-box; */}
为什么要单独探讨下百分比,这是我开发中遇到想按背景图比例设置元素尺寸时引发的。我设置尺寸时,除了绝对值px和相对单位em、rem、vw与vh外,还常用用到百分比,盒模型好多属性也可以设置成百分比。但是经常遇到百分比后的值不是自己想象的,尤其是height百分比,这个也是本节要解决的,相信大家以前也没深入探讨过,当然我主要测试了几个常用的。
- width、margin、padding中百分比都是依据父元素的width。可以利用这个特性,设置width和padding来适应背景图的长宽比。
- height的百分比是依据父元素的height。它的计算非常特殊,详细见下面
- background-position的百分比是依据元素减去图片的剩余值,即元素300px,图元素100px,则此时百分比20%就是0.2*(300-100)=40px。
- 定位position中left、right依据父元素宽度,top和bottom依据父元素的高度。
百分比的计算
宽度百分比: 父元素指明宽度时,百分比就是父元素宽度百分比;若父元素未指明时,切记不是父元素被撑开的宽度百分比,而是向上寻找,直到有指明宽度为止,body宽度默认为屏幕宽度。
高度百分比: 父元素指明高度时,百分比就是父元素高度百分比;若父元素未指明时,则它视为0,不会向上寻找,也不考虑撑开的高度。
.box {/* 因为背景图比例是1.8:1,所以width是padding-bottom(相当于height)的1.8倍 */width: 90%;padding-bottom: 50%;margin-left: 2%;border-width: 5%;/* background-position: 20% 20%; *//* position: absolute;left: 10%;top: 10%; */background-image: url(https://img.php.cn/upload/course/000/000/001/5f59db624c2e2735.png);background-repeat: no-repeat;background-size: cover;}
在我的作业https://www.php.cn/blog/detail/24434.html中已经比较详细分析了em和rem的本质,这里就不再解析了,这里主要演示layui文档中不同尺寸的按钮和重点展示效果。
<style>/* 基本样式 */.btn {outline: none;border: none;padding: 0.5em 1em;margin: 0 0.8em;color: white;background-color: darkgreen;border-radius: 0.5em;}.btn:hover {opacity: 0.8;transition: 0.3s;cursor: pointer;box-shadow: 0 0 0.2em red;}/* 不同尺寸效果 */.big { font-size: 20px; }.medium { font-size: 16px; }.small { font-size: 12px; }/* 重点展示效果 */div { margin: 20px auto; }span:link { font-size: 16px; }span:hover { font-size: 22px; transition: 0.3s; }</style><body><div><h1>按钮不同尺寸</h1><button class="btn big">相对单位</button><button class="btn medium">相对单位</button><button class="btn small">相对单位</button></div><div><h1>重点突出显示</h1><span class="btn">重点展示</span></div></body>
源码见我的Github https://github.com/woxiaoyao81/phpcn13或Gitee https://gitee.com/freegroup81/phpcn13