

伪类英文是pseudo-class。通常选择器不能表现HTML元素的状态或特征,我们可以在CSS选择器上添加伪类表示元素的状态、特征 。伪类名写在选择器的:冒号后面,必要时可以添加(),例如:#comments:not(:target)。CSS3为了区分伪类和伪元素规定,:冒号是伪类,::双冒号是伪元素,为了兼容CSS2有时伪元素也用:冒号。
结构性伪类x-child和x-of-type是表示子元素位置特征,详细探讨见我的博文https://www.php.cn/blog/detail/24455.html,而状态性伪类如悬停hover、激活active和访问过visited则表示元素状态,它们在CSS定义时要注意源码顺序,因为元素状态是有先后的。
今天在学习Flex布局后想实现响应式布局时,遇到了想单击菜单弹出侧边导航栏的问题,本想用js解决,但看到网上有CSS解决方案,就学习了,发现CSS3还真是强大。当然这是CSS3才有的功能。CSS3增加了:target伪类,结合排除伪类:not()就可以实现非常强大功能。
伪类:not(),即排除或否定伪类。它在大量子元素中选择除了某元素外所有非常有效,如导航栏中选择除Logo元素以外所有元素就很方便。
- 括号()中是选择器 ,可以是标签、类或ID,当然包括伪类。如:not(:first-child){}。
- 伪类可以级联形成交集 ,目前我接触的结构伪类、状态伪类和排除伪类都可以级联的,如.box a:hover:not(first-child){}。
- 排除伪类不增加优先级 ,这点和其它伪类不一样,如#foo:not(#bar)和#foo二者优先级相同。
例子:.content :not(.notice) em
解释:匹配了.content 中所有的 em 元素,但是排除了 .content .notice 中 em 元素
:target伪类用来指定那些包含片段标识符的URL的目标元素样式。前面是MDN解释,相信看了还是很难懂,下面是我对它的理解:
常见构成: 分成三部分
1.有ID的容器 ,最终是要定义这个ID容器的CSS样式。如ID为rightMenu。
2.有一个a链接元素 ,其 href值为”#ID” 形式。它对应#ID:target选择器。
3.还有一个a链接元素 ,其 href值为”#” 形式。它对应#ID:not(:target)选择器。特别说明: 后两个链接元素和ID容器的位置关系是任意的,即2个链接元素都可在ID容器内,也可以不在容器内 。
<style>/* 第一个链接元素被点击时,定义ID容器中子元素样式 */#container:target h2 {color:seagreen}#container:target .show {display: none;}#container:target .hide {display: inline-block;}/* 第二个链接元素被点击时,定义ID容器中子元素样式 */#container:not(:target) h2 {color:initial;}#container:not(:target) .show {display: inline-block;}#container:not(:target) .hide {display: none;}</style><div class="container" id="container"><h2>target伪类的使用</h2><a class="show" href="#container">显示</a><a class="hide" href="#">隐藏</a></div>

从上不难看出,它其实就是HTML中锚点 ,锚点功能是在同一个页面内位置跳转。不过加了CSS3的:target伪类后,在CSS中则可以定义其它选择器的样式 ,这个以前是JS的专利,现在CSS3也可以实现了。它常见应用是Tab标签、显示/隐藏屏幕侧边导航栏、显示/隐藏区域和显示/隐藏模态框,这些常用而简单功能,在以前不得不用JS,现在CSS3就可以实现了。下面将实例说明。
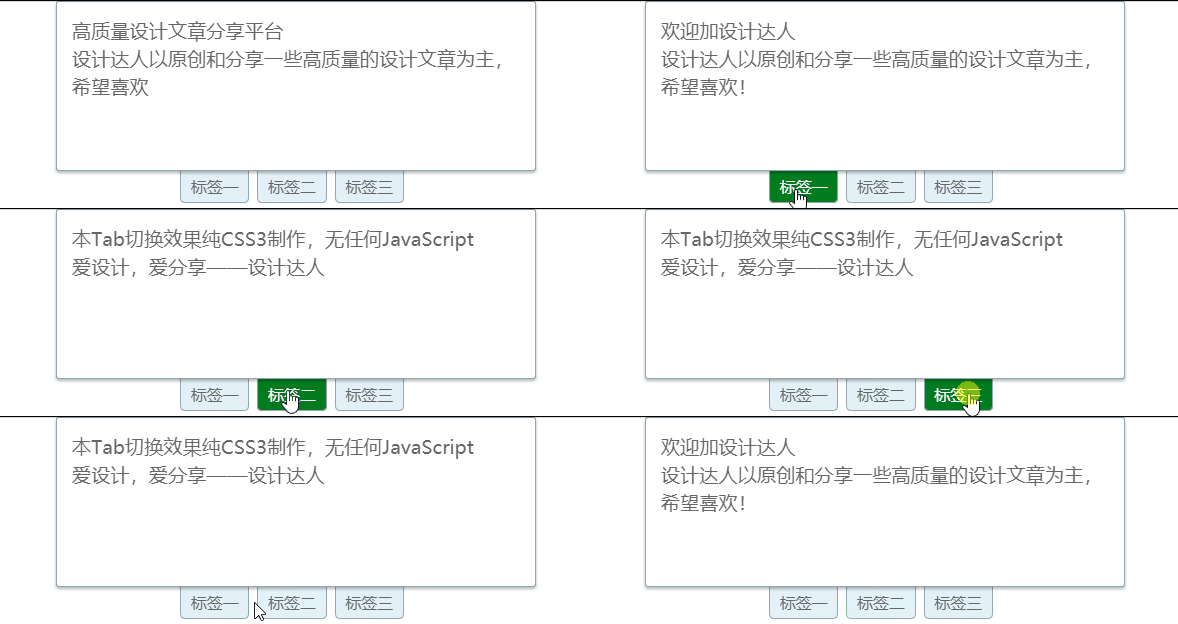
:target伪类最常用的应用就是tab标签了,所有链接元素都放在ID容器外,并且只需要使用常规的#ID:target选择即可。
<style>/* 位置关系:target伪类实现tab标签时,a链接元素一般在ID容器外 *//* Tab标签一般只用到:target伪类即可,不需要:not(:target)配合 *//* 清除样式 */* {margin: 0;padding: 0;border: none;outline: none;box-sizing: border-box;}a {text-decoration: none;color: #666;}li{list-style: none;}/* 定义基本样式 */.container {position: relative;width: 30em;margin:auto;height: 200px;color:#666;}.tabmenu {width: 100%;position: absolute;top: 175px;display: flex;justify-content: center;}.tabmenu li a {padding:0.3em 0.6em;margin-right:0.5em;border: 1px solid #91a7b4;border-radius: 0 0 0.3em 0.3em;background: #e3f1f8;}.tabmenu li a:hover{color:white;background-color: #007d20;}.tabmenu li a:active{color:white;background-color: #007d20;}.tab_content {position: absolute;width: 100%;height: 170px;padding: 15px;border: 1px solid #91a7b4;border-radius: 3px;box-shadow: 0 2px 3px rgba(0, 0, 0, 0.1);font-size: 1.2em;line-height: 1.5em;background: #fff;}/* target伪类定义的样式 */#tab1:target,#tab2:target,#tab3:target {z-index: 1;}</style><div class="container"><ul class="tabmenu"><li><a href="#tab1">标签一</a></li><li><a href="#tab2">标签二</a></li><li><a href="#tab3">标签三</a></li></ul><div id="tab1" class="tab_content"><p>欢迎加设计达人</p>设计达人以原创和分享一些高质量的设计文章为主,希望喜欢!<!-- end tab1 content --></div><div id="tab2" class="tab_content"><p>本Tab切换效果纯CSS3制作,无任何JavaScript</p>爱设计,爱分享——设计达人<!-- end tab2 content--></div><div id="tab3" class="tab_content"><p>高质量设计文章分享平台</p>设计达人以原创和分享一些高质量的设计文章为主,希望喜欢<!-- end tab3 content--></div></div>

target伪类实现显示/隐藏屏幕侧边导航栏算是比较复杂的了,掌握了就基本掌握target伪类的用法了。它和tab标签不同的是a链接元素都在ID容器内 ,通过ID来定义子元素样式,从而实现一个元素状态另一个元素样式的效果,并且需要:target伪类和:not(:target)配合 。
<style>/* 清除样式 */* {margin: 0;padding: 0;border: none;outline: none;box-sizing: border-box;}a {text-decoration: none;color: #666;}li {list-style: none;}/* 定义基本样式 */.container {width: 100vw;height: 100vh;overflow: hidden;color: #666;}#header {width: 100%;height: 80px;line-height: 80px;background-color: rgba(0, 202, 175, 0.75);transition: height 0.3s ease-in;display: flex;justify-content: space-around;align-items: center;}.nav {min-width: 60vw;height: 100%;display: flex;justify-content: space-evenly;text-align: center;font-size: 1.1em;}.nav li a {color: white;}.topRight {height: 100%;display: flex;justify-content: space-around;align-items: center;}.topMenu {visibility: hidden;width: 36px;height: 36px;border-radius: 5px;background-color: white;margin-left: 0.5em;display: flex;flex-flow: column;justify-content: space-evenly;align-items: center;}.topMenu span {width: 80%;height: 3px;background-color: rgb(0, 202, 175);}.closeMenu {display: none;}.closeMenu span:first-child {margin-top: 3px;transform: rotate(45deg);}.closeMenu span:last-child {margin-top: -18px;transform: rotate(-45deg);}@media screen and (min-width: 800px) {.nav li {flex: 1 1 auto;height: 100%;border-bottom: 1px solid transparent;}.nav li a {padding: 0.5em 1em;border-radius: 0.5em;}.nav li:hover a {background-color: whitesmoke;color: #007d20;}.nav li:hover {border-bottom-color: red;}}@media screen and (max-width: 800px) {#header {justify-content: space-between;height: 58px;line-height: 58px;padding: 0 1em;}.nav {display: none;position: fixed;left: 0;top: 58px;bottom: 0;min-width: 30vw;background-color: rgba(0, 202, 175, 0.75);transition: width 0.3s ease-in;flex-flow: column nowrap;justify-content: initial;}.nav li {flex: initial;}.nav li a {padding: initial;}.topMenu {visibility: visible;}.nav li:hover a {color: #007d20;}.nav li:hover {background-color: white;}}/* target核心代码 */#header:target .nav {display: flex;}#header:target .openMenu {display: none;}#header:target .closeMenu {display: inline-flex;}</style><div class="container"><header id="header"><h2>侧边导航功能演示</h2><ul class="nav"><li><a href="">首页</a></li><li><a href="">关于我们</a></li><li><a href="">最新要闻</a></li><li><a href="">加入我们</a></li></ul><div class="topRight"><a class="topMenu openMenu" href="#header"><span></span><span></span><span></span></a><a class="topMenu closeMenu" href="#"><span></span><span></span></a></div></header></div>

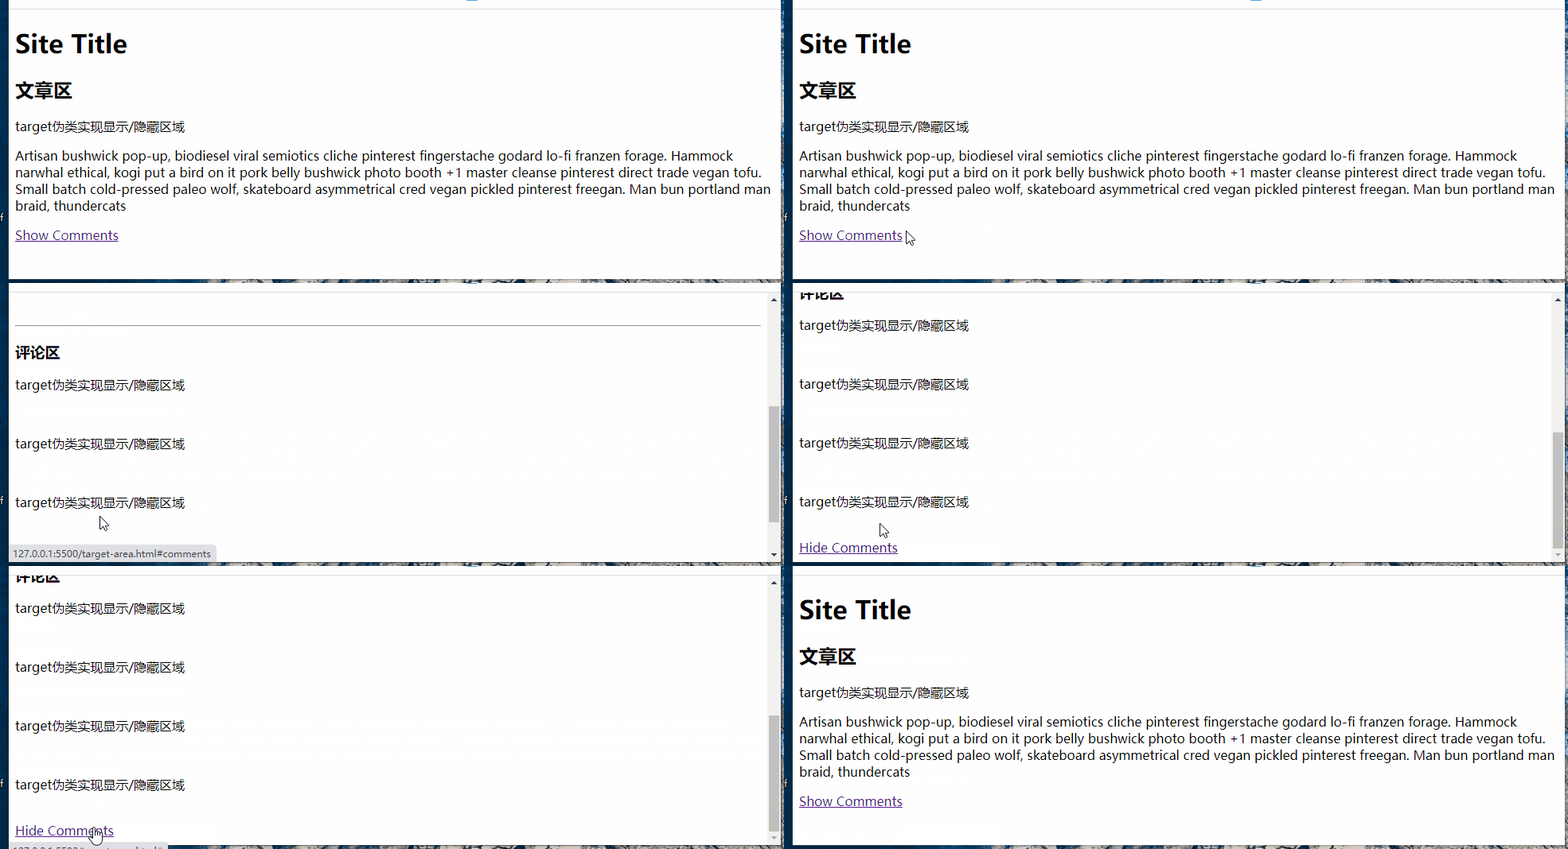
学习了target显示/隐藏屏幕侧边导航栏后,后两个就好实现了,主要就是利用:target伪类和:not(:target)达到不同样式效果。与上面最大不同就是a链接元素一个在ID容器外,另一个外在ID容器内 。由于比较简单就不演示了,自己可以复制源码测试。
<style>#comments {padding-top: 2em;}#comments:not(:target) {display: none;}#comments:target {display: block;}</style><header><div class="wrapper"><h1>Site Title</h1></div></header><div class="wrapper body-wrapper"><h2>文章区</h2><p>文章区文章区文章区</p><p>文章区文章区文章区文章区文章区文章区</p><a href="#comments">Show Comments</a><section id="comments"><hr><h3>评论区</h3><p>target伪类实现显示/隐藏区域</p><br /><p>target伪类实现显示/隐藏区域</p><br /><p>target伪类实现显示/隐藏区域</p><br /><p>target伪类实现显示/隐藏区域</p><br /><a href="#">Hide Comments</a></section></div>

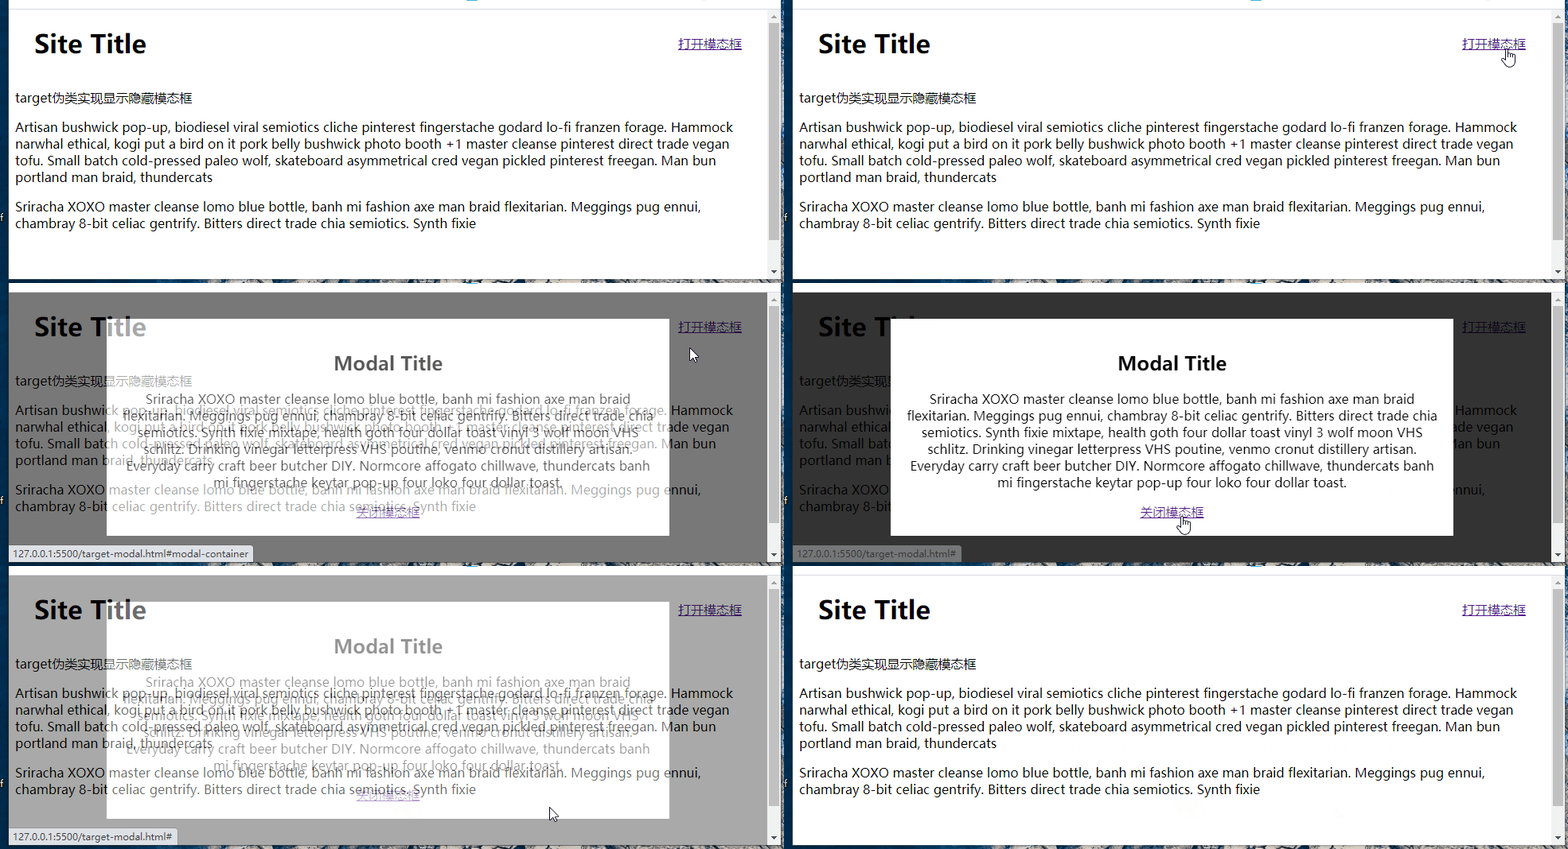
同上,比较简单就不演示了,自己可以复制源码测试。
header {background: #fff;margin-bottom: 30px;position: fixed;top: 0;left: 0;width: 100%;}header .wrapper {display: flex;justify-content: space-between;align-items: center;padding:0 2em;}.body-wrapper {margin-top: 100px;margin-bottom: 100px;}#modal-container {position: fixed;top: 0;left: 0;width: 100%;height: 100%;background: rgba(0, 0, 0, 0.8);justify-content: center;align-items: center;display: flex;}.modal {width: 70%;background: #fff;padding: 20px;text-align: center;}#modal-container:not(:target) {opacity: 0;visibility: hidden;transition: opacity 1s, visibility 1s;}#modal-container:target {opacity: 1;visibility: visible;transition: opacity 1s, visibility 1s;}<header><div class="wrapper"><h1>Site Title</h1><a href="#modal-container" aria-label="Open Navigation">打开模态框</a></div></header><div class="wrapper body-wrapper"><p>target伪类实现显示隐藏模态框</p><p>target伪类实现显示隐藏模态框</p><p>target伪类实现显示隐藏模态框</p></div><div id="modal-container"><div class="modal"><h2>Modal Title</h2><p>Sriracha XOXO master cleanse lomo blue bottle, banh mi fashion axe man braid flexitarian. Meggings pug ennui, chambray 8-bit celiac gentrify. Bitters direct trade chia semiotics. Synth fixiemixtape, health goth four dollar toast vinyl 3 wolf moon VHS schlitz. Drinking vinegar letterpress VHS poutine, venmo cronut distillery artisan. Everyday carry craft beer butcher DIY.Normcore affogato chillwave, thundercats banh mi fingerstache keytar pop-up four loko four dollar toast.</p><a href="#" aria-label="Open Navigation">关闭模态框</a></div></div>

- a链接元素 “锚点” 是页面内跳转常用功能,常用于目录跳转页面。
- 锚点结合CSS3的target伪类 ,再加上 伪类:not() 配合可以实现简单JS交互效果。可以实现tab标签、屏幕侧边栏、弹出对话框等。
- target伪类通过父容器ID可以操纵其子元素的样式,从而实现了一个元素状态影响另一个元素的样式的效果。