Correction status:qualified
Teacher's comments:其实ajax的四步/五步操作还是有点繁琐了, 有空了解一下fetch api,这才是以后的主流, 是不是有点学不动的感觉了, 没办法呀,选择了这行


json:json 是 js 的对象表示法,是通用的跨编程语言的轻量级数据交换/传输/存储格式json和js的区别
// JS对象:const user = {name:"GGG",email = "12345679@youyou6.net",age = 20,};
// JS对象表示法:json数据:{"name" = "GGG","email" = "123456798@youyou6.net,"age" = 20 //最后一项不能有逗号(json不能写注释,这里是为了说明)} // 结束不能有分号;
- `json`的数据类型:1. 数值2. 布尔值3. 字符串4. null没有underfined5. 复合类型:对象和数组
json 只支持字面量
let user = `{"name": "GGG","email": "123456@youyou6.net","age": "20"}`;
PS:
- json 不能有注释
- js 字符串需要解析为 js 对象才可以用个到浏览器之中。
JSON.parse(jsonStr)通过 JSON.parse()可以将一个 json 字符串数据转换为一个 JS 对象,方便调用和数据的处理。
// 设置一个json字符串(字面量字符串)let user = `{"name": "GGG","email": "123456@youyou6.net","age": "20"}`;let num = `{"id" : 1,"price" : 55,"num" : "暂无存货"}`;
语法:
变量 = JSON.parse(json字符串)=>将 json 模板字面量转化为一个对象object
// 通过JSON.parse接口将json字符串转换为js对象,方便数据调用和处理const obj = JSON.parse(user);console.log(obj);const pac = JSON.parse(num);console.log(pac);console.log(typeof pac);


JSON.stringify作用:将 JS 对象/数组/属性/值等转换为 Json 字符串,方便 json 存储和使用。
变量 = JSON.stringify(对象/值/数组等)
工作方法:
演示:
const produce = {name: "手机",price: 88888,num: 99999,};const poduc = JSON.stringify(produce);console.log(poduc);

以前端请求,后端响应为例
异步最常用的处理形式就是回调函数
XMLHttpRequest是浏览器提供的,处理异步请求的宿主对象,而非 JS 内置对象
用于创建请求对象之中。const obj = new XMLHttpRequest
GET 和POST请求GET请求GET请求的创建和完成方式分为以下几步:JSONJSON.parse()解析 JSON 字符串

new XMLHttpRequestonreadystatechange
onreadystatechange:监听变量名.readystate变化 0,1,2,3,4表示成功。状态为 4 时表示请求回调成功
open语法:
open(请求类型,请求地址,是否异步)
演示:变量名.open("GET","http://youyou6.net/open.php",true)
send()通常为
send()括号内的参数不写,但是为了避免其他浏览器识别出错,或出现其他 BUG,建议参数为null。
最终语法:send(null)
<title>Ajax-GET</title><style>form {display: inline-grid;grid-template-columns: 5em 15em;gap: 1em;padding: 1em;border: 1px solid #000;background-color: lightcyan;}form button {grid-area: auto / 2 / auto / span 1;}</style></head><body><form action="" onsubmit="return false;"><label for="username">用户名:</label><input type="text" id="username" name="username" /><label for="email">邮箱:</label><input type="email" id="email" name="email" /><button>保存</button></form><script>// 1.创建请求对象const url = new XMLHttpRequest();// 2.监听监控回调// 通过事件监听器监听变化,传值给show函数,采用冒泡方式url.addEventListener("readystatechange", show, false);// 3.初始化请求参数url.open("GET", "http://demo.io/test1.php", true);// 4.发送请求url.send(null);// 设置回调函数的处理方法function show(user) {if (url.readyState === 4) {// 返回的数据在url.responseTextconsole.log(url.responseText);// json -> jsobjconst user = JSON.parse(url.responseText);console.log(user);document.querySelector("#username").value = user.name;document.querySelector("#email").value = user.email;}}</script>

POST请求
POST请求比GET请求就只多了一步:需要设置请求头:setRequestHeader()
与GET请求,需要设置一个请求头,指明数据以哪种格式发送到服务器端
其他四步和GET大同小异
共有三种方式:通过表单form属性enctype可以查看到
- 创建请求对象:
new XMLHttpRequest()
- 监听请求回调:
onreadystatechange()
- 初始化请求参数:
open(请求类型,请求地址,是否异步)
- 设置请求头:
setRequestHeader()
- 发送请求:
send(data)
设置请求头的时候建议多增加一步,charset=utf-8
最后请求头设置为:.setRequestHeader("content-type","编码格式;charset=utf-8")
编码格式:content-type: 1.application/x-www-form-urlencoded2.text-plain3.application/json以json方式发送数据,但json方式只支持utf-8
<script>// 1.创建请求对象const url = new XMLHttpRequest();// 2.监听请求回调url.addEventListener("readystatechange", show, false);// 3.初始化请求url.open("POST", "http://baidu.com", true);// 4.设置请求头// 以表单键值对的方式发送数据url.setRequestHeader("content-type", "application/x-www-form-urlencoded");// 5.发送请求url.send(null);// 回调函数处理办法:function show(ev) {if (url.readyState === 4) {// 值从responseText之中拿console.log(url.responseText);}}</script>

利用 JS 对象模拟表单数据
// 用js对象来模拟表单数据const user = {email: "admin@php.cn",password: "123456",};// 前端是 js, 后端 php, php不能识别 js 对象,只能识别 jsonlet data = JSON.stringify(user);// 4. 发送请求: `send()`url.send(data);
使用json来发送数据的话就要修改请求头格式,以json格式发送
// 4. 设置请求头: `setRequestHeader()`// 以json格式发送数据, json只支持utf-8xhr.setRequestHeader("content-type", "application/json;charset=utf-8");
FormData:将数据封装后发送。
操作步骤:
// 1.拿到表单和按钮const form = document.querySelector("form");const btn = document.querySelector("button");// 2.创建请求对象const url = new XMLHttpRequest();// 按钮点击事件btn.addEventListener("click", callback, false);// 将事件封包到一个表单之中function callback(ev) {// 3.监听请求回调url.addEventListener("readystatechange", show, false);// 4.初始化请求参数url.open("POST", "http://demo.io/data/test1.php", true);// 5.设置请求头url.setRequestHeader("content-type", "application/json");// 6.发送请求(使用FormData()来发送当前表单)url.send(new FormData(form));}// 请求的回调function show() {if (url.readyState === 4) {console.log(url.responseText);}}

同源必须是协议
http或https,域名,端口都一直才叫同源,否则就不是同源
# 协议不同https://www.caidu.cn:443 /course/812.htmlhttp:// www.caidu.cn:443 /course/812.html# 端口不同http://www.caidu.cn:80 /wenda/165068.htmlhttp://www.caidu.cn:8080 /wenda/165068.html# 域名不同http://www.caidu.net:80 /wenda/165068.htmlhttp://www.caidu.cn:80 /wenda/165068.html
jsonp 仅限于
GET方式
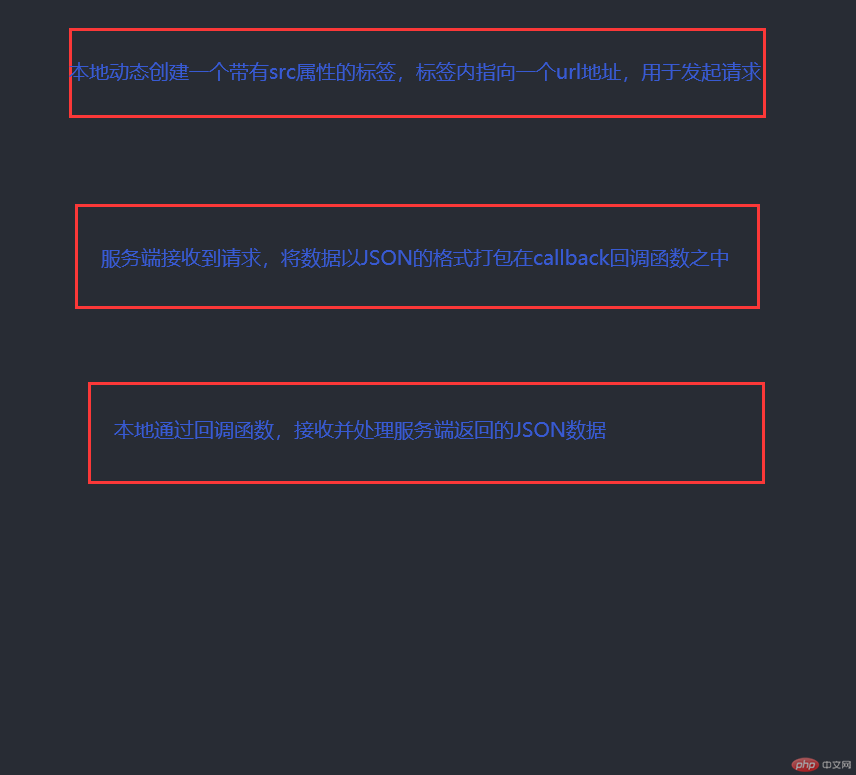
jsonp:重点在于 Url 的参数中必须要有一个回调参数
动态生成标签,标签必须要有src属性,如<img>、<script>、<ifarme>为什么要使用跨域 JSONP?
Ajax 直接请求普通文件存在跨域无权限访问的问题,甭管你是静态页面、动态网页、web 服务、WCF,只要是跨域请求,一律不准,但是在 Web 页面上调用 JS 文件则不守是否跨域的影响。恰巧 json 就是一种通用的跨编程语言的轻量级数据交换/传输/存储格式,是一种纯字符类语言,我们可以随意调用和处理数据。跨域请求的原理:
src属性的标签,调用服务端的 JSJS文件Json格式传递给前端解析
实例:
script标签允许跨域请求脚本: <script src="...."></script><script>元素,并将需要跨域访问的 URL,赋值给 script 元素的 src 属性blog.io,并指向到当前项目的一个目录中,例如blog
回调函数和属性名(以名值对的方式向服务器发送给请求):
<!DOCTYPE html><html lang=""><head><meta charset="UTF-8" /><meta name="viewport" content="width=device-width, initial-scale=1.0" /><title>JSONP跨域请求</title><style>form {display: inline-grid;grid-template-columns: 5em 15em;gap: 1em;padding: 1em;border: 1px solid #000;background-color: lightcyan;}form button {grid-area: auto / 2 / auto / span 1;}</style></head><body><form action="" onsubmit="return false;"><label for="username">用户名:</label><input type="text" id="username" name="username" /><label for="email">邮箱:</label><input type="email" id="email" name="email" /><button>保存</button></form><hr /><button id="jsonp">JSONP跨域请求</button><script>// 拿到按钮的bom属性const btn = document.querySelector("#jsonp");// 监听按钮的点击事件btn.addEventListener("click", creatScript, false);// createScirpt()动态创建<script>function creatScript() {// 这里的url内的show就相当于callback函数// 以get方法添加查询参数,就是放在url中,以键值对方式添加每个键值对之间用&分割let url = "http://blog.io/index.php?id=3&jsonp=show";// 生成script元素const script = document.createElement("script");// 将跨域请求的url赋值给src属性script.src = url;// 将script添加到页面之中document.head.appendChild(script);}// 回调函数show,为什么是show,请看url,我们定义了一个callback返回函数接收数据function show(user) {// 服务端返回的数据以及自动解析为了JS对象,所以可以直接引用console.log(user);document.querySelector("#username").value = user.name;document.querySelector("#email").value = user.email;}</script></body></html>
服务端代码:
<?php$users = [['id'=>1, 'name'=>'admin', 'email'=>'admin@php.cn'],['id'=>2, 'name'=>'peter', 'email'=>'peter@php.cn'],['id'=>3, 'name'=>'jack', 'email'=>'jack@php.cn'],];// 查询条件// 通过前端发送请求的url内的id来查询$id = $_GET['id'];// js回调$callback = $_GET['jsonp'];//回调变量名:可在前端跨域请求url之中查看到foreach ($users as $user) {if ($user['id'] == $id) {$result = $user;break;}}$data = json_encode($result);// 创建一条js函数的调用语句返回// echo "函数名(参数)";echo "{$callback}({$data})";
最终跨域拿到数据: