Correction status:qualified
Teacher's comments:


Vue是一套用于构建用户界面的渐进式框架。与其它大型框架不同的是,Vue 被设计为可以自底向上逐层应用。Vue 的核心库只关注视图层,不仅易于上手,还便于与第三方库或既有项目整合,今天我就开始Vue入门学习之旅
//使用之前需要new一个vue的类const vm = new Vue({//设置挂载点:el:'.app',//数据注入:data:{//在data中声明的所有变量都会成为vue实例的属性:username:'VueStudent',greeting:false,//false会影响对应挂载点里面三元表达式的值}})
在html给vue创建一个根节点:
<div class="app"><!-- {{里面的就是插值,可以接受表达式}} --><p>用户名:{{username}}</p><p>10+10={{10+10}}</p><p>greeting?‘上午好’:‘下午好’</p></div>
浏览器中的运行效果
v-text:相当于原生js中的innerText或者textContent
v-once:只渲染一次
例如我们在外面给在data中已经设置好的username重新赋值
vm.username="<em style='color:red; font-size:2em;'>SecondStudent</em>"
再写两个一个没有设置v-html和有设置的p标签:
<div class="app"><p>{{username}}</p><p v-html="username"></p></div>
运行后产生了不同的结果:
1.绑定style:
<div class="app"><!-- 用v-bind绑定了data中style1的值: --><p v-bind:style="style1">style:{{style}}</p><!-- v-bind可以简写成一个冒号“:” --><p :style="`color:red`">style:{{site}}</p></div><script src="https://cdn.jsdelivr.net/npm/vue/dist/vue.js"></script><script>const vm = new Vue({el:'.app',data:{site:'php中文网',style1:"color:red",class1:"active bigger",}})</script>
由于第一个p标签绑定的style1的值和第二个p标签绑定的值一样,所以运行后得到相同的结果
2.绑定类
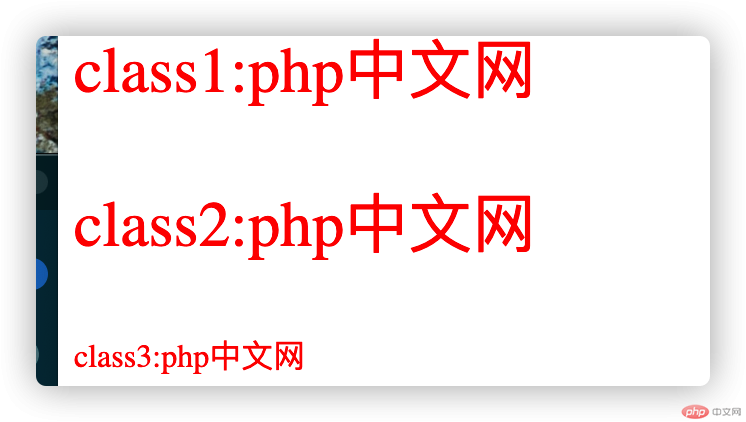
<style>.active{color:red;}.bigger{font-size: 2rem;}</style></head><body><div class="app"><!-- 绑定类class属性 --><!-- 给里面的类绑定了style里面提前设置好的的.active和.bigger样式 --><p :class="`active bigger`" >class1:{{site}}</p><!-- 也可以绑定给data里面的class1,因为已经提前赋值好了 --><p :class="class1">class2:{{site}}</p><!-- 用对象设置开和关 --><p :class="{active:true, bigger:false}">class3:{{site}}</p></div><script src="https://cdn.jsdelivr.net/npm/vue/dist/vue.js"></script><script>const vm = new Vue({el:'.app',data:{site:'php中文网',style1:"color:red",class1:"active bigger",}})
以下是运行后的结果,可见对象里面的布尔值起到了作用
四.使用v-on绑定事件
我们可以使用v-on绑定绑定事件,格式是:```javascript
v-on:”事件名称”=”函数名称”
**在js中事件常用的一些方法也可以添加到v-on后面,比如阻止事件冒泡,阻止元素默认行为,也可以用$event给事件对象传参,v-on可以简写成@****当然,绑定事件的前提是,你先得在methods里面写好函数**```javascript<div class="app"><!-- 这里用@简写了v-on,并阻止了默认事件和事件冒泡,并只能执行一次 --><p><a href="https://php.cn" @click.prevent.stop.once="show">点击显示网站名称</a></p><!-- 这里我们传入了事件对象的参数 --><button @click.stop="handle($event,100,200)">click</button></div><script src="https://cdn.jsdelivr.net/npm/vue/dist/vue.js"></script><script>const vm = new Vue({el:'.app',data:{site:"php中文网",},methods:{show(){//这里的this指当前vue的实例对象alert(this.site)},handle(ev,a,b){//type是指事件类型console.log(ev.type,ev.target);console.log("%d+%d=%d",a,b,(a+b));},}})</script>
绑定写在methods里面的函数运行后,函数得到了执行:

双向绑定指:修改页面当中的数据,模型中的数据也能跟着修改,例如以下代码:
<div class="app"><p>模型中的数据:{{content}}</p><p>双向绑定: <input type="text" value="content" @keyup="content=$event.target.value"></p></div><script src="https://cdn.jsdelivr.net/npm/vue/dist/vue.js"></script><script>const vm = new Vue({el:'.app',data:{content:"php中文网",}})</script>
因为这个方法经常使用,所以vue提供了语法糖:v-model,上面的代码可以直接简写:
<p>双向绑定:<input type="text" v-model.lazy.number="content"> </p>
运行的结果显示我们确实成功的改变了模型中的值:
遇到集合数据的时候,可以用遍历进行显示,例如我们在data中分别创建一个数组,对象,数组对象,在页面中进行显示:
const vm = new Vue({el:'.app',data:{//数组:items:["天","地","人"],//对象:user:{name:"Jasper",psw:"123",},//对象数组:users:[{id:1,name:"Jasper",psw:"123"},{id:2,name:"Peter", psw:"321"},{id:3,name:"Mary",psw:"666"},],},})
用v-for在li标签中进行遍历并显示:
<ul><!-- 此处的item代表值,index是索引具有唯一性 --><li v-for="(item,index) in items" :key="index">{{index}}--{{item}}</li></ul><ul><!-- item:是对象的值,prop是键,index是索引,索引和键都具有唯一性 --><li v-for="(item,prop,index) in user" :key="prop">{{prop}}--{{index}}--{{item}}</li></ul><ul><li v-for="(user,index) in users" :key="user.id">{{user.id}}--{{user.name}}--{{user.psw}}</li></ul>
运行后成功的遍历并显示了,代替了重复的工作