Correction status:qualified
Teacher's comments:


响应式布局等于流动网格布局,这里响应式布局分为四种;第一种浮动
float布局(传统布局),第二种定位position布局,第三种弹性flex盒子,还有最后一种网格grid布局;后两种会在接下来的文章中介绍,本章主要讲定位布局。
| 解释 | 说明 |
|---|---|
| 本质 | 为了解决图文并茂显示问题 |
| 核心 | 浮动初心是为了解决图片与文本并排显示的问题 |
| 原理 | 浮动元素脱离了文档流,后面的元素会上移填充它原来的空间 |
| 特征 | 任何元素(包括行内元素)浮动后,都具备了块级元素的特征 |
注意:浮动元素不会影响到它前面的元素的布局,只会影响到后面的元素的排列
clear:both清除浮动| 符合BFC法则 | 备注 |
|---|---|
| float: left / right | 不能是 none |
| overflow: hidden / auto / scroll | 不能是 visible |
| display: inline-block / table-cell | 无 |
| display: flex / inline-flex | 无 |
| display: grid / inline-grid | 无 |
| position: absolute / fiexed | 无 |
overflow:hidden转为BFC| 类型 | 说明 |
|---|---|
| static | 默认,也就是文档流定位,元素的位置和源码顺序一样 |
| relative | 相对于该元素在文档流中的原始位置进行偏移 |
| absolute | 相对于它的定位祖先元素中离它最近的”定位元素”的位置发生偏移 |
| fiex | 它始终相对于html进行定位 |
何为”定位元素”呢?
定位元素:只要这个元素中有position:relavite或者position:absolute就称为定位元素;
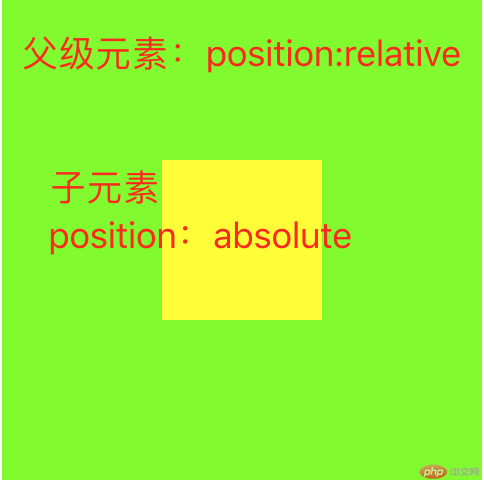
<!DOCTYPE html><html lang="en"><head><meta charset="UTF-8"><meta name="viewport" content="width=device-width, initial-scale=1.0"><title>相对定位</title><style>.box{width: 15em;height: 15em;background-color: lawngreen;/* 转为定位元素,它内部的元素就相对于它进行绝对定位 */position: relative;}.box .sub{width: 5em;height: 5em;left: 0;right: 0;top: 0;bottom: 0;/* 使用绝对定位的完全定位空间来快速实现水平和垂直居中 */margin: auto;background-color: yellow;position: absolute;}</style></head><body><div class="box"><div class="sub"></div></div></body></html>
效果图如下
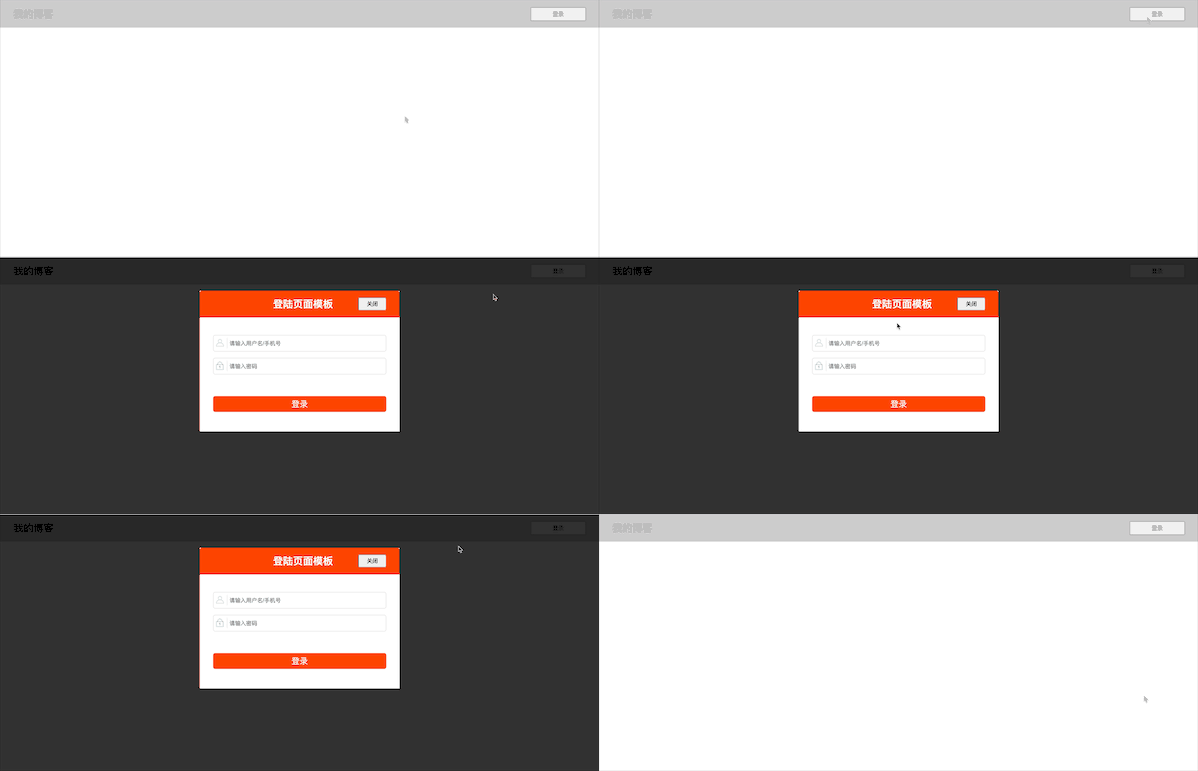
接下来我们运用固定定位来实现模态框效果
3.1 css代码如下
* {margin: 0;padding: 0;box-sizing: border-box;}header {padding: 1em 2em;background-color: #ccc;overflow: hidden;}header h2 {float: left;}header button {width: 10em;height: 2.5em;float: right;}.modal {width: 5em;height: 5em;display: none;}.modal .modal-backsorp {/* 蒙版 */background-color: rgba(0, 0, 0, 0.8);left: 0;top: 0;right: 0;bottom: 0;position: fixed;}.modal .modal-body {left: 30em;top: 5em;right: 30em;min-height: 15em;/* 固定定位 */position: fixed;background-color: #fff;}.modal .modal-body .pane-header {width: 100%;height: 64px;background-color: orangered;border-radius: 5px 5px 0 0;line-height: 64px;color: white;text-align: center;margin-bottom: 10px;cursor: move;padding: 0em 2em 0em 2em;}.modal .modal-body .pane-header h2 {float: left;padding-left: 6em;}.modal .modal-body .pane-header button {float: right;padding: 0.3em;width: 5em;margin-top: 1.2em;}.modal .modal-body .pane-content {padding: 2em;}.modal .modal-body .pane-content .userpwd {margin-bottom: 15px;height: 40px;position: relative;}.modal .modal-body .pane-content .userpwd img {position: absolute;top: 7px;left: 6px;}.modal .modal-body .pane-content .userpwd input {width: 100%;height: 100%;box-sizing: border-box;padding-left: 38px;border-radius: 5px;border: 1px solid #dddddd;}input[type="text"],input[type="password"] {border-width: 1px;border-style: solid;border-color: #707070 #CECECE #CECECE #707070;padding: 2px 4px;height: 18px;line-height: 18px;vertical-align: middle;}.modal .modal-body .login-btn {margin: 15px 0;width: 100%;height: 38px;background-color: orangered;border: 0;font-size: 20px;color: white;border-radius: 5px;cursor: pointer;}
3.2 html代码如下
<!DOCTYPE html><html lang="en"><head><meta charset="UTF-8"><meta name="viewport" content="width=device-width, initial-scale=1.0"><title>固定定位:模态框</title><link src="modal.css"></head><body><!-- 页眉 --><header><h2>我的博客</h2><button>登录</button></header><!-- 模态框 --><div class="modal"><!-- 蒙板:用来盖住后面的内容,使它半透明状态 --><div class="modal-backsorp"></div><!-- 主体 --><div class="modal-body"><div class="pane-header"><h2>登陆页面模板</h2><button class="close">关闭</button></div><div class="pane-content"><form name="form1" method="post" action="login.php"><div class="userpwd"><img src="images/icon_people.png"><input type="text" name="userid" placeholder="请输入用户名/手机号"></div><div class="userpwd"><img src="images/icon_password.png"><input type="password" name="pwd" placeholder="请输入密码"></div><dt> </dt><button type="submit" name="sm1" class="login-btn" onclick="this.form.submit();">登录</button></form></div></div></div></body><script src="modal.js"></script></html>
3.3 js代码如下
const btn = document.querySelector("header button");const modal = document.querySelector('.modal');const close = document.querySelector('.close');btn.addEventListener('click', setModal, false);close.addEventListener('click', setModal, false);function setModal(ev){ev.preventDefault();let status = window.getComputedStyle(modal,null).getPropertyValue('display');modal.style.display = status == 'none' ? 'block' : 'none';}
3.4 效果图如下