Correction status:qualified
Teacher's comments:


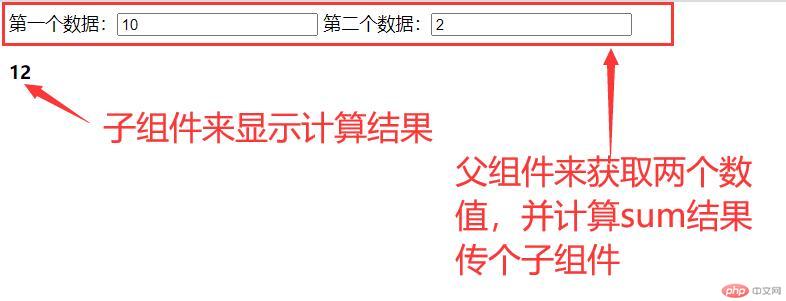
1.父级组件通过v-bind把数据绑定到子组件的标签属性中。
2.自己组件通过实列props属性来接收父级传过来的数据即可
3.代码
<!DOCTYPE html><html lang="zh"><head><meta charset="UTF-8"><meta name="viewport" content="width=device-width, initial-scale=1.0"><meta http-equiv="X-UA-Compatible" content="ie=edge"><title>组件间数据的传递</title><script src="vue.js" type="text/javascript" charset="utf-8"></script></head><body><div class="app"><label for="num1">第一个数据:</label><input type="text" id="num1" v-model.number="num1"><label for="num2">第二个数据:</label><input type="text" id="num2" v-model.number="num2"><sum :sum="sum"></sum></div></body><script>const vm=new Vue({el:".app",data:{num1:1,num2:2,},computed:{sum(){return this.num1+this.num2;}},components:{sum:{props:["sum"],template:`<h4>{{sum}}</h4>`,}}})</script></html>
4.演示结果
1.子组件的挂载点:html内容必须有一个标签包裹
2.子组件传数据
4、演示结果
<!DOCTYPE html><html lang="zh"><head><meta charset="UTF-8"><meta name="viewport" content="width=device-width, initial-scale=1.0"><meta http-equiv="X-UA-Compatible" content="ie=edge"><title>组件间数据的传递</title><script src="vue.js" type="text/javascript" charset="utf-8"></script></head><body><div class="app"><span-sum @get="getsum"></span-sum><h1>{{sum}}</h1></div><template id="son"><div><label for="num1">第一个数据:</label><input type="text" id="num1" v-model.number="num1"><label for="num2">第二个数据:</label><input type="text" id="num2" v-model.number="num2"><button type="button" @click="getsum()">计算</button><span>{{sum}}</span></div></template></body><script>// 子组件const spanSum={data(){return {num1:1,num2:2,sum:3,}},template:"#son",methods:{getsum(){this.sum=this.num1 + this.num2;this.$emit('get',this.sum);}}}// 父组件const vm=new Vue({el:".app",data:{sum:"答案",},components:{spanSum,},methods:{getsum(sum){console.log(sum);this.sum=sum;}}})</script></html>

1.组件实际上就是一个Vue实例,只不过时通过自定义标签名隐式挂载的
2.创建组件关键字:Vue.extend({})
3.注册全局组件:Vue.component(“自定义标签名”,组件)
4.组件的数据data,必须是一个函数的return返回值
5.组件可以重复利用,且是一个封闭的对象(避免污染全局)
6.一般不建议创建全局组件
7.全局组件,可以载任何vue实例模板中直接使用
8.代码
<!DOCTYPE html><html lang="zh"><head><meta charset="UTF-8"><meta name="viewport" content="width=device-width, initial-scale=1.0"><meta http-equiv="X-UA-Compatible" content="ie=edge"><title>组件的组成和分类</title><script src="vue.js" type="text/javascript" charset="utf-8"></script></head><body><div class="app">{{leave}}<child-div></child-div><child-div></child-div><!-- <child></child><child></child><child></child> --></div><template id="child"><span>子组件</span></template></body><script type="text/javascript">// 创建组件const child=Vue.extend({template:"#child",});// 注册全局组件Vue.component("childDiv",child);const vm=new Vue({el:".app",data(){return {site:"种业圈",leave:"父级组件",}},// 局部组件components:{// child,}})</script></html
9.运行结果