Correction status:qualified
Teacher's comments:


组件,从形式上看,组件就是一个自定义的 html 标签;组件本质上来看是一个可复用的 Vue 实例,是构造函数 Vue 的一个子类;组件实现了代码复用。从组件的层面上来理解,Vue 的挂载点就是一个组件,不过它是一个隐式声明根组件。
创建一个组件需要进行两个步骤
child-component的新组件(使用 Vue.component 创建的组件为全局组件)
<!-- 创建一个新组件 --><script>Vue.component("child-component", {template: `<h1>Helo World</h1>`,data() {return {};},});</script>
其中 “child-component” 是创建的组件的名字(用户自定义的 html 标签),后边的对象{}中的内容是组件的配置项,其中 template 中的内容是一个字符串模板,作为 Vue 实例的标识使用。模板将会替换挂载的元素,也就是挂载点上的<child-component></child-component>这一对自定义 html 标签。挂载元素的内容都将被忽略,除非模板的内容有分发插槽。由于组件是一个 Vue 的子类,所以它的属性也是由一个函数data(){return{}}返回一个对象来实现的。
2.挂载,将自定义的 html 标签放到 Vue 挂载点的子结点上
<body><!-- 挂载点是一个隐式声明根组件, --><div class="app"><!-- 自定义html标签 --><child-component></child-component></div><script>// 将组件名放到挂载点的子结点中const vm = new Vue({el: ".app",data() {return {};},});</script></body>
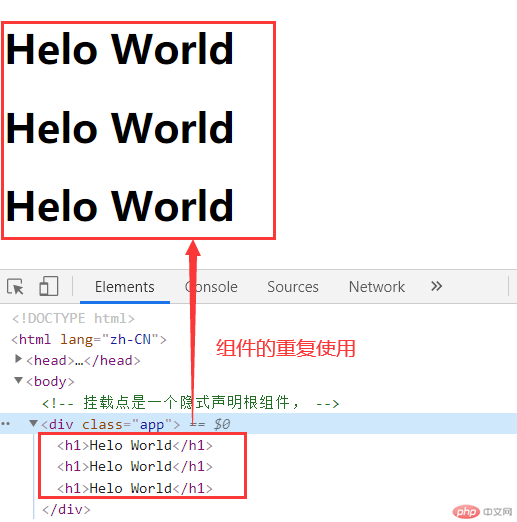
声明组件的目的就是实现代码复用,将这个组件可以重复的放置在已经挂载好的根节点中
例如
<body><!-- 挂载点是一个隐式声明根组件, --><div class="app"><!-- 自定义html标签 --><child-component></child-component><child-component></child-component><child-component></child-component></div></body>

上述示例中,组件的创建是通过Vue.component来实现的。这样声明的组件是全局组件,它在全局可见,声明在 Vue 实例外部,全局组件可以在多个 Vue 实例中共享,不过尽可能不要去声明一个全局组件,减少全局污染。因为通常一个项目只有一个 Vue 实例,所以尽可能不要用全局组件,而应该使用局部组件代替。
局部组件的声明
局部组件是属于 Vue 实例的,使用 components 声明。
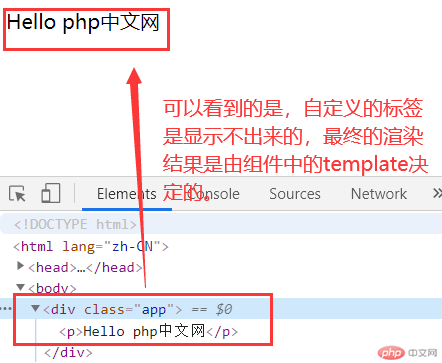
<body><div class="app"><child-hello></child-hello></div><script>const vm = new Vue({el: ".app",data() {return {};},// 声明一个局部组件components: {childHello: {template: `<p>Hello {{site}}</p>`,data() {return {site: "php中文网",};},},});</script></body>
<child-hello></child-hello>,是定义的局部组件。但是在 dom 结构中是找不到的。
父组件向子组件传参
父组件是通过自定义属性的方式将参数传到子组件中的, 然后子组件中用固定属性名称 props 来接收父组件自定义的属性名。
现在我们来声明一个子组件,将其放到挂载点下,然后在子组件中不进行属性声明,所有的属性在父组件中声明定义,然后试着将这些父组件中的属性传递到子组件中。
<body><script src="https://cdn.jsdelivr.net/npm/vue@2.6.12/dist/vue.js"></script><div id="app"><!-- 父组件,父组件是通过自定义属性的方式将参数传到子组件中的 --><btn-inc :user-name="username" :parent-count="count"></btn-inc><p>{{count}}</p></div><script>const vm = new Vue({el: "#app",data() {return {username: "父组件的变量",count: 0,};},// 局部组件components: {btnInc: {// 使用固定属性名称props来接收父组件自定义的属性名props: ["userName", "parentCount"],// 组件之间的数据传递是单向的,不允许在子组件中更新父组件中的数据template: `<div><button @click="num++">点赞:+ {{num}}</button><span>{{userName}}</span></div>`,data() {return {num: this.parentCount,};},},},});// 子组件中的数据变化更新父组件的数据,通过消息传递(事件)实现console.log(vm.count);</script></body>
父组件中的自定义属性的值可以来自根组件的 data,不过如果使用根组件上的变量就要对自定义属性进行 v-bind 绑定,父组件中的自定义属性名尽量写成”:user-name”,而在子组件中接收的时候应该写成”userName”的形式。
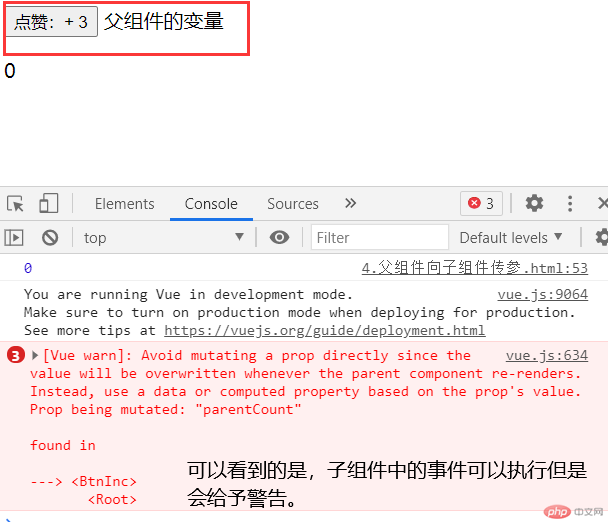
试着直接使用父组件data中的count直接使用在子组件的template,会发现根本就不可以进行渲染,根本就识别不出来。只能通过父组件自定义属性绑定到父组件上,然后再传参才可以在子组件中拿到父组件中的数据。而且父组件中的数据拿过来之后,也就是通过props获取到之后,不能对其进行修改,如果想要进行改变值的操作,就只能在子组件的data中重新定义一个变量接收,然后对这个变量进行修改,如果不这样做,Vue 就会报错。
在子组件的template中直接使用父组件的属性进行修改,会出现如下报错情况。
template:
<div> <button @click="parentCount++">点赞:+ {{parentCount}}</button> <span>{{userName}}</span> </div>,
报错情况

而且改变之后,对于父组件中的 count 是没有影响的。
子组件向父组件传参
子组件中的数据变化更新父组件的数据,通过消息传递(事件)实现,子组件向父组件传参是通过声明同名事件来实现的。
在子组件的templatehtml 字符串中定义事件,必须对事件使用$emit()事件方法,$emit(父组件中要使用的方法名称,子组件要传给父组件的值)。
现在来列举一个子组件向父组件传参的例子
<body><div id="app"><btn-inc:user-name="username":parent-count="count"@click-count="handle"></btn-inc></div><script>const vm = new Vue({el: "#app",data() {return {username: "父组件的变量",count: 0,};},// 局部组件components: {btnInc: {// 使用固定属性名称props来接收父组件自定义的属性名props: ["userName", "parentCount"],// 必须使用$emit()事件方法// $emit(父组件中要使用的方法名称,子组件要传给父组件的值)template: `<div><button @click="$emit('click-count',num)">点赞:+ {{parentCount}}</button><span>{{userName}}</span></div>`,data() {return {num: 1,};},},},// 父组件更新数据的方法methods: {handle(value) {console.log(this.count);this.count += value;},},});</script></body>
父组件中通过定义同名事件,来对子组件中的数据进行接收,另外,这个子组件传递的参数可以是任何类型。
总结: