Correction status:qualified
Teacher's comments:


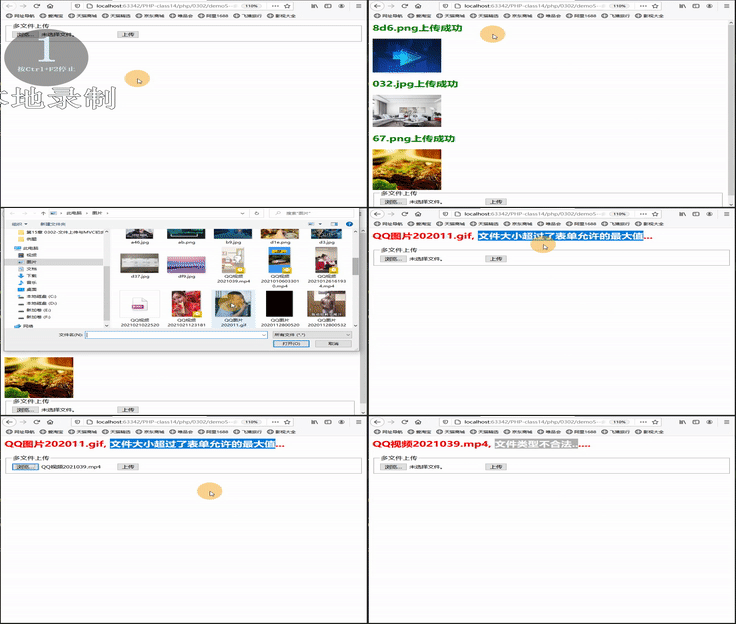
1、 上传代码封装为UpLoad.php类文件;2、 UpLoad.php上传类提供,upLoadFile(文件上传)、checkErrorCode(错误码检测)、checkType(文件类型检测),3个公有方法;3、 UpLoad.php上传类中,上传文件的命名采用当前时间 + 3位随机数来实现;4、 在测试文件中,实例化UpLoad.php上传类,并将上传的文件由$_FILES[]超全局变量接收后,传给上传类;
<?phpspl_autoload_register(function ($name) {$file = str_replace('\\', DIRECTORY_SEPARATOR, $name) . '.php';require $file;});if (!empty($_POST)) {$files = $_FILES['file'];$upload = new UpLoad();$upload->upLoadFile($files);}?><form method="post" enctype="multipart/form-data"><fieldset><legend>多文件上传</legend><input type="hidden" name="MAX_FILE_SIZE" value="1000000"><!-- 添加 multipart name的值写成php数组的格式 --><input type="file" multiple name="file[]"><input type="submit" value="上传"></fieldset></form>
<?phpclass UpLoad{private $error; //保存错误信息public function upLoadFile($files){foreach ($files['error'] as $key => $error) {if ($this->checkErrorCode($error)) {//调用文件类型验证函数if ($this->checkType($files['tmp_name'][$key])) {// 现在随机文件名样板:20210309033027827,时间正规写法date('Y-m-d H:i:s'),$randName = date('YmdHis') . '_' . rand(100, 999);$path = './upload/' . $randName . strrchr($files['name'][$key], '.');//echo $path, '<br>';if (move_uploaded_file($files['tmp_name'][$key], $path)) {echo "<h2 style='color:green'>{$files['name'][$key]}上传成功</h2>";echo "<img src='{$path}' width='150' />";}} else {echo "<h2 style='color:red'>{$files['name'][$key]}, {$this->errorMsg}...</h2>";}} else {echo "<h2 style='color:red'>{$files['name'][$key]}, {$this->errorMsg}...</h2>";}}}public function checkErrorCode($ErrorCode): bool{if ($ErrorCode != 0) {switch ($ErrorCode) {case 1:$this->errorMsg = '文件超过系统允许的最大值';return false;case 2:$this->errorMsg = '文件大小超过了表单允许的最大值';return false;case 3:$this->errorMsg = '只有部分文件上传';return false;case 4:$this->errorMsg = '没有文件上传';return false;case 6:$this->errorMsg = '找不到临时文件';return false;case 7:$this->errorMsg = '文件写入失败';return false;default:$this->errorMsg = '未知错误';return false;}} else {return true;}}public function checkType($file): bool{//第一步:创建finfo资源$info = finfo_open(FILEINFO_MIME_TYPE);//第二步:将finfo资源和文件做比较,识别出文件mime类型$mime = finfo_file($info, $file);//第三步,比较是否合法$allow = array('image/jpeg', 'image/png', 'image/gif'); //允许的类别if (in_array($mime, $allow)) {return true;} else {$this->errorMsg = '文件类型不合法...';return false;}}}
1、 此示例制作三个文件,Model.php(模型类)、View.php(视图类)、Controller.php(控制器类);2、 Model.php(模型类)中,封装了获取数据库数据的方法;3、 View.php(视图类)中,封装了显示界面;4、 Controller.php(控制器类)中,封装了服务容器Container类;5、 服务容器Container类中,提供了bind(绑定数据)、make(读取数据)两个方法;6、 实例化容器Container类后,给定关键字,通过匿名函数将实便化的模型类、视图类,绑定到实便化的容器类中;7、 通过实例化Controller.php(控制器类),并通过关键字来获得模型类数据,并渲染到视图类中;8、 不是很非常能理解容器类的使用和代码意思,不知道我这样理解对不对???
<?php// 模型类class Model{// 获取数据的方法public function getData(){//连接数据库$pdo = new PDO('mysql:dbname=phpedu', 'root', 'root');//每页显示员工信息的条目数量$num = 10;//目前显示是第几页,默认为第1页$page = $_GET['p'] ?? 1;//页面加载的偏移量, 用于分布,给到sql语句使用,select * from `staffs` limit {$offset}, {$num};$offset = ($page - 1) * $num;//计算分页数量//获取分页后总条目数, 使用别名total后,变量$pageNum Array的结果:( [ceil(count(*)/10)] => 8 )$stmt = $pdo->prepare("select ceil(count(*)/{$num}) as total from `staffs`;");$stmt->execute();$pageNum = $stmt->fetch()['total'];//获取员工数据$staffs,给到table渲染$stmt = $pdo->prepare("select * from `staffs` limit {$offset}, {$num}");$stmt->execute();$staffs = $stmt->fetchAll();return $staffs;}}
<?php// 视图class View{// 数据展示public function fetch($staffs){$table = '<table border="1" cellspacing="0">';$table .= '<caption>员工信息表</caption><tr bgcolor="lightcyan"><th>id</th><th>姓名</th><th>性别</th><th>工资</th><th>邮箱</th><th>生日</th></tr>';foreach ($staffs as $staff) {$table .= '<tr>';$table .= '<td>' . $staff['sid'] . '</td>';$table .= '<td>' . $staff['name'] . '</td>';$table .= '<td>' . $staff['gender'] . '</td>';$table .= '<td>' . $staff['salary'] . '</td>';$table .= '<td>' . $staff['email'] . '</td>';$table .= '<td>' . $staff['birthday'] . '</td>';$table .= '</tr>';}$table .= '</table>';return $table;}}
<?php//引入模型类、视图类require 'Model.php';require 'View.php';// 服务容器class Container {// 1. 对象容器private $instances = [];// 2. 添加对象public function bind($alias, Closure $process){$this->instances[$alias] = $process;}// 3.取出对象public function make($alias, $params=[]) {return call_user_func_array($this->instances[$alias], []);}}// 将依赖的外部对象添加到容器中$container = new Container();$container->bind('model',function (){return new Model();});$container->bind('view',function (){return new View();});class Controller {// 1. 获取数据, 2. 渲染视图public function index(Container $container) {// 1. 获取数据$data = $container->make('model')->getData();// 2. 渲染视图return $container->make('view')->fetch($data);}}// 测试// 创建控制器对象$ctrl = new Controller();echo $ctrl->index($container);