Correction status:qualified
Teacher's comments:


我们在使用框架,诸如 ThinkPHP 、Laravel时,访问一个页面,例如:http://localhost/idnex.php/user/admin/id/1,这样就可以找到用户名(user)为admin,id为1的用户了。这是什么原理呢?这个就是通过PATHINFO的方式来进行的参数解析。框架是MVC架构,我们也知道,框架在运行过程中,我们实际上访问的是控制器的方法,因此,url地址最终肯定都要定位到一个控制器方法中。
案例:假设当前demo1.php脚本当成框架的入口文件(类似于TP中的index.php入口文件)。即访问地址是:http://localhost:8888/PHP/20210305/demo1.php?controller=user&action=show。
控制器类
class UserController{public function show() : string{return "Hello, World!";}}
// 通过url地址获取controller和action参数$controller = ucfirst($_GET['controller']) . 'Controller';$action = $_GET['action'];// 实例化控制器类,调用show方法echo (new $controller)->$action();
但是上述通过查询字符串的格式的地址,对于搜索引擎不友好,可以用PATHINFO来优化,地址可以变更成为:http://localhost:8888/PHP/20210305/demo1.php/controller/user/action/show
// 获取PATHINFO路径$pathinfo = $_SERVER['PATH_INFO'];// 将PATHINFO路径以“/”为分隔符,切割成一个数组$queryArr = explode('/', ltrim($pathinfo, '/'));$controller = ucfirst(array_shift($queryArr)) . 'Controller';$action = array_shift($queryArr);echo (new $controller)->$action();
如果,我们要在PATHINFO路径中传参又该如何解析呢?下面,我把上述的访问地址改造一下,修改成带参数的PATHINFO路径:http://localhost:8888/PHP/20210305/demo1.php/user/show/id/10/name/admin。
namespace mvc;class UserController{public function show(int $id, string $name) : string{return "Hello, {$name}! => {$id}";}}
根据上述访问地址,先拿到PATHINFO路径,以“/”为分隔符,将其切割成一个数组,并过滤掉数组中键值为空的元素:
$pathinfo = array_filter(explode('/', $_SERVER['PATH_INFO']));

然后根据上面拿到的结果,生成控制器和方法:
// 生成控制器$controller = __NAMESPACE__ . '\\' . array_shift($pathinfo) . 'Controller';// 生成方法$action = array_shift($pathinfo);
生成了控制器和方法之后,此时就可以将参数从PATHINFO中解析出来了,我们现在先打印一下目前$pathinfo的值:
printf('<pre>%s</pre>', print_r($pathinfo, true));

从上面的结果可以看出,数组中的元素,两两为一组,就是PATHINFO路径中传递的参数值,可以用一个循环将参数和其值保存起来:
// 创建一个空数组保存参数$params = [];for ($i=0; $i < count($pathinfo); $i += 2) {$params[$pathinfo[$i]] = $pathinfo[$i + 1];}
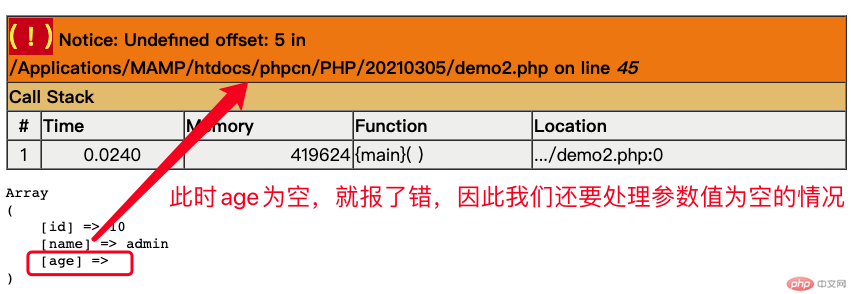
同时,我们需要考虑的一个问题是:用户有可能在传参的时候传了一个空值,如果我们不处理的话就会造成错误:

// 创建一个空数组保存参数$params = [];for ($i=0; $i < count($pathinfo); $i += 2) {// 判断当前循环的$i+1的值是否存在if (isset($pathinfo[$i + 1])) {$params[$pathinfo[$i]] = $pathinfo[$i + 1];}}// 异步调用echo call_user_func_array([(new $controller), $action], $params);
这样就不会存在传递的参数中有空值而报错的情况了。
Hello, admin! => 10
API接口使用的是聚合数据提供的免费API,该案例主要是为了研究如何调用第三方接口获取一些数据。我找了一个成语接龙的免费接口做测试案例,下面分享一下我写的代码。
declare(strict_types = 1);namespace homework\api;use Exception;class API{/*** 请求api** @var string*/private $baseUrl = 'http://apis.juhe.cn/idiomJie/query';/*** 请求参数数组** @var array*/public $params = [];/*** 初始化参数** @param array $params*/public function __construct(array $params = []){$this->params = $params;}/*** 从API获取数据** @return string*/public function getQueryData() : string{// 构造查询参数$query = http_build_query($this->params);// 完整的查询API地址$url = $this->baseUrl.'?'.$query;// echo $url;// cURL:发起一个http请求return $this->curl_get($url);}/*** 创建cURL请求** @param string url地址* @return string*/public function curl_get(string $url) : string{// 初始化cURL$ch = curl_init();// 设置请求的url完整地址curl_setopt($ch, CURLOPT_URL, $url);// 设置请求类型curl_setopt($ch, CURLOPT_HTTPGET, true);// 设置hedaer头信息,这里不需要就去掉curl_setopt($ch, CURLOPT_HEADER, false);// 默认是浏览器输出,只返回不输出curl_setopt($ch, CURLOPT_RETURNTRANSFER, true);// 执行curl$data = curl_exec($ch);if ($data) {curl_close($ch);return $data;} else {$errno = curl_errno($ch);curl_close($ch);throw new Exception("curl出错,错误码:$errno");}}}$api = new API(['key' => '6a2fb6390f349aec8661a7e9ddae141c', 'wd' => $_REQUEST['val']]);echo $api->getQueryData();
<!DOCTYPE html><html lang="en"><head><meta charset="UTF-8"><meta http-equiv="X-UA-Compatible" content="IE=edge"><meta name="viewport" content="width=device-width, initial-scale=1.0"><title>API接口请求数据示例</title><style>* {box-sizing: border-box;}.form {width: 40rem;height: 3rem;margin: 5rem 10rem 0;overflow: hidden;border-radius: 0;}form {width: 40rem;height: 3rem;position: relative;}form input {width: 34rem;height: 3rem;/* border-radius: 10px; */border-top-left-radius: 10px;border-bottom-left-radius: 10px;outline: none;border: none;font-size: 1.5rem;text-indent: .5rem;border: 2px solid #c4c7ce;transition: all .5s;}form input:hover {transition: all .5s;border-color: #4e6ef2;}form button {width: 6rem;height: 3rem;border-top-right-radius: 10px;border-bottom-right-radius: 10px;background-color: #4e6ef2;font-size: 1.1rem;border: 2px solid #4e6ef2;color: #fff;position: absolute;right: 0;top: 0;outline: none;cursor: pointer;}ul, li {list-style: none;margin: 0;padding: 0;}.content {width: calc(100% - 6rem);border: 2px solid #4e6ef2;border-top-width: 0;height: 25rem;padding: 1rem 0 0 1rem;}ul {width: 100%;height: calc(100% - 1rem);background-color: #fff;overflow-y: scroll;}ul li {width: 100%;line-height: 1.6rem;}</style></head><body><div class="form"><form method="get" name="form" onsubmit="return false;"><input type="text" value="" placeholder="输入成语的最后一个字查找相关成语"><button type="button">查找一下</button></form><div class="content"><ul></ul></div></div><script>const form = document.querySelector('.form');const btn = document.querySelector('button');const ul = document.querySelector('ul');const input = document.querySelector('input');// 点击搜索按钮执行ajaxbtn.onclick = ev => {ev.preventDefault();getData();ev.stopPropagation();};// 点击回车键执行ajaxinput.addEventListener("keydown", ev => {console.log(ev);if (ev.keyCode === 13) {getData();}ev.stopPropagation();});input.addEventListener('input', ev => {console.log(ev);if(ev.target.value === '') {ul.innerHTML = null;form.style.height = '3rem';input.style.borderColor = '#c4c7ce';input.style.borderTopLeftRadius = '10px';input.style.borderBottomLeftRadius = '10px';}});/*** ajax获取数据** @return void*/function getData() {// 输入框里的内容const val = input.value;// 1.创建xhr对象let xhr = new XMLHttpRequest;// 2.配置xhr请求参数xhr.open('get', `api.php?val=${val}`);xhr.responseType = 'json';// 3.响应xhr请求// 成功xhr.onload = () => {form.style.height = 'auto';input.style.borderColor = '#4e6ef2';input.style.borderRadius = '0';console.log(xhr.response);const result = xhr.response;const frag = document.createDocumentFragment();for (let i = 0; i < result.result.total_count; i++) {const li = document.createElement('li');li.textContent = result.result.data[i];frag.appendChild(li);}ul.appendChild(frag);}// 失败xhr.onerror = () => {console.log('xhr error...');}// 4.发送xhrxhr.send(null);}</script></body></html>
心得总结:其实大部分的第三方API,一般都给的有文档,我们只需要按照文档来进行操作即可,有的还给出的有demo案例,如果真的不会可以先跑一遍别人的demo试一下。