

我们在开发项目时,会用到很多的静态资源,我们在浏览器,浏览网页时,网页加载的速度就会变慢,而且有很多的文件都是相互依赖的。
webpack 是前端的一个项目构建工具,它是基于 Node.js 开发出来的一个前端工具

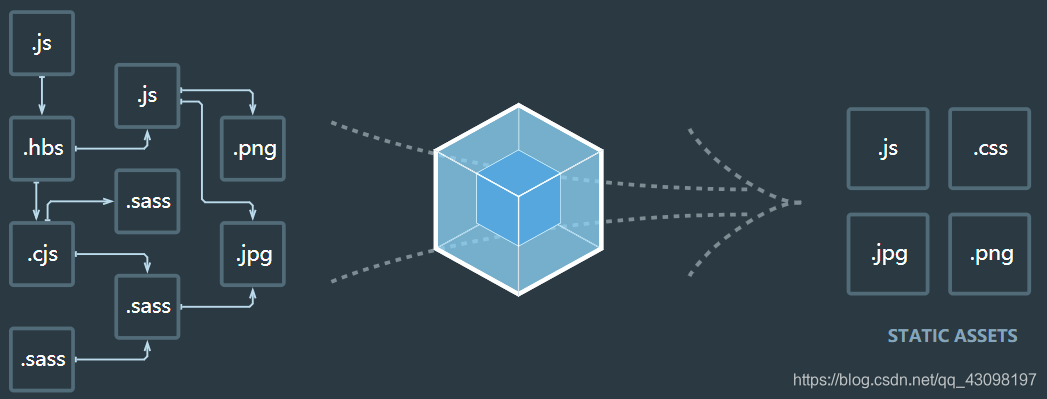
从图中我们可以看出,Webpack 可以将多种静态资源 js、css、less 转换成一个静态文件,减少了页面的请求。
npm i webpack -g全局安装webpack,这样就能在全局使用webpack的命令npm i webpack --save-dev安装到项目依赖中
初始化项目,会在项目的根目录下生成一个package.json文件
npm init -y
安装webpack和webpack-cli(webpack4.0以后需要单独安装)
npm install webpack webpack-cli --save-dev
node_modules\.bin\webpackpackage.json文件编写index.js,简单写一句输出语句即可
console.log("ok");
输入打包命令
webpack ./src/index.js -o ./dist/bundle.js
在webpack4.0以后,打包命令需要加-o,不然回报如下错误
成功,你会发现 dist 目录下多了一个main.js的文件
在index.html中引入 dist 目录下的main.js文件
<script src="../dist/main.js"></script>
F12打开控制台,输出ok就行webpack.config.js文件
const path = require('path');module.exports = {// 配置入口(要打包的文件)entry: path.join(__dirname, './src/index.js'),// 输出文件相关配置output: {// 配置出口,指定打包好的文件存放路径path: path.join(__dirname, './dist'),// 要输出的文件名filename: 'main.js'},mode: 'development'}
直接输入webpack命令即可
你或许会遇见下面的黄色警告
黄色警告:是因为webpack4引入了模式,有开发模式,生产模式,无这三个状态
可以看到末尾并没有生成我们所打包的main.js的信息
黄色部分的警告的意思是,没有设置模式,有开发模式和生产模式两种,
webpack.config.js添加属性:mode: 'development'
index.css文件,写点样式
body {background-color: green;}
在index.js文件中,将css引入
import './css/index.css';
此时我们打包后,会报下面错误

You may need an appropriate loader to handle this file type,
currently no loaders are configured to process this file.
它的意思是说:没有一个合适的加载器
这时我们需要安装第三方loader加载器
css-loader:用于处理 css 文件,使得能在 js 文件中引入使用;
style-loader:用于将 css 文件注入到 index.html 中的 <style> 标签上;
安装命令
npm i style-loader css-loader --save-dev
webpack.config.js中,配置第三方匹配规则
// 配置第三方模块module: {// 配置匹配规则rules: [{test: /\.css$/, // 匹配以后缀为.css的文件use: ['style-loader', 'css-loader']}]}
<style>标签中了,且背景已经绿了index.scss文件
body {div {width: 250px;height: 250px;border: 2px solid #000;margin: 10px;}#a {font-size: 20px;}#b {color: red;}}
index.html中,添加如下
<div id="a">aaaaaa</div><div id="b">bbbbbb</div>
index.js引入index.scss文件
import './css/index.scss';
node-sass和sass-loader
npm i node-sass sass-loader --save-dev
webpack.config.js配置module.rules匹配规则
{test: /\.scss$/,use: ['style-loader', 'css-loader', 'sass-loader']}
打开F12后,已经成功了
index.less文件
body {div {color: #fff;}}
index.js引入index.less
import './css/index.less';
less和less-loader
npm i less less-loader --save-dev
webpack.config.js中,配置module.rules匹配规则
{test: /\.less$/,use: ['style-loader', 'css-loader', 'less-loader']}
打包测试
F12查看,看得出来,成功了

index.js中
console.loo("ok");
别怀疑,对,就是console.loo(),很明显,这个是一个错误的语句。
webpack.config.js中,开启 source-map
module.exports = {// ...devtool: 'source-map', // 开启 source-map// ...}
webpack.config.js中,module.rule 配置如下
rules: [{test: /\.(sc|sa|le|c)ss$/,use: ["style-loader",{loader: 'css-loader',options: {sourceMap:true}},{loader: 'sass-loader',options: {sourceMap: true}},{loader: 'less-loader',options: {sourceMap: true}}]}]
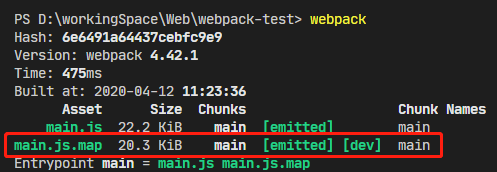
dist目录下,多了个main.js.map文件,这个文件里面是映射的对应关系


url-loader和file-loader
npm i url-loader file-loader --save-dev
webpack.config.js中,配置module.rules
rules: [{test: /\.(png|jpg|gif|bmp|jpeg)$/,use: ['url-loader']}]
#a添加一张背景图
data:image/jpeg;base64,/9j/4AAQSkZJRgABAQAAAQABAAD/2wBDAAEBAQEBAQEB...FFFABRRRQB/9k=
url-loader的一些参数
use: ['url-loader?limit=53251&name=[hash:8]-[name].[ext]']
作用:我们每次只要把文件修改一下,就需要进行重新打包,这样非常麻烦,而webpack-dev-server就是为此诞生的。
安装
npm i webpack-dev-server --save-dev
package.json,配置scripts,如下
"scripts": {// ..."webpack-dev-server": "webpack-dev-server"// ...},
key可以随意,你可以直接写成dev,我这样写,也仅仅只是随便记住这个单词,哈哈。
npm run webpack-dev-server
i 「wds」: Project is running at http://localhost:8080/i 「wds」: webpack output is served from /
第一条:项目运行地址
第二条:输出文件的位置在/下,也就是项目根目录下
修改index.js中的代码,重新刷新浏览器(不用重新打包),也发现没有任何效果,那是因为输出文件被放到项目根目录下了
<!-- 开启 webpack-dev-server 后,输出文件在 项目根目录下 --><script src="../main.js"></script>
"scripts": {// ..."webpack-dev-server": "webpack-dev-server --open --port 8888 --contentBase src --hot"// ...},
webpack-dev-server的第二种配置方式(了解)
webpack.config.js中,module.exports 配置属性
devServer: {open: true,port: 8888,contentBase: 'src',hot: true // 启用热更新的第一步}
webpack.config.js中,顶部引入
const webpack = require('webpack');
webpack.config.js中,module.exports配置属性
plugins: [// 创建热更新的模板对象new webpack.HotModuleReplacementPlugin()]
有些时候,我们写的ES6代码,浏览器并不支持,所以需要将ES6的代码,转为更低级的,浏览器可以识别的。
index.js编写一段ES6代码
class Person {static info = {name: '小灵',age: 17}}console.log(Person.info);
cnpm i babel-loader @babel/core @babel/preset-env -Dcnpm i @babel/plugin-proposal-class-properties -D
webpack.config.js配置如下,配置module.rules
rules: [{test: /\.js$/,use: {loader: 'babel-loader',options: {presets: ['@babel/preset-env'],plugins: ['@babel/plugin-proposal-class-properties']}},exclude: /node_modules/}]
options这一块可以移到项目根目录的.babelrc文件
{"presets": ["@babel/env"],"plugins": ["@babel/proposal-class-properties"]}
安装vue-loader和vue-template-compiler
cnpm i vue vue-loader vue-template-compiler -D
index.js导入Vue
import Vue from 'vue';
dist/vue.runtime.common.js的,所以需要修改一下
import Vue from '../node_modules/vue/dist/vue.js'
webpack.config.js中添加如下(推荐)
module.exports = {// ...resolve: {alias: {"vue$": "vue/dist/vue.js"}}// ...}
webpack.config.js中,在 vue-loader 15.* 之后,要添加如下
const vueLoaderPlugin = require('vue-loader/lib/plugin');
webpack.config.js中,plugins 配置如下
module.exports = {// ...plugins: [new vueLoaderPlugin()]// ...}
App.vue组件.vue组件中,只能有<template>、<script>、<style>三样标签
<template><h1>App 组件</h1></template><script></script><style></style>
webpack.config.js中,module.rules 配置属性
rules: [{test: /\.vue/, use: 'vue-loader'}]
index.html添加如下
<div id="app"></div>
index.js中导入App.vue组件
import App from './js/App.vue';
var vm = new Vue({el: '#app',render: function(createElements) {return createElements(App);}});
<script>引入放到底端即可安装vue-router
cnpm i vue-router -D
index.js如下
import Vue from 'vue';import VueRouter from 'vue-router'// 手动安装 VueRouterVue.use(VueRouter);// 导入 login 组件import login from './js/login.vue'// 创建路由对象var router = new VueRouter({routes: [{path: '/login', component: login}]});var vm = new Vue({el: '#app',render: els => els(App),router});
导入:
导出:
注意:
导入:
导出:
安装
cnpm i html-webpack-plugin -D
webpack.config.js引入
const htmlWebpackPlugin = require('html-webpack-plugin');
plugins: [// 在内存中生成一个 HTML 插件new htmlWebpackPlugin({// 指定模板页面template: path.join(__dirname, './src/index.html'),// 指定生成的文件名filename: 'index.html'})],
VM开头的文件