


1.了解盒模型
盒模型,即box model,本质是一个盒子,封装周围的HTML元素,它包含了边界、边框、填充和内容四个属性,它允许我们在其他元素和周围元素边框之间放置元素。可以这么理解,每个HTML元素都是一个盒子,这个盒子又包着几个更小的盒子,它们一层包裹着一层,这就是盒模型。注:图片、表单之类的并不是盒子,只能看作文本,因为他们不能像盒子一样放东西,他们本身就是内容。
如图所示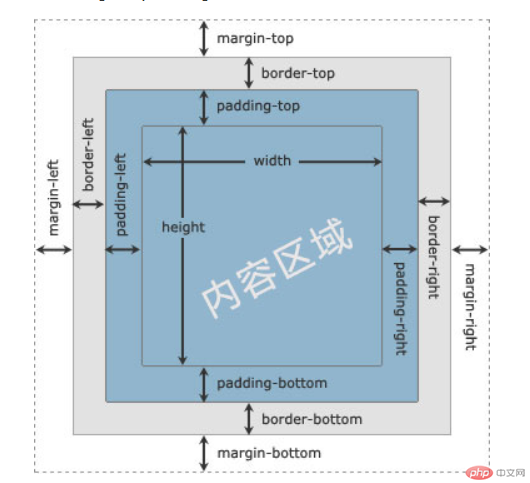
外边距(margin);边框(border);内边距(padding);内容(content);高度(height);宽度(width)
2.padding和margin的语法结构和浏览器兼容问题
padding语法结构
(1)padding-top:10px;上内边距
(2)padding-bottom:10px;下内边距
(3)padding-left:10px;左内边距
(4)padding-right:10px;右内边距
(5)padding:10px;四边统一内边距
(6)padding:10px 20px;上下、左右内边距
(7)padding:10px 20px 30px;上、左右、下内边距
(8)padding:10px 20px 30px 40px;上、右、下、左内边距
margin语法结构
(1)margin-top:10px;上外边距
(2)margin-bottom:10px;下外边距
(3)margin-left:10px;左外边距
(4)margin-right:10px;右外边距
(5)margin:10px;四边统一外边距
(6)margin:10px 20px;上下、左右外边距
(7)margin:10px 20px 30px;上、左右、下外边距
(8)margin:10px 20px 30px 40px;上、右、下、左外边距
浏览器兼容问题
(1)所有浏览器都支持padding属性和margin属性
()任何版本都不支持属性值“inherit”
3.box-sizing功能
词义:允许你以特定的方式定义某个区域的特定元素
属性与说明
content-box:指定的宽度和高度的行为。指定元素的宽度和高度(最小/最大属性)适用于box的宽度和高度,元素的填充和边框布局和绘制指定宽度和高度除外。
此属性表现为标准模式下的盒模型(w3c盒模型)。
取值:Element width(实际宽度)=width+border+padding
border-box:指定宽度和高度(最小/最大属性)确定元素边框。也就是说,对元素指定宽度和高度包括了padding和border。通过从已设定的宽度和高度分别减去边框和内边距才能得到内容的宽度和高度。
此属性表现为怪异模式下的盒模型(IE盒模型)。
取值:Element width(实际宽度)=width
inherit:指定box-sizing 属性的值,应该从父元素继承。
4.box-sizing功能实例
在浏览器页面按“F12”键,打开开发者模式,选中元素,单机“Elements”,就可以在右侧的“Computed”中查看选中元素的盒模型。
content-box
效果图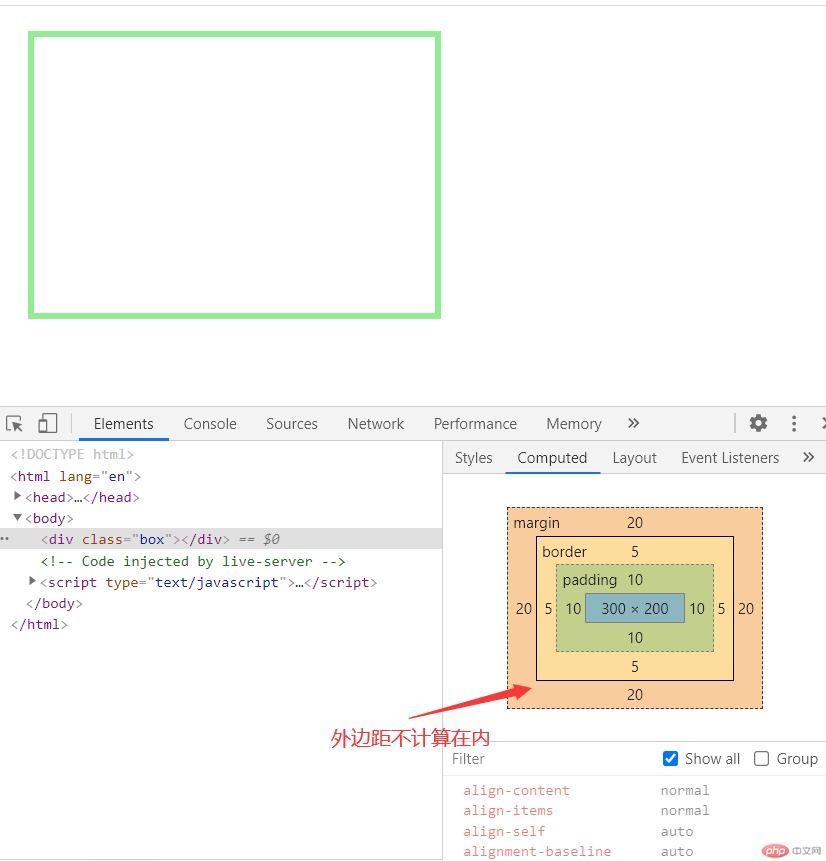
代码块
<!DOCTYPE html><html lang="en"><head><meta charset="UTF-8" /><meta http-equiv="X-UA-Compatible" content="IE=edge" /><meta name="viewport" content="width=device-width, initial-scale=1.0" /><title>content-box</title><style>.box {width: 300px;height: 200px;padding: 10px;border: 5px solid lightgreen;margin: 20px;}</style></head><body><div class="box"></div></body></html>
border-box
效果图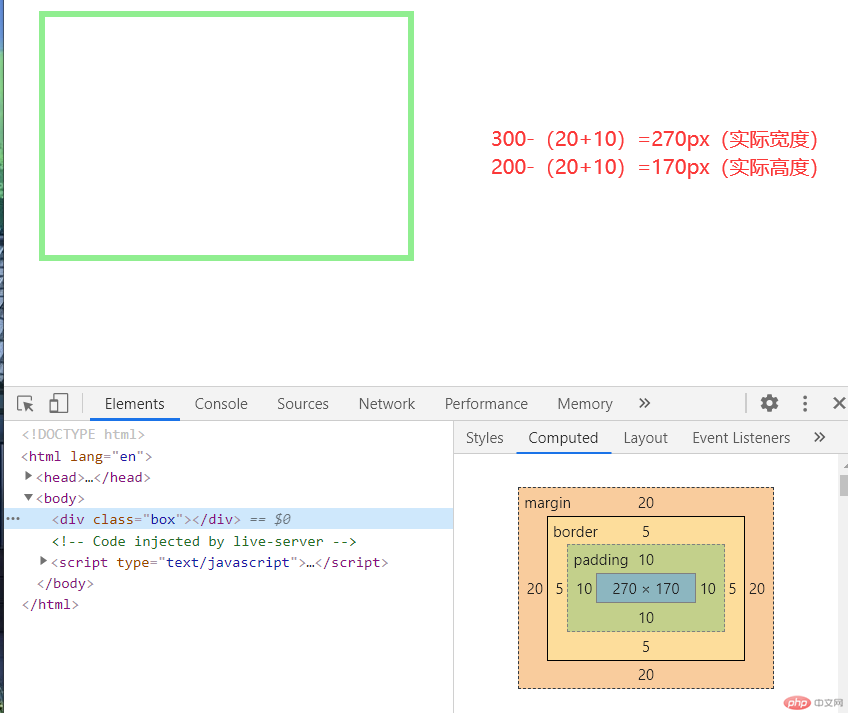
代码块
<!DOCTYPE html><html lang="en"><head><meta charset="UTF-8" /><meta http-equiv="X-UA-Compatible" content="IE=edge" /><meta name="viewport" content="width=device-width, initial-scale=1.0" /><title>border-box</title><style>.box {width: 300px;height: 200px;padding: 10px;border: 5px solid lightgreen;margin: 20px;box-sizing: border-box;}</style></head><body><div class="box"></div></body></html>
border-可以更好的在不破坏整体网页布局情况下改变网页布局
尝试一下
设置border-box改变原本盒模型计算大小方式
效果图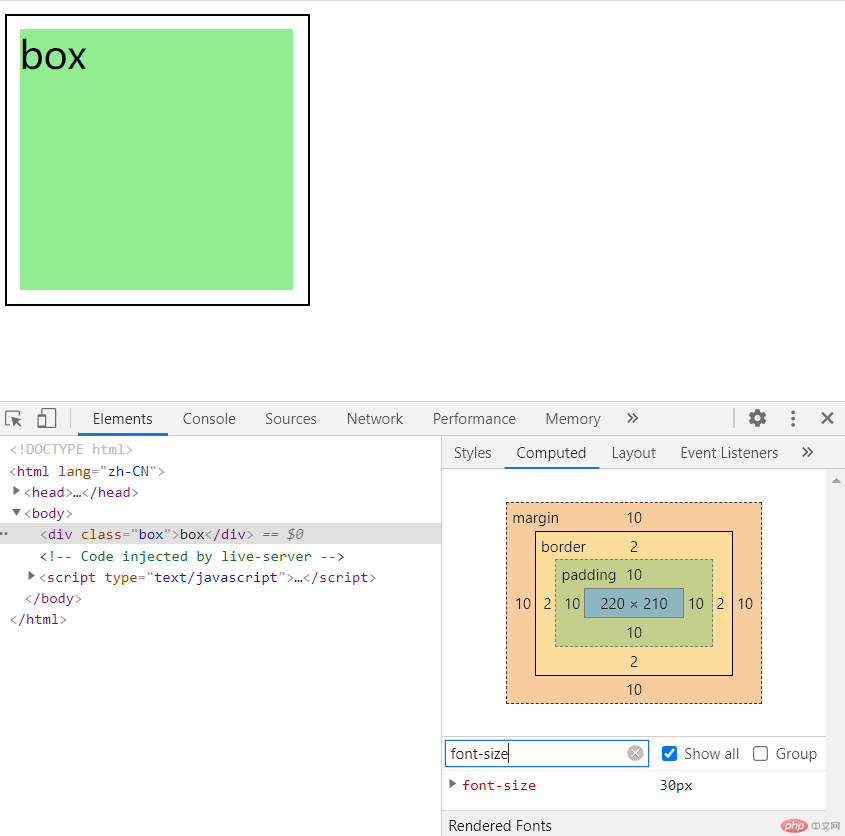
代码块
<!DOCTYPE html><html lang="zh-CN"><head><meta charset="UTF-8" /><meta http-equiv="X-UA-Compatible" content="IE=edge" /><meta name="viewport" content="width=device-width, initial-scale=1.0" /><title>box-sizing</title><style>/* 初始化 */* {margin: 0;padding: 0;box-sizing: border-box;}/* :root ===html */:root {/* font-size: 16px */font-size: 10px;}/* em,rem *//* em: 根据元素的上下文来确定它的值 *//* rem: 根据根元素的字号来设置 */.box {/* font-size: 16px; */font-size: 30px;/* width: 200px; *//* width: 12.5em; *//* width: 12.5rem; */width: 22rem;/* height: 200px; *//* height: 12.5em; *//* height: 12.5rem; */height: 21rem;border: 2px solid;/* border: 上 右 下;顺时针顺序 */padding: 10px 5px 5px 10px;/* 三值:左右相同,而上下不同 */padding: 8px 10px 8px;/* 二值进行简化 */padding: 8px 10px;/* 只要写到第二个参数上,一定代表的是左右 *//* padding: 10px */padding: 1rem;margin: 1rem;background-color: lightgreen;/* 考虑将w3c的标准盒子转为IE的盒子 *//* 将盒子的padding和border计算在with,height内 *//* box-sizing: border-box; *//* 再转为标准盒子 */box-sizing: content-box;background-clip: content-box;}</style></head><body><div class="box">box</div></body></html>
1.定位(position)
设定元素在文档中的位置,可以把标签(元素)转换为块级。你可以理解为把元素放在只有一个象限的坐标轴上进行位移。
2.定位属性的值
(1)static:静态定位
默认值,没有定位,不受 top、bottom、left和right属性(偏移值)的影响。
(2)relative:相对定位
如果对一个元素进行相对定位,它并不会发生变化。可以通过设置偏移值改变其位置,让这个元素相对于它的起点进行移动。
相对定位的特点:
1.如果不设置位置偏移量,元素不会有任何变化;
2.不影响元素本身的特性;
3.使元素不会脱离文档流;
4.提升层级.
(3)absolute:绝对定位
脱离文档流,相对于最近的定位祖先元素进行定位,相对于body(文档主体)做偏移。
绝对定位的特点
1.没有设置偏移量时,元素的位置不会改变;
2.内联元素支持宽高
3.块元素默认由内容撑开高度
4.使元素完全脱离文档流
5.绝对定位一般与相对定位结合使用
6.有定位父级,相对于距离最近的祖先元素偏移。没有父级,相对于document(<html>元素)发生偏移;
7.提升层级。
(4)fixed:固定定位
相对于视口定位,脱离文档流,跟父级的定位没有任何关系。一般在开发中来固定导航栏。
相对定位实例演示
尝试两种不同的办法,让某个元素进行位移
创建3个div元素:box1、box2、box3,从上到下排列,宽高都为200px.
如图1-1所示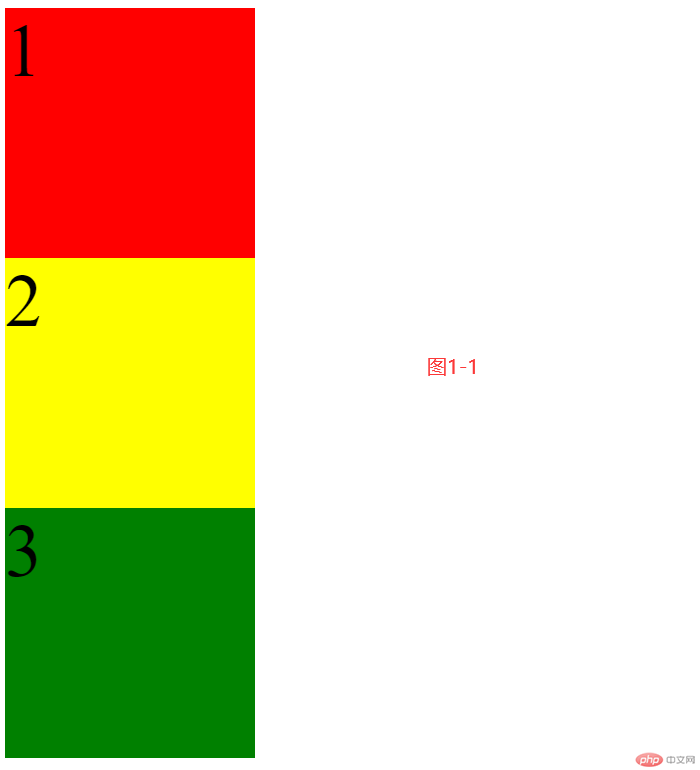
代码块
<!DOCTYPE html><html lang="en"><head><meta charset="UTF-8" /><meta http-equiv="X-UA-Compatible" content="IE=edge" /><meta name="viewport" content="width=device-width, initial-scale=1.0" /><title>相对定位(position:relative)</title><style>body {font-size: 60px;}.box1 {width: 200px;height: 200px;background-color: red;}.box2 {width: 200px;height: 200px;background-color: yellow;}.box3 {width: 200px;height: 200px;background-color: green;}</style></head><body><div class="box1">1</div><div class="box2">2</div><div class="box3">3</div></body></html>
要求仅调整元素的CSS样式,使box2移动到box1的右侧,且box保持不动,得到图1-2的效果。
图1-2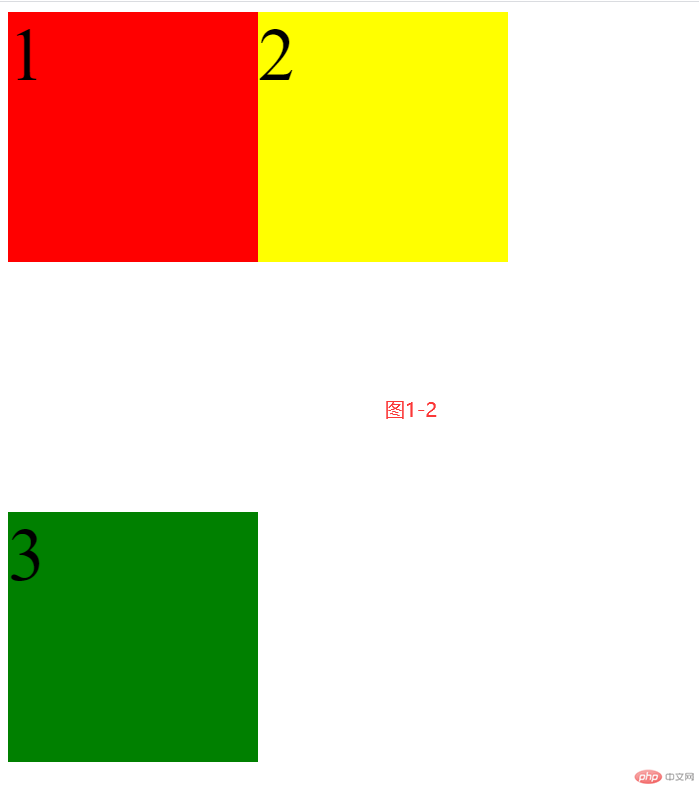
第一种方法,用margin来实现box2的位移
代码块
<!DOCTYPE html><html lang="en"><head><meta charset="UTF-8" /><meta http-equiv="X-UA-Compatible" content="IE=edge" /><meta name="viewport" content="width=device-width, initial-scale=1.0" /><title>相对定位(position:relative)</title><style>body {font-size: 60px;}.box1 {width: 200px;height: 200px;background-color: red;}.box2 {width: 200px;height: 200px;background-color: yellow;margin-left: 200px;margin-top: -200px;}.box3 {width: 200px;height: 200px;background-color: green;margin-top: 200px;}</style></head><body><div class="box1">1</div><div class="box2">2</div><div class="box3">3</div></body></html>
注:box2设置了定位偏移量,所以box2的位置相对于原点发生了偏移,box3便会占用box2原来的位置,出现上移。这时我们可以用到margin,让box3保持不动。
移动一个元素,会影响到其他元素的布局,只会用margin是远远不够的,为了减少麻烦,我们需要用到一种更加灵活、更加高级的布局手段:定位(position)。通过开启定位,你可以把元素摆放到页面任意位置,使用定位属性来设置定位。
第二种更为灵活的方法,用相对定位(position:relative)实现box2的位移。
代码块
.box2 {width: 200px;height: 200px;background-color: yellow;position: relative;left: 200px;top: -200px;}
(复制此段代码,选中1-1中box2的代码,粘贴上去,效果和图1-2一样)
什么叫开启定位
只要定位(position)的值不是默认值(static),而是其余的任意一个定位属性值,就说明开启了定位。
偏移量(offset)
当元素开启了定位以后,可以通过偏移量来设置元素的位置。
top:定位元素和定位位置上边的距离;
bottom:定位元素和定位位置下边的距离;
定位元素垂直方向的位置由top和bottom两个属性来控制,通常情况下只会使用其中一种;
top值越大,定位元素越向下移动,bottom值越大,定位元素越向上移动;
left:定位元素和定位位置的左侧距离;
right:定位元素和定位位置的右侧距离;
通常情况下只会使用其中一种;
left值越大,定位元素越向右移动,right值越大,定位元素越向左移动。
绝对定位实例
把图1-2中的相对定位改为绝对定位,我们发现box2和box3位置都发生了变化,但box2位置有所偏移。如图1-3所示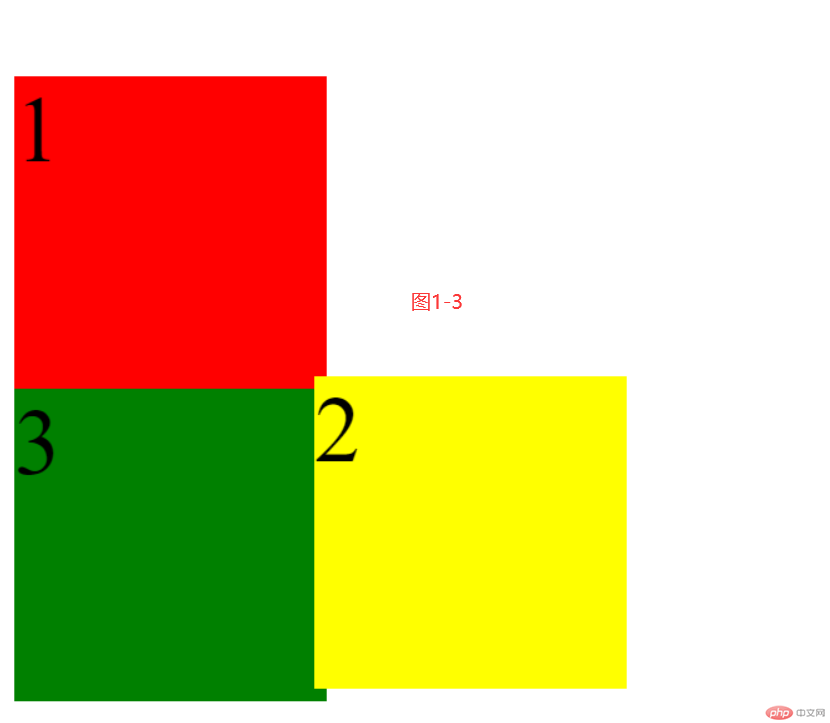
代码块
.box2{width: 200px;height: 200px;background-color: yellow;position: absolute;left: 200px;top: -200px;}
变化原因:
给元素设置绝对定位后,
(1)元素会脱离文档流,box2脱离文档流意味着box3在文档中的布局无视box2的存在,所以出现上移。
(2)box2移动时参考体系发生变化,box2没有已定位的父级元素,所以它是相对于最外层的html元素定位的。
box2位置有所偏移,原因是没有清除body的默认margin值。
怎么才能消除偏移的问题呢?我们有两种方法,都可以实现图1-4所示的效果。
方法一:清除body元素的默认样式。
代码块
html, body{margin: 0;padding: 0;}
方法二:给body设置相对定位,使其成为box2的定位父级。
代码块
body{position: relative;margin: 0;padding: 0;}
效果图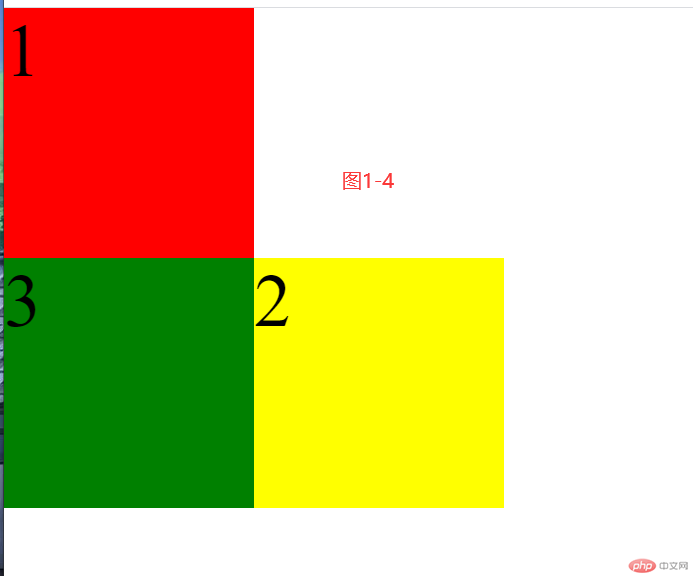
使用绝对定位完成如图1-5所示的布局,需要相对于定位父级移动box2和box3两个元素的位置。开启绝对定位后,位移和元素原来的位置毫无关系,只和参考父级的位置有关系。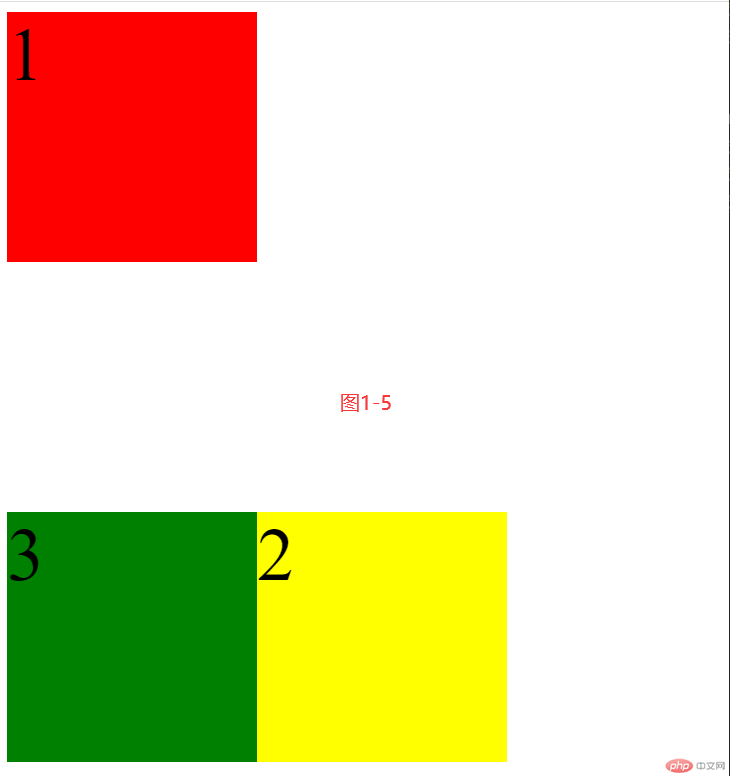
代码块
.box2{width: 200px;height: 200px;background-color: yellow;position: absolute;left: 200px;top: 400px;}.box3{width: 200px;height: 200px;background-color: green;position: absolute;left: 0;top: 400px;}body{position: relative;}
写在最后
相对定位和绝对定位看起来有些复杂,但你可以通过前面的概述和实例,多动手操作,加深理解,尽快掌握。