Correction status:qualified
Teacher's comments:不错


表单的头部一半都是先输入用户注册信息,method有两种数据请求。
post:数据在请求体中,不在url中,安全,可发送大量的数据,例如文件上传
GET:数据在url中,明文发送,适合少量数据,不超过4K。有些数据需要GET,请求参数像书签。还有书签
<formaction="check.php"method="GET"style="display: grid; gap: 0.5em"onsubmit="return false;"></form>
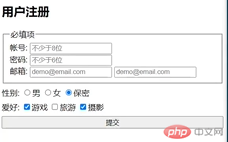
<h2>用户帐号注册</h2><label for="username">帐号:</label><inputtype="text"id="username"name="username"placeholder="不少于9位数"required autofocusvalue="laoshi"/>
<buttom>提交</buttom>
输出:
type中的text改为password可进行密码隐藏
<label for="psw">密码:</label><inputtype="password"id="psw"name="psw"placeholder="不少于6位"required/>
内部样式改为email即可
<label for="email">邮箱:</label><inputtype="email"id="email"name="email"placeholder="demo@email.com"required/>
输出:
单选中的name属性,必须全部一样,才能保证返回到唯一值
checked布尔属性,不需要值,只要存在就是true/真
<div><label for="secret">性别:</label><input type="radio" name="gender" id="male" value="male" /><labelfor="male" >男</label>
<input type="radio" name="gender" id="female" value="female" /><labelfor="female">女</label>
<inputtype="radio"name="gender"id="secret"value="secret"checked/><label for="secret">保</label></div>
输出:
把上面复选框复制过来稍作修改即可.
hobby[]表示数组,可以保存一组不同类型的数据,供后端调用.
id是拿来获取元素的还可以和标签label的绑定.
<div><label>爱好:</label>
<inputtype="checkbox"name="hobby[]"id="trave"value="trave"/><label for="trave">旅游</label>
<inputtype="checkbox"name="hobby[]"id="shoot"value="shoot"/><label for="shoot">游戏</label>
<inputtype="checkbox"name="hobby[]"id="secret"value="secret"checked/><label for="secret">摄影</label></div>
输出:
下拉列表,将变量名和多个值份来来设置,由用户自己选择.
ame,value应该在一个标签内,但是select也就是下拉列表
<div><label>会员等级:</label>
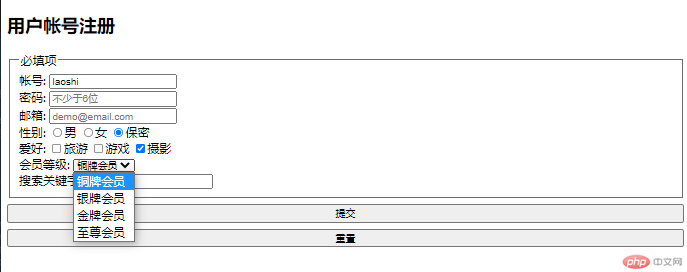
<select name="" id=""><option value="1">铜牌会员</option><option value="2">银牌会员</option><option value="3">金牌会员</option><option value="4">至尊会员</option></div>
输出:
value标签要输入内容才能进行联想
<div><label for="">搜索关键字:</label><input type="search" name="search" list="keywords" /><datalist id="keywords"><option value="怒情湘西">怒情湘西</option><option value="云南虫谷">云南虫谷</option><option value="黄皮子坟">黄皮子坟</option><option value="龙岭迷窟">龙岭迷窟</option></datalist></div>
输出:
默认样式:用户代理 样式,这是浏览器为每一个内置元素设置的默认样式
h1 {display: block;font-size: 2em;margin-block-start: 0.67em;margin-block-end: 0.67em;margin-inline-start: 0px;margin-inline-end: 0px;font-weight: bold;}
自定义样式:用户定义样式
h1 {color: red;background-color: aqua;}
style属性:行内样式,仅限于当前元素
<h1 style="color: royalblue">hello php</h1>
浏览器不检查id的唯一性,唯一性由程序员自己确保
<h2 id="title">今晚天气不错</h2>
选择器:用于选择页面一个或多个元素的字符串
声明1;
声明2;
选择器 + 声明块 + 规则
使用属性选择器
id选择器是高频选择器及常用,简写为#title
<style>[id="title"] {color: red;background-color: aqua;}#title {color: saddlebrown;background-color: salmon;}</style>
<p class="demo">今晚菜很好</p><h2 class="demo">css很好玩</h2>
<style>[class="demo"] {color: brown;background-color: blueviolet;}.demo {color: chartreuse;background-color: cornflowerblue;}</style>```
标签选择器
!important(最高属性) > style属性 > id > class > tag
!important 和style属性都是 用在 样式的调试
<style>h2 {color: crimson !important;}aaa. {color: darkgreen;}#test {color: darkorange;}</style>
<h2 id="test" class="aaa">老师</h2>
三大通用属性:几乎所有的元素都可以使用的属性:style , id, class
选择当前h3有三种选择器:
标签, class, id
将id,class,tag,想像成一个三位整数,初始为 0, 0 ,0
百位 十位 个数
id class tag
0 - 0 - 0
百位对应: id
十位对应: class
个位对应: tag
<h3 id="a" class="b">hello</h3>
h3 {background-color: darkseagreen;}
body h3 {background-color: darkslateblue;}
html body h3 {background-color: deeppink;}
.b {background-color: deepskyblue;}
h3.b {background-color: fuchsia;}
#a {background-color: goldenrod;}
使用外部样式让<h1>标签中的内容变色,先创建一个css样式文件。css加入颜色代码。
<body><h1>春天</h1></body>
css的代码
h1 {color: green;}
回到html文件加入<link>标签,即可使用h1标签中的内容变色
<link rel="stylesheet" href="style.css" />
不用link标签的话用style + import标签也是可以实现的效果
<style>@import url(style.css);</style>
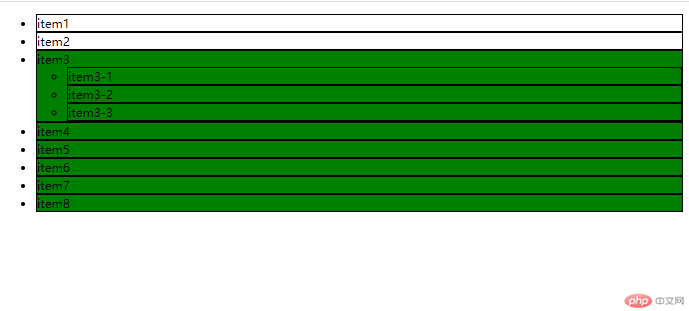
<ul class="list"><li>item1</li><li class="item">item2</li><li>item3<ul><li>item3-1</li><li>item3-2</li><li>item3-3</li></ul></li><li>item4</li><li>item5</li><li>item6</li><li>item7</li><li>item8</li></ul>
输出:
.list > li {border: 1px solid #000;}
.list li {border: 1px solid #000;}
.list .item + li {background-color: green;}
.list .item ~ * {background-color: green;}