Correction status:qualified
Teacher's comments:


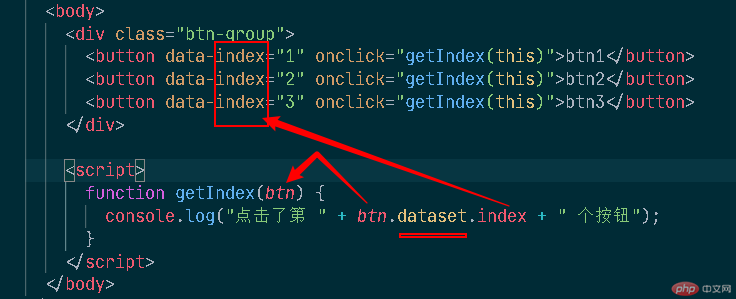
主要用于js脚本控制,以data-为前缀
<body><div class="btn-group"><button data-index="1" onclick="getIndex(this)">btn1</button><button data-index="2" onclick="getIndex(this)">btn2</button><button data-index="3" onclick="getIndex(this)">btn3</button></div></body>
onclick是预定义属性
data-index是自定义属性
看清上图中,不要加“data-”
再看一个例子

注意,“price-lowest”转成驼峰写法“priceLowest”,否则中间的哪个短横会被当做减号。干脆就别用短横,用下划线。
dataset可读可写。
xiGua.dataset.priceLowest = 1.3;console.log(xiGua.dataset.priceLowest);
<!DOCTYPE html><html lang="en"><head><meta charset="UTF-8" /><meta http-equiv="X-UA-Compatible" content="IE=edge" /><meta name="viewport" content="width=device-width, initial-scale=1.0" /><title>Document</title><style>div {width: 150px;height: 100px;}</style></head><body><div style="color: red; background-color: lightcyan">hello</div><script>const div = document.querySelector("div");console.log(div.style.color);console.log(div.style.height); // 用style只能拿到行内样式,拿不到width和heightconsole.log(window.getComputedStyle(div).width);console.log(window.getComputedStyle(div).backgroundColor);const width = window.getComputedStyle(div).width;console.log(width, typeof width); // 拿到的width是个stringconsole.log(typeof parseInt(width)); // 拿到的width是个stringdiv.style.width = parseInt(width) * 2 + "px"; // 这样宽度就扩大了2倍</script></body></html>


<!DOCTYPE html><html lang="en"><head><meta charset="UTF-8" /><meta http-equiv="X-UA-Compatible" content="IE=edge" /><meta name="viewport" content="width=device-width, initial-scale=1.0" /><title>Document</title><style>.red {color: red;}.bgc {background-color: yellow;}.blue {color: blue;}.bd {border: 5px solid black;}</style></head><body><h2>hello</h2><script>const h2 = document.querySelector("h2");// h2.className = "red bgc"; // 这样的方式可以// 建议下面这种用法h2.classList.add("red");h2.classList.add("bgc");// contains用于判断console.log(h2.classList.contains("bgc")); // 返回true// remove用于移除h2.classList.remove("bgc");//replace用于替换h2.classList.replace("red", "blue"); // 第一个参数是被替换的// toggle用于切换h2.classList.toggle("bd");h2.classList.toggle("bd");</script></body></html>

<!DOCTYPE html><html lang="en"><head><meta charset="UTF-8" /><meta http-equiv="X-UA-Compatible" content="IE=edge" /><meta name="viewport" content="width=device-width, initial-scale=1.0" /><title>Document</title></head><body><button>元素对象1</button><button>元素事件监听器</button><button>事件派发</button><script>const btn1 = document.querySelector("button:first-of-type");btn1.onclick = function () {console.log(event);};btn1.onclick = null; // 删除事件const btn2 = document.querySelector("button:nth-of-type(2)");function show() {console.log(event);}btn2.addEventListener("click", show); //添加事件btn2.removeEventListener("click", show); // 移除事件const btn3 = document.querySelector("button:nth-of-type(3)");// 先添加一个事件,然后自动触发他let i = 0;btn3.addEventListener("click",() => {console.log("恭喜,又赚了:" + i + "元");i += 0.8;},false);//创建一个自定义事件const myclick = new Event("click");btn3.dispatchEvent(myclick);btn3.dispatchEvent(myclick);btn3.dispatchEvent(myclick);btn3.dispatchEvent(myclick);//一次性定时器setTimeout(() => btn3.dispatchEvent(myclick), 2000);//连续定时器setInterval(() => btn3.dispatchEvent(myclick), 1000);</script></body></html>