Correction status:qualified
Teacher's comments:


伪类:伪代表假,类代表权重(class级别),可以分发结构伪类和状态伪类。
结构伪类:根据元素位置获取元素。
状态伪类:根据元素状态获取元素。
重点学习结构伪类。
结构伪类主要用来选择子元素,需要知道一个起点然后进行查询。
<!DOCTYPE html><html lang="en"><head><meta charset="UTF-8" /><meta http-equiv="X-UA-Compatible" content="IE=edge" /><meta name="viewport" content="width=device-width, initial-scale=1.0" /><title>伪类查询</title></head><body><!-- 创建一个8行单列的列表 --><!-- ul.list>li{item$}*8 --><ul class="list"><li>item</li><li>item</li><li>item</li><li>item</li><li>item</li><li>item</li><li>item</li><li>item</li></ul><style>/* <!-- 通过伪类选择任意一行,进行操作, *//* 一共8行,取值【1-8】 -- > */.list > li:nth-of-type(4) {background: green;}/* 选中第一行 ,可以用first-child,但是first-child会忽略数据类型,所以以后都用first-of-type来处理*//* 属于单元素伪类 */.list > li:first-of-type {background-color: aquamarine;}/* 选中最后一行 ,属于单元素伪类*/.list > li:last-of-type {background-color: brown;}/* nth-of-type(an+b)参数计算 *//* a:系数,取值0,1,2,3。。。h *//* n:权数,取值从0,1,2,3。。。自动计算 *//* b:偏移量,0,1,2,3,.... *//* 举例 *//* 偶数行字体设置为italic */.list > li:nth-of-type(2n) {font-style: italic;}/* 奇数行字体大小20px,用2n-1或2n+1 */.list > li:nth-of-type(2n-1) {font-size: 20px;}/* 对于常用语法有语法糖,2n用even表示,2n+1用odd表示。 *//* 偶数行鼠标移上去字体变为30px */.list > li:nth-of-type(even):hover {font-size: 30px;cursor: pointer;}/* 奇数行字体颜色设置为lightgreen */.list > li:nth-of-type(odd) {color: lightgreen;}</style></body></html>

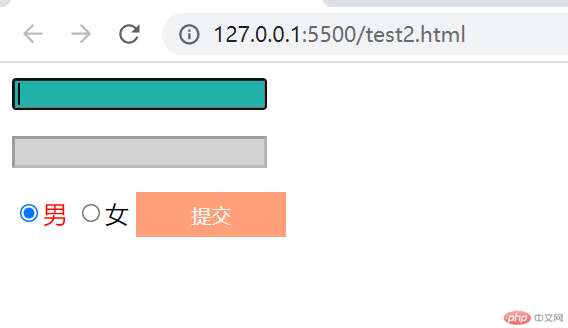
<!DOCTYPE html><html lang="en"><head><meta charset="UTF-8" /><meta http-equiv="X-UA-Compatible" content="IE=edge" /><meta name="viewport" content="width=device-width, initial-scale=1.0" /><title>表单伪类</title></head><body><input type="text" /><!-- 禁用表单,减少攻击项 --><p><input type="text" disabled /></p><input type="radio" name="sex" id="m" value="0" /><label for="m">男</label><input type="radio" name="sex" id="f" value="1" /><label for="f">女</label><button>提交</button><style>/* 将iput设置为disbled的input背景色设置为lightgrey */input:disabled {background-color: lightgrey;}/* 将enbaled的input设置背景未浅绿 */input:enabled {background-color: limegreen;}/* 将选择按钮选中后绑定的lable的字体颜色变为红色 */input:checked + label {color: red;}/* 设置button样式,宽100px,高30px,无边框,无边线,背景绿色,字体白色 */button {width: 100px;height: 30px;border: none;outline: none;background-color: seagreen;color: snow;}/* 鼠标移动到button,背景变为lightsalmon色,鼠标变为小手pointer */button:hover {background-color: lightsalmon;cursor: pointer;}/* 鼠标聚焦到input,背景颜色变为lightseegreen */input:focus{background-color: lightseagreen;}}</style></body></html>

字体图标引用第三方,目前用的最多的是阿里图表,因为免费,样式也不错。
网站地址https://www.iconfont.cn
所有的图像图标实际都是文本。
有三种引用方式:unicode,font class,symbol,推荐使用更方便的font class方式引用。
引用步骤:
打开源码中的demo_index.html按font class的引用步骤操作,如下:
第一步:引入项目下面生成的 fontclass 代码:<link rel="stylesheet" href="./iconfont.css">
第二步:挑选相应图标并获取类名,应用于页面:<span class="iconfont icon-xxx"></span>
“ iconfont” 是你项目下的 font-family。可以通过编辑项目查看,默认是 “iconfont”。
<!DOCTYPE html><html lang="en"><head><meta charset="UTF-8" /><meta http-equiv="X-UA-Compatible" content="IE=edge" /><meta name="viewport" content="width=device-width, initial-scale=1.0" /><link rel="stylesheet" href="./font_icon2/iconfont.css" /><title>字体图标引用</title></head><body><!-- 引用图标class,第一个class必须是iconfont,第二个class是对应图标的class名称 --><p><span class="iconfont icon-chart_bar"></span></p><p><span class="iconfont icon-user"></span></p><p><span class="iconfont icon-home home"></span></p><p><span class="iconfont icon-show eye"></span></p><!-- 通过style设置图表属性,因为图标本质上是文本,所以文本的相关属性设置均可使用 --><style>.iconfont.icon-chart_bar {font-size: 80px;color: red;}.iconfont.icon-user {font-size: 50px;color: royalblue;}.home {font-size: 50px;color: seagreen;}.eye {font-size: 50px;color: tomato;}</style></body></html>

常用的盒模型属性:width,height,border,padding,margin。
实例演示常用属性:
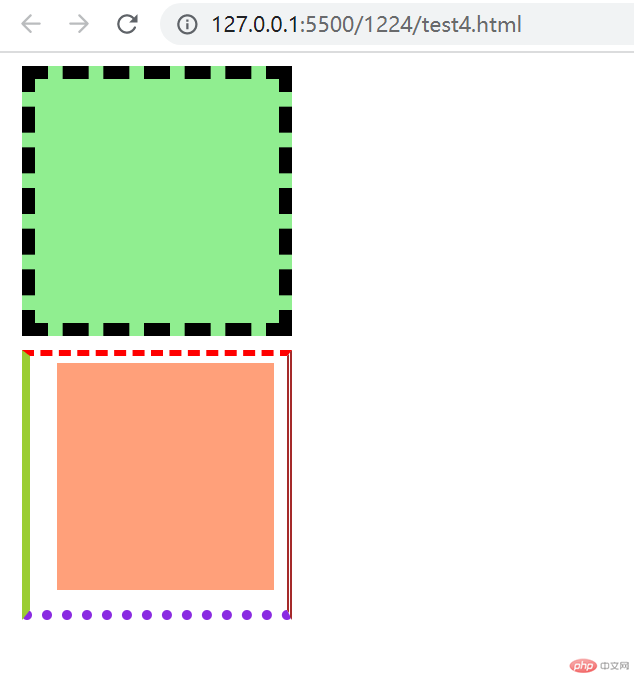
<!DOCTYPE html><html lang="en"><head><meta charset="UTF-8" /><meta http-equiv="X-UA-Compatible" content="IE=edge" /><meta name="viewport" content="width=device-width, initial-scale=1.0" /><title>常用盒模型属性</title></head><!-- 创建5个box实例供实验使用 --><body><div class="box1"></div><div class="box2"></div><div class="box3"></div><div class="box4"></div><div class="box5"></div><style>/* 设置box1宽200px,高200px,边框宽度10px,虚线,黑色,背景色浅绿 *//* 实际box1的宽带计算=200+30*2+10*2=280px,比设计的200px变大了 *//* 此时要想让box1的实际大小为设置的200px,需要添加box-sizing=border-box属性。 */.box1 {width: 200px; /*宽度*/height: 200px; /*高度*/border: 10px dashed black; /*边框宽度,样式,颜色*/background-color: lightgreen; /*box1的背景色*/padding: 20px; /*内边距,呼吸区*/box-sizing: border-box; /*box1宽带包含border和padding宽度*/margin: 10px; /*设置box间距10px*/}.box2 {width: 200px; /*宽度*/height: 200px; /*高度*//* border: 10px solid black;边框宽度,样式,颜色 */background-color: lightsalmon; /*box1的背景色*//* 四值 , 顺时针 *//* padding: 上 右 下 左 ; *//* padding: 5px 10px 15px 20px; *//* 三值 , 中间表示左右*//* padding: 5px 10px 15px; *//* 双值: 第1个上下,第2个左右 *//* padding: 5px 10px; *//* 单值, 四个方向全一样 *//* padding: 5px; *//* padding: 是透明的,只有宽度可以设置 */padding: 5px 10px 15px 20px; /*内边距,呼吸区*/box-sizing: border-box; /*box1宽带包含border和padding宽度*/margin: 10px; /*设置box间距10px*/background-clip: content-box; /*边框背景裁剪到内容区,默认是整个box,如box1*//* 分别设置border得4个边框样式 */border-top: 5px dashed red;border-bottom: 8px dotted blueviolet;border-left: 6px solid yellowgreen;border-right: 4px double brown;}/* 通用初始化box方案 */.box3 {padding: 0px;border: 0px;box-sizing: border-box;}</style></body></html>

px,em,rem,vh,vw
px:是决定单位,和设备相关。
em/rem:相当单位,em相当于当前浏览器的默认字号,推算得1em=16px,1rem=10px。使用该单位可以动态调整大小,利于布局,同时也会受到其他因素限制。
vh/vw:相对固定值,将视口(可视窗口)高度/宽度分成100份,是个比值。1vh=1/100,1vw=1/100
抄录圣杯布局:
<!DOCTYPE html><html lang="zh-CN"><head><meta charset="UTF-8" /><meta http-equiv="X-UA-Compatible" content="IE=edge" /><meta name="viewport" content="width=device-width, initial-scale=1.0" /><title>圣杯布局</title></head><body><header>header</header><aside class="left">left</aside><main>main</main><aside class="right">right</aside><footer>footer</footer><style>* {padding: 0;margin: 0;box-sizing: border-box;}header,footer {background-color: lightgreen;}body {display: grid;grid-template-columns: 6em 1fr 6em;grid-template-rows: 2em minmax(20em, 30em) 2em;}aside {background-color: lightblue;}main {background-color: yellow;}header,footer {grid-column: span 3;}</style></body></html>
