

这篇文章给大家介绍了通过vue的方式,实现扫码功能,实现步骤分为两步,本文通过实例代码给大家介绍的非常详细,感兴趣的朋友跟随小编一起看看吧
提示
这个插件只能在https协议下才能访问,http协议不好使,最好用vue2,vue3容易报错!!!!!
描述
通过vue的方式,实现扫码功能
参考文档:vue-qrcode-reader去官网–>官方文档
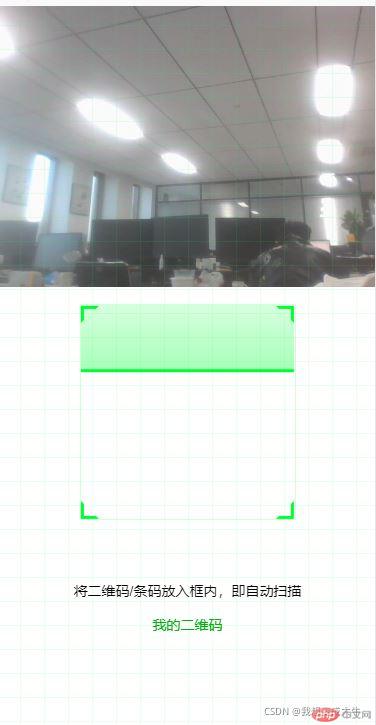
效果展示
实现步骤:
步骤一(安装插件)
npm install —save vue-qrcode-reader
步骤二(创建组件)
因为可能多个页面都会用到,所以弄成了组件
(1)在src下面的components创建qrcode.vue
(2)代码实现
`实现步骤:
步骤一(安装插件)
npm install —save vue-qrcode-reader
步骤二(创建组件)
因为可能多个页面都会用到,所以弄成了组件
(1)在src下面的components创建qrcode.vue
(2)代码实现
// qrcode.vue
<template>
<div>
<!-- <p class="error">{{ error }}</p> -->
<!--错误信息-->
<!-- <p class="decode-result">
扫描结果:
<b>{{ result }}</b>
</p> -->
<!--扫描结果-->
<!-- <p @click="openCamera">打开相机</p>
<div v-show="show" class="cameraMessage">
<p @click="closeCamera">关闭相机</p>
<p @click="openFlash">打开手电筒</p>
<p @click="switchCamera">相机反转</p>
</div> -->
<qrcode-stream
v-show="qrcode"
:camera="camera"
:torch="torchActive"
@decode="onDecode"
@init="onInit"
>
<div>
<div class="qr-scanner">
<div class="box">
<div class="line"></div>
<div class="angle"></div>
</div>
<div class="txt">
将二维码/条码放入框内,即自动扫描
<div class="myQrcode">我的二维码</div>
</div>
</div>
</div>
</qrcode-stream>
</div>
</template>
<script>
// 下载插件
// cnpm install —save vue-qrcode-reader
// 引入
import { QrcodeStream } from ‘vue-qrcode-reader’;
export default {
// 注册
components: { QrcodeStream },
data() {
return {
result: ‘’, // 扫码结果信息
error: ‘’, // 错误信息
// show: false,
// qrcode: false,
qrcode: true,
torchActive: false,
camera: ‘front’,
};
},
methods: {
onDecode(result) {
console.log(result);
this.result = result;
},
async onInit(promise) {
const { capabilities } = await promise;
const TORCH_IS_SUPPORTED = !!capabilities.torch;try {await promise;} catch (error) {if (error.name === 'NotAllowedError') {this.error = 'ERROR: 您需要授予相机访问权限';} else if (error.name === 'NotFoundError') {this.error = 'ERROR: 这个设备上没有摄像头';} else if (error.name === 'NotSupportedError') {this.error = 'ERROR: 所需的安全上下文(HTTPS、本地主机)';} else if (error.name === 'NotReadableError') {this.error = 'ERROR: 相机被占用';} else if (error.name === 'OverconstrainedError') {this.error = 'ERROR: 安装摄像头不合适';} else if (error.name === 'StreamApiNotSupportedError') {this.error = 'ERROR: 此浏览器不支持流API';}}},// 打开相机// openCamera() {// this.camera = 'rear'// this.qrcode = true// this.show = true// },// 关闭相机// closeCamera() {// this.camera = 'off'// this.qrcode = false// this.show = false// },// 打开手电筒// openFlash() {// switch (this.torchActive) {// case true:// this.torchActive = false// break// case false:// this.torchActive = true// break// }// },// 相机反转// switchCamera() {// // console.log(this.camera);// switch (this.camera) {// case 'front':// this.camera = 'rear'// console.log(this.camera)// break// case 'rear':// this.camera = 'front'// console.log(this.camera)// break// }// }
},
};
</script>
<style scoped>
.error {
font-weight: bold;
color: red;
}
.cameraMessage {
width: 100%;
height: 60px;
}
.qr-scanner {
background-image: linear-gradient(
0deg,
transparent 24%,
rgba(32, 255, 77, 0.1) 25%,
rgba(32, 255, 77, 0.1) 26%,
transparent 27%,
transparent 74%,
rgba(32, 255, 77, 0.1) 75%,
rgba(32, 255, 77, 0.1) 76%,
transparent 77%,
transparent
),
linear-gradient(
90deg,
transparent 24%,
rgba(32, 255, 77, 0.1) 25%,
rgba(32, 255, 77, 0.1) 26%,
transparent 27%,
transparent 74%,
rgba(32, 255, 77, 0.1) 75%,
rgba(32, 255, 77, 0.1) 76%,
transparent 77%,
transparent
);
background-size: 3rem 3rem;
background-position: -1rem -1rem;
width: 100%;
/ height: 100%; /
height: 100vh;
/ height: 288px; /
position: relative;
background-color: #1110;
/ background-color: #111; /
}
/ .qrcode-stream-wrapper {
display: flex;
justify-content: center;
align-items: center;
margin-top: 82px;
clear: both;
} /
/ .qrcode-stream-wrapper >>> .qrcode-stream-camera {
width: 213px;
height: 210px;
clear: both;
margin-top: 39px;
} /
.qr-scanner .box {
width: 213px;
height: 213px;
position: absolute;
left: 50%;
top: 50%;
transform: translate(-50%, -50%);
overflow: hidden;
border: 0.1rem solid rgba(0, 255, 51, 0.2);
/ background: url(‘http://resource.beige.world/imgs/gongconghao.png‘) no-repeat center center; /
}
.qr-scanner .txt {
width: 100%;
height: 35px;
line-height: 35px;
font-size: 14px;
text-align: center;
/ color: #f9f9f9; /
margin: 0 auto;
position: absolute;
top: 70%;
left: 0;
}
.qr-scanner .myQrcode {
text-align: center;
color: #00ae10;
}
.qr-scanner .line {
height: calc(100% - 2px);
width: 100%;
background: linear-gradient(180deg, rgba(0, 255, 51, 0) 43%, #00ff33 211%);
border-bottom: 3px solid #00ff33;
transform: translateY(-100%);
animation: radar-beam 2s infinite alternate;
animation-timing-function: cubic-bezier(0.53, 0, 0.43, 0.99);
animation-delay: 1.4s;
}
.qr-scanner .box:after,
.qr-scanner .box:before,
.qr-scanner .angle:after,
.qr-scanner .angle:before {
content: ‘’;
display: block;
position: absolute;
width: 3vw;
height: 3vw;
border: 0.2rem solid transparent;
}
.qr-scanner .box:after,
.qr-scanner .box:before {
top: 0;
border-top-color: #00ff33;
}
.qr-scanner .angle:after,
.qr-scanner .angle:before {
bottom: 0;
border-bottom-color: #00ff33;
}
.qr-scanner .box:before,
.qr-scanner .angle:before {
left: 0;
border-left-color: #00ff33;
}
.qr-scanner .box:after,
.qr-scanner .angle:after {
right: 0;
border-right-color: #00ff33;
}
@keyframes radar-beam {
0% {
transform: translateY(-100%);
}
100% {
transform: translateY(0);
}
}
</style>
(3)在需要扫码的页面引入//
import qrcode from '@/components/qrcode.vue';
(4)注册组件//
components: {
‘vue-qrcode’: qrcode,
},
5)使用组件
`// 在需要展示二维码的地方进行渲染
<vue-qrcode />
//如果上面这个不好使,可以用下面这个
<vue-qrcode></vue-qrcode>
到此这篇关于vue实现二维码扫码功能的文章就介绍到这了,更多相关vue二维码扫码内容请搜索脚本之家以前的文章或继续浏览下面的相关文章希望大家以后多多支持脚本之家!````