


镜像下载、域名解析、时间同步请点击 阿里云开源镜像站
Ansible 是一款开源自动化平台。它是一种简单的自动化语言,能够在Ansible Playbook 中完美地描述 IT 应用基础架构。它也是一个自动化引擎,可运行 Ansible Playbook。
Ansible 可以管理强大的自动化任务,而且能够适应许多不同的工作流和环境。同时,Ansible 新用户可以非常快速地利用它来提高工作效率。
说白了就是批量化部署(控制)其他主机,控制的主机叫做控制节点(master),被控制的主机受控节点(node)
控制节点主机可以是:Linux、Unix
受控节点主机可以是:Linux、Unix、Windows
Ansible Playbook 像是任务书,它采用 YAML 文本文件编辑,易于阅读
当你需要使用 Ansible 时,只需要在控制节点上下载 ansible 和 python,受控节点上只需下载 python 即可(python 的版本要求:python27+ / python35+)
控制节点上还需要编写 Ansible清单和 Ansible配置文件,清单为受控节点分组,配置文件指定了清单的路径、SSH连接的用户和连接细节等等
我们还需要为 SSH 连接做一些相关配置,比如发送公钥,便于我们免密登录
为了方便起见,我们为受控节点的用户配置 免密sudo
基础配置主要是一些简单的配置,为了方便我们做实验也做了统一规定
为了方便我们做实验,我们选用三台不同版本的 操作系统 来做实验,分别是:
[root@master:~]$ cat /etc/redhat-releaseRocky Linux release 8.5 (Green Obsidian)[root@node12:~]$ cat /etc/redhat-releaseCentOS Linux release 7.8.2003 (Core)[root@node13:~]$ cat /etc/redhat-releaseCentOS Stream release 8
当然还可以是其他版本,下载官网有:网易开源镜像站、清华大学开源镜像站、阿里巴巴开源镜像站
选择了版本,再将其 主机名 命名如下,以区分控制节点与受控节点:
[root@master:~]$ hostnamemaster[root@node12:~]$ hostnamenode12[root@node13:~]$ hostnamenode13
为其配置 IP,主机位分别为:11、12、13
[root@master:~]$ ip address show ens332: ens33: <BROADCAST,MULTICAST,UP,LOWER_UP> mtu 1500 qdisc fq_codel state UP group default qlen 1000link/ether 00:0c:29:67:de:22 brd ff:ff:ff:ff:ff:ffinet 192.168.32.11/24 brd 192.168.32.255 scope global noprefixroute ens33valid_lft forever preferred_lft foreverinet6 fe80::20c:29ff:fe67:de22/64 scope link noprefixroutevalid_lft forever preferred_lft forever[root@node12:~]$ ip address show ens332: ens33: <BROADCAST,MULTICAST,UP,LOWER_UP> mtu 1500 qdisc pfifo_fast state UP group default qlen 1000link/ether 00:0c:29:b1:4a:7d brd ff:ff:ff:ff:ff:ffinet 192.168.32.12/24 brd 192.168.32.255 scope global noprefixroute ens33valid_lft forever preferred_lft foreverinet6 fe80::10eb:4b68:b809:f62f/64 scope link noprefixroutevalid_lft forever preferred_lft forever[root@node13:~]$ ip address show ens332: ens33: <BROADCAST,MULTICAST,UP,LOWER_UP> mtu 1500 qdisc fq_codel state UP group default qlen 1000link/ether 00:0c:29:b1:6e:60 brd ff:ff:ff:ff:ff:ffinet 192.168.32.13/24 brd 192.168.32.255 scope global noprefixroute ens33valid_lft forever preferred_lft foreverinet6 fe80::20c:29ff:feb1:6e60/64 scope link noprefixroutevalid_lft forever preferred_lft forever
将 DNS解析 分别写入各自的 /etc/hosts 文件(这里以 master 为例展示)
[root@master:~]$ cat /etc/hosts127.0.0.1 localhost localhost.localdomain localhost4 localhost4.localdomain4::1 localhost localhost.localdomain localhost6 localhost6.localdomain6192.168.32.11 master192.168.32.12 node12192.168.32.13 node13
ping 命令测试
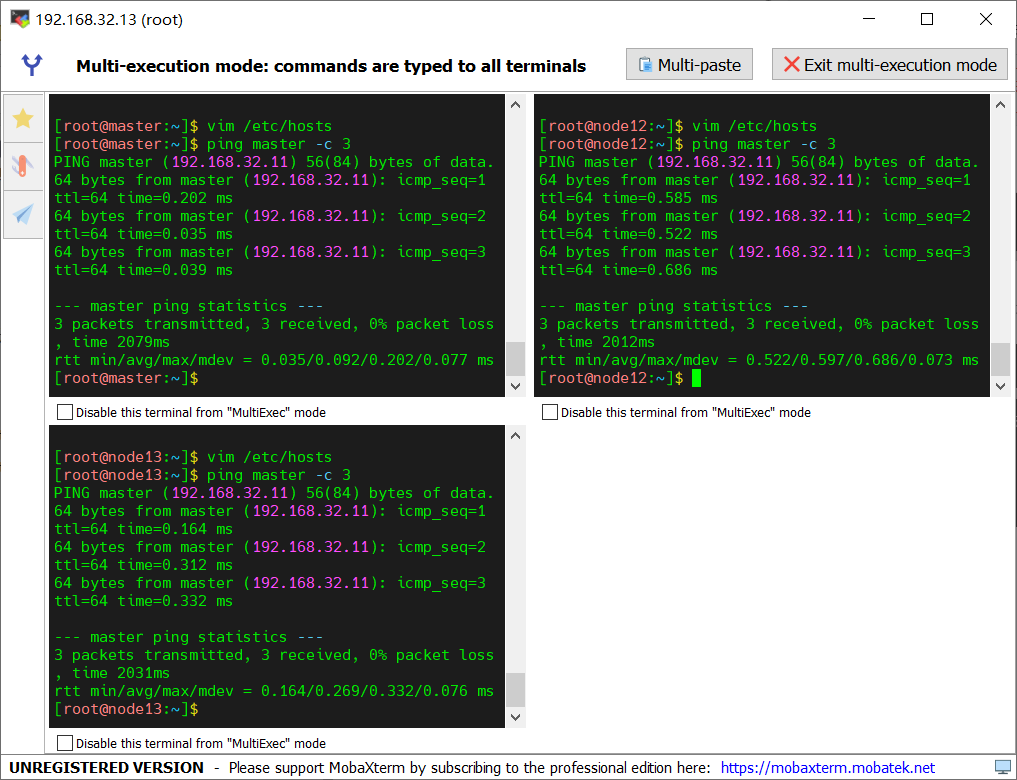
为各自 添加用户,每台主机添加student用户,控制节点额外添加 class 用户
[root@master:~]$ id studentuid=1000(student) gid=1000(student) groups=1000(student)[root@master:~]$ id classuid=1001(class) gid=1001(class) groups=1001(class)[root@node12:~]$ id studentuid=1000(student) gid=1000(student) groups=1000(student)[root@node13:~]$ id studentuid=1000(student) gid=1000(student) groups=1000(student)
为每个 student 用户配置免密sudo:vim /etc/sudoers
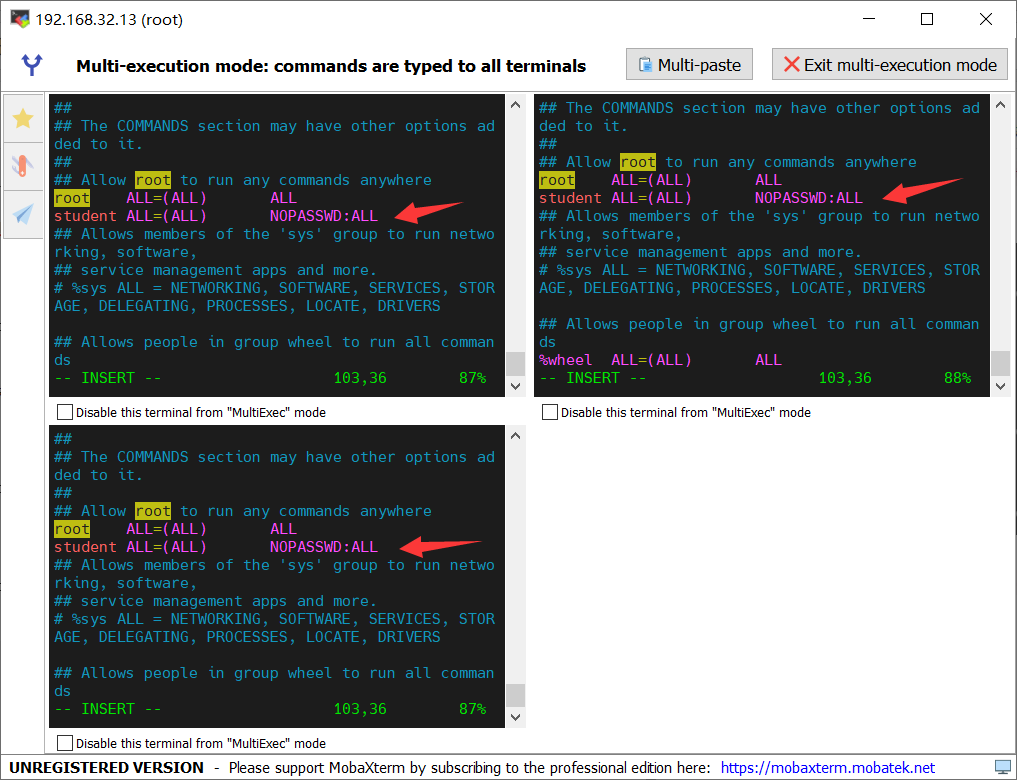
SSH:控制节点生成公私钥,将公钥传给受控节点的 student 用户
##用class用户生成# 生成密钥ssh-keygen# 传公钥ssh-copy-id student@masterssh-copy-id student@node12ssh-copy-id student@node13
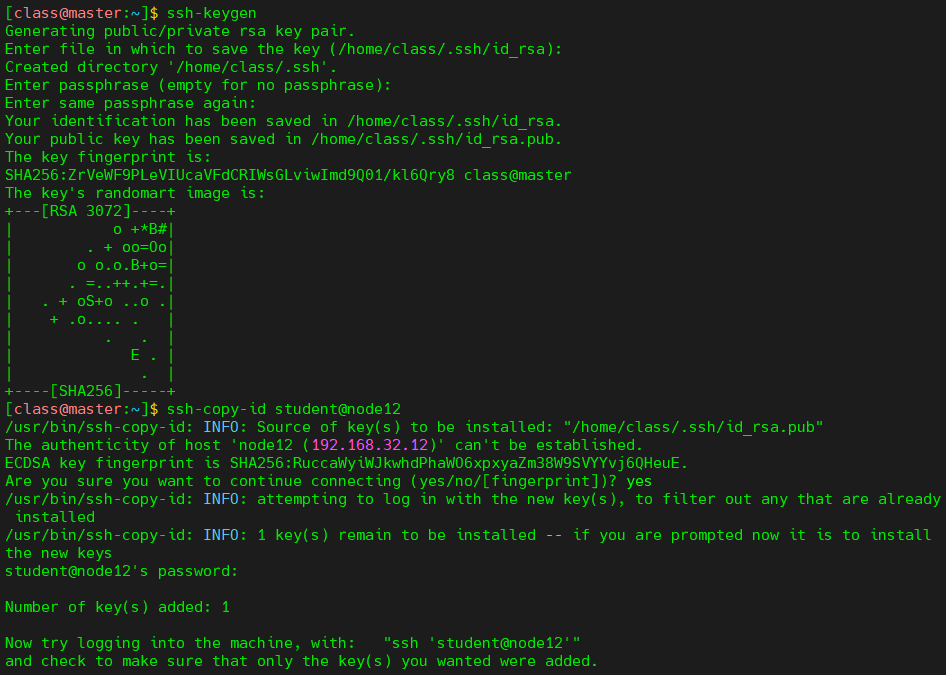
查看各自家目录
[class@master:~]$ ll /home/class/.ssh/total 12-rw------- 1 class class 2602 Feb 19 19:58 id_rsa-rw-r--r-- 1 class class 566 Feb 19 19:58 id_rsa.pub-rw-r--r-- 1 class class 364 Feb 19 19:58 known_hosts[root@master:~]$ ll /home/student/.ssh/total 4-rw------- 1 student student 566 Feb 19 19:58 authorized_keys[root@node12:~]$ ll /home/student/.ssh/total 4-rw------- 1 student student 566 Feb 19 19:59 authorized_keys[root@node13:~]$ ll /home/student/.ssh/total 4-rw------- 1 student student 566 Feb 19 19:59 authorized_keys
环境配置主要是软件包的下载
三台主机我们统一下载 python36:yum install pyton36 /yum module install python36
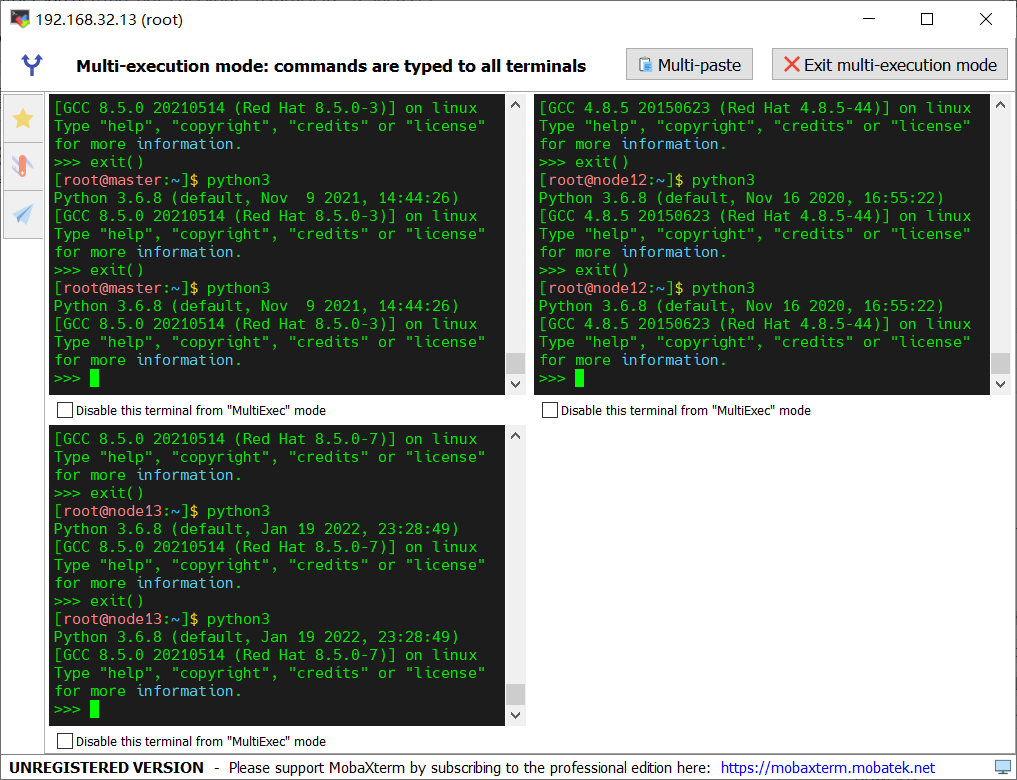
接下来就是控制节点 安装 Ansible
在安装之前,我们需要写 yum 源:vim /etc/yum.repos.d/epel.repo
[epel]name=epelbaseurl=https://mirrors.aliyun.com/epel/8/Everything/x86_64/gpgcheck=0
接下来安装:yum install ansible -y
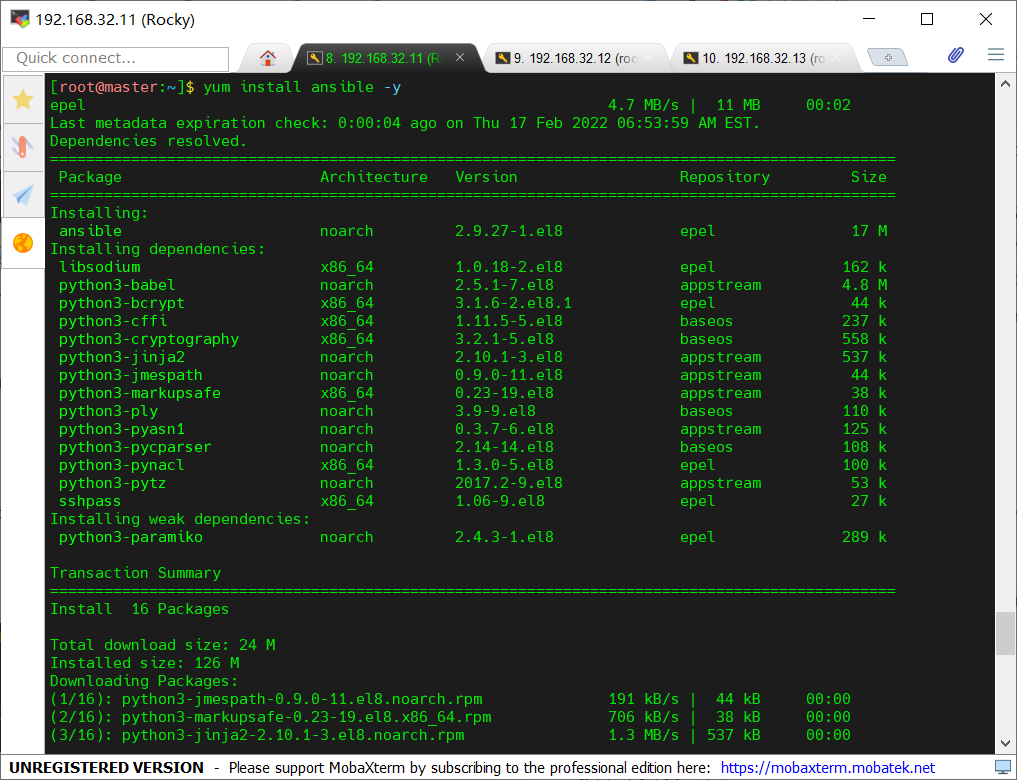
查看版本:ansible --version
[root@master:~]$ ansible --versionansible 2.9.27config file = /etc/ansible/ansible.cfgconfigured module search path = ['/root/.ansible/plugins/modules', '/usr/share/ansible/plugins/modules']ansible python module location = /usr/lib/python3.6/site-packages/ansibleexecutable location = /usr/bin/ansiblepython version = 3.6.8 (default, Nov 9 2021, 14:44:26) [GCC 8.5.0 20210514 (Red Hat 8.5.0-3)]
我们一共需要编写两个文件(不包括 Ansible Playbook):清单、配置文件
配置文件一共有三类:
./ansible.cfg # 优先级最高,在工作目录下~/.ansible.cfg # 优先级第二,在家目录下,是个隐藏文件/etc/ansible/ansible.cfg # 优先级最低
那么我们就新建一个目录为工作目录,在其下编写配置文件并执行 Ansible 命令
在哪里使用 ansible命令,那里就是工作目录
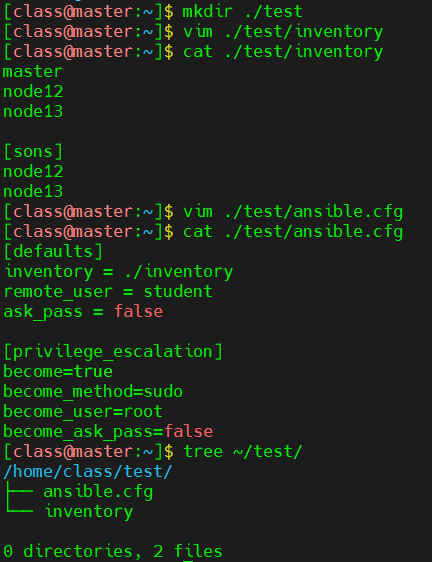
# 如下则为配置文件的内容[defaults]inventory = ./inventory ; 指定了清单的路径remote_user = student ; 指定远程控制哪个用户ask_pass = false ; 设置为不需要密码的登录# 上面的等号两边要有空格,且下面留出空行[privilege_escalation]become=true ; 登录到受控主机后是否变为其他用户become_method=sudo ; 以 sudo 方式变为其他用户(sudo、su)become_user=root ; 变为 root 用户become_ask_pass=false ; sudo 时无需密码
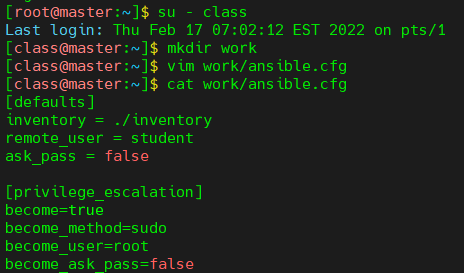
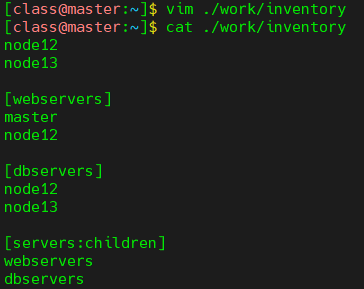
在工作目录下编写清单:vim ./work/inventory
清单的默认路径在 /etc/ansible/hosts,但是我们一般不使用它
node12node13# 以下为分组[webservers]masternode12[dbservers]node12node13# 这个写法是将两个组和为一个组[servers:children]webserversdbservers
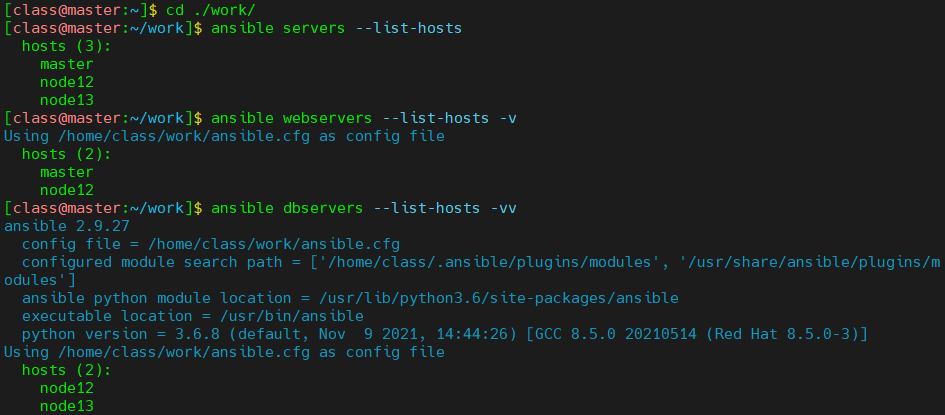
测试:ansible 组名或主机名 --list-hosts[ -vvv]
必须在工作目录下执行,否则就会按照优先级加载配置文件;我们可以在后面跟上选项-v,它会根据 v的个数给出逐渐详细的过程
1、以 all 主机组为目标执行 id 命令
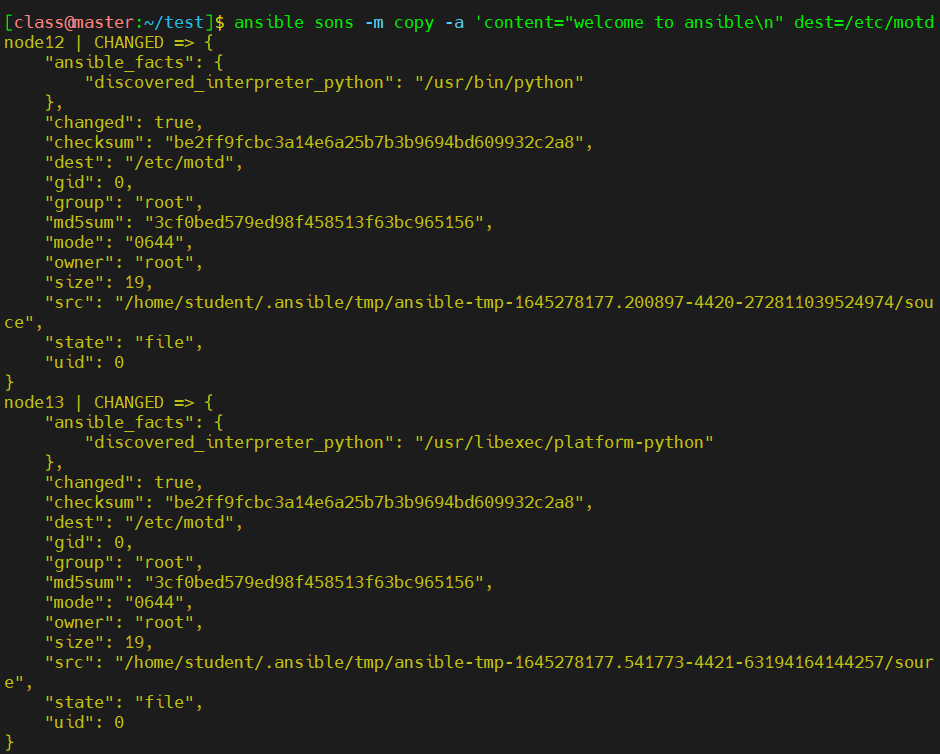
2、使用 copy模块 修改所有主机上的 /etc/motd 文件内容为 welcome to ansible
3、使用 command模块 查看 /etc/motd 文件的内容
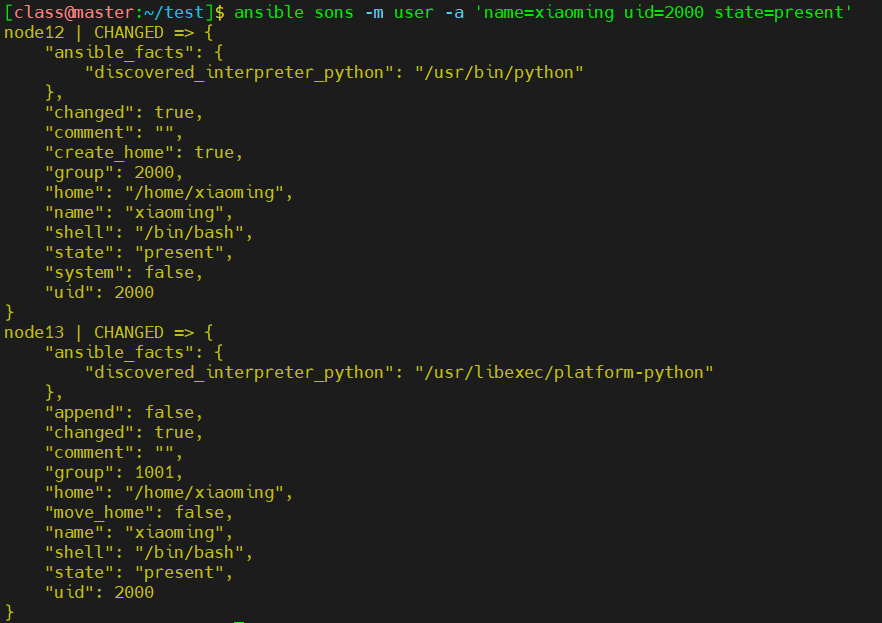
4、 使用 user模块 创建用户 xiaoming,uid 为 2000
先创建一个工作目录,并在其下编辑清单和配置文件
1、以 all主机组为目标执行 id命令:ansible all -m command -a id

2、使用 copy模块 修改所有主机上的 /etc/motd文件内容为 welcome to ansible:ansible sons -m copy -a 'content="welcome to ansible\n" dest=/etc/motd'
3、使用·command模块 查看/etc/motd文件的内容:ansible sons -m command -a 'cat /etc/motd'

4、使用 user模块 创建用户 xiaoming,uid 为 2000:ansible sons -m user -a 'name=xiaoming uid=2000 state=present'
Ansible 的用法是:ansible host-pattern -m module [-a 'module arguments'] [-i inventory]
这是它的临时命令,通常我们将这些指令写在 Ansible Playbook 中
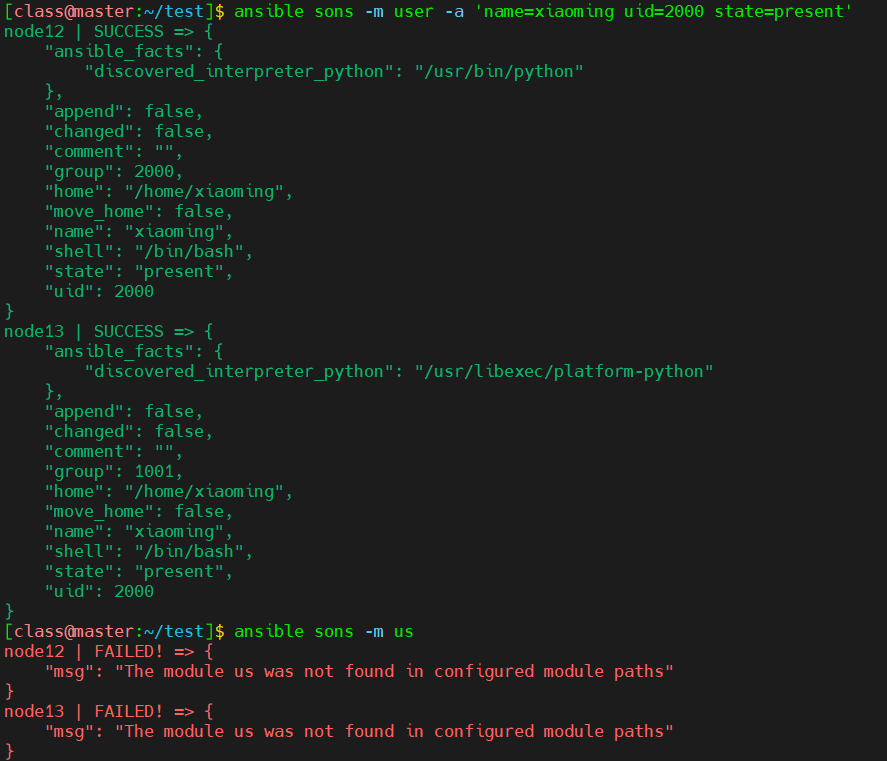
它的返回值有三种,一种是上面出现的 CHANGED,表示执行成功并且已做出改变;还有一种就是 SUCCESS,表示执行成功,检查到已经是该状态故没有做出改变;最后一种就是 FAILED,就是执行错误。相应的,他们的颜色也有所不同
本文转自:https://blog.csdn.net/SuichI314/article/details/123020414