Correction status:qualified
Teacher's comments:


1.react.js2.agular.js3.vue.js
前端的三板斧
htmlcssJavaScript
vue.js :vue官网:
https://cn.vuejs.org/guide/introduction.html
引入vue
1.直接通过script 标签引入
<script src="https://unpkg.com/vue@next"></script>
2.静态页面:
<h1>Hello World</h1>
3.模板页面化:通过模板字面量将页面模板化,页面内容可以根据不同的内容进行更改,用两个大括号包围起来将(双大括号);
<!---- {{message}} : 插值, 数据占位符 ----><h1 class="title">{{message}}</h1>
4.用es6写:将es6 里面的textContent进行文本替换,将双大括号的内容更新成我们需要输出的内容
document.querySelector('.title').textContent = 'Hello 猪老师早上好';
5.vue.js:通过Vue.createApp创建一个vue实例,然后调用data方法,对上方的定义的插值message进行传值
可以通过定义一个容器的来装之后,通过mount方法将内容挂载到对应的页面元素上输出
const app = Vue.createApp({data() {return {message: 'Hello 大家好不好',};},});app.mount(document.querySelector('.title'));
1.挂载点;挂载点: vue实例的作用域(当前vue可以影响的区域)
不能挂载到body里面,可以选择body里面的元素进行挂载:
<body><div class="app"><p>用户名:{{username}}</p></div></body>
然后通过vue实例并挂载
注:首先创建一个常量app 然后调用Vue中的createApp属性,里面有一个data方法,直接在data方法中返回上方username的值保存到常量中,调用mount方法将他挂载到上方的div上 渲染到页面中
<script>const app = Vue.createApp({data(){return{username:'马老师'}},}).mount('.app');</script>
2.数据注入
数据注入就是在通过data将和对象数据绑定之后,可以通过vue实例直接调用数据内容获取上方的div中的数据
console.log(app.$data.username);也可以用简化语法直接调用:console.log(app.username);
响应式:可以通过vue实例,进行实时更新app.username = '张老师';
vue的指令 以 “ v-“ 为前缀v-text 在标签中直接填入相应内容(只能填入文本)v-html 可以将标签一起解析并输出 (可以解析标签以及标签中添加的样式)
<div class="app"><!-- v-text -> textContent --><!-- <p>用户名: <span v-text="username"></span></p> --><!-- v-html -> innerHTML --><p>用户名: <span v-html="username"></span></p></div><script>const app = Vue.createApp({data() {return {username: '西安',};},}).mount('.app');app.username = '<i style="color:red">南京/i>';</script>
vue中的样式绑定
先创建一个行内样式style
<style>.active {color: red;}.bgc {background-color: yellow;}</style>
行内样式style,用v-bing样式绑定的style:
<script src="https://unpkg.com/vue@3"></script><style>.active{color: red;}.bgc{background-color: aquamarine;}</style></head><body><div class="app"><p v-bind:style="{color: textcolor, backgroundColor:bgc}">PHP</p><p v-bind:style="[base,custom]">PHP</p></div><script>const app = Vue.createApp({data( ) {return {textcolor: 'green',bgc:'wheat',base:{border:'1px solid',background:'lightgreen'},custom:{color:'while',padding:'15px'}}}}).mount('.app');</script></body></html>
class
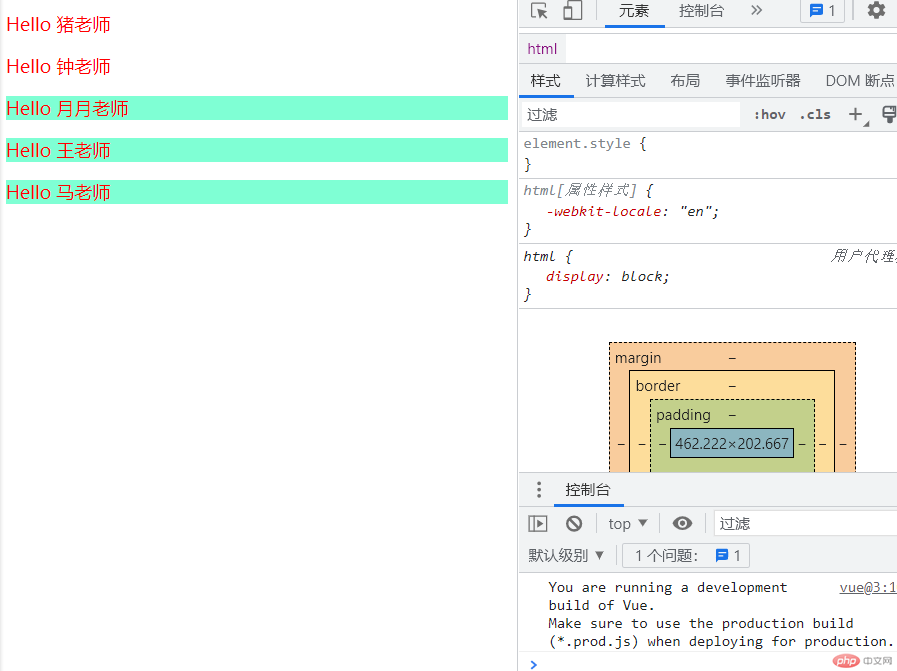
<title>样式绑定</title><script src="https://unpkg.com/vue@3"></script><style>.active{color: red;}.bgc{background-color: aquamarine;}</style></head><body><div class="app"><p v-bind:class="active">Hello 猪老师</p><!------- classList --------><!------ 在添加类样式时,可以通过true和false 来控制是否有效(同时这个值也可以添加到一个变量中) ------><p v-bind:class="{active: isActive}">Hello 钟老师</p><p class="active bgc">Hello 月月老师</p><!------ v-bind:是高频指令, 可简化为冒号 : ------><p :class="['active', 'bgc']">Hello 王老师</p><p :class="[mycolor, mybgc]">Hello 马老师</p></div><script>const app = Vue.createApp({data() {return {/* // style: 'color: blue', */textColor: 'yellow',bgc: 'wheat',base: {border: '1px solid',background: 'lightgreen',},custom: {color: 'white',padding: '15px',},active: 'active',isActive: true,mycolor: 'active',mybgc: 'bgc',};},}).mount('.app');</script></body></html>
效果图:
2.双向绑定:
介绍事件,在vue中用事件:
先创建一个事件:<div class="app"><p><input type="text" @input="comment = $event.target.value" :value="comment" /><span>{{comment}}</span></p></div>
$event:当前事件对象,在vue中要在前面加一个$符号v-on: vue的事件指令v-on: 高频指令, @表示
<title>双向绑定</title><script src="https://unpkg.com/vue@3"></script><style>.active{color: red;}.bgc{background-color: aquamarine;}</style></head><body><div class="app"><p><input type="text" @input="comment = $event.target.value" :value="comment" /><span>{{comment}}</span><!-- <input type="text" @input="comment = $event.target.value" :value="comment" /><span>{{comment}}</span> --><!--简化语法 --><!-- Vue为简化双向数据绑定,创建了一个语法堂:v-mond 指令$event 事件对象,在vue不能直接用event-->简化语法:<input type="text" v-model="comment" :value="comment" /><span>{{comment}}</span></p></div><script>const app = Vue.createApp({data() {return {comment: null,};},}).mount('.app');</script></body></html>
<!-- 延迟绑定:修饰符 -->/*修饰符lazy*/<div class="app"><p><input type="text" v-model.lazy="comment" :value="comment" /><span>{{comment}}</span></p></div>