Correction status:qualified
Teacher's comments:


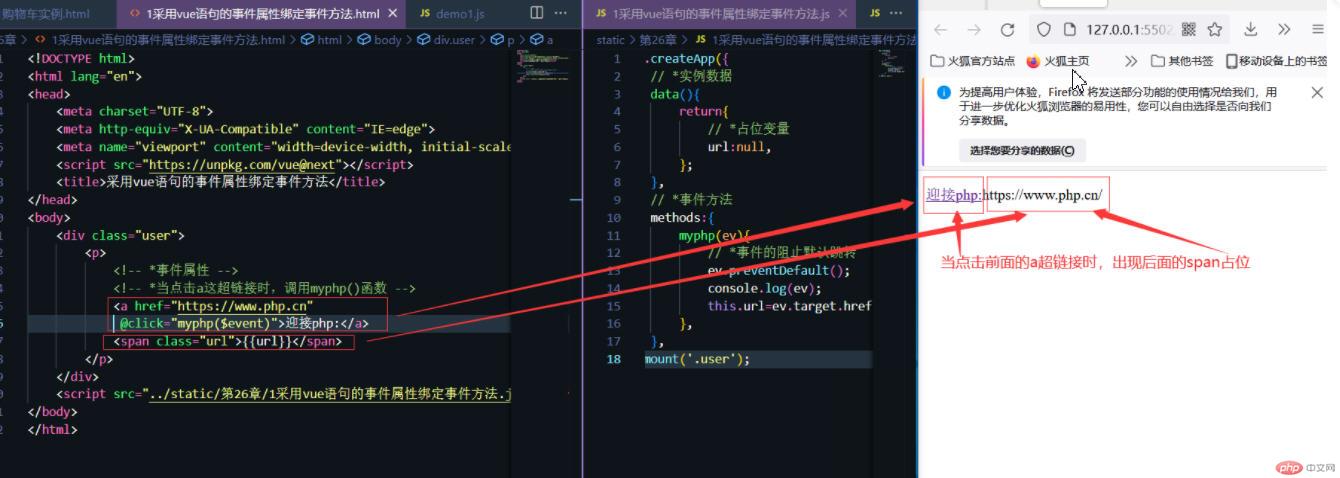
<!DOCTYPE html><html lang="en"><head><meta charset="UTF-8"><meta http-equiv="X-UA-Compatible" content="IE=edge"><meta name="viewport" content="width=device-width, initial-scale=1.0"><script src="https://unpkg.com/vue@next"></script><title>采用vue语句的事件属性绑定事件方法</title></head><body><div class="user"><p><!-- *事件属性 --><!-- *当点击a这超链接时,调用myphp()函数 --><a href="https://www.php.cn"@click="myphp($event)">迎接php:</a><span class="url">{{url}}</span></p></div><script src="../static/第26章/1采用vue语句的事件属性绑定事件方法.js"></script></body></html>
Vue.createApp({// *实例数据data(){return{// *占位变量url:null,};},// *事件方法methods:{myphp(ev){// *事件的阻止默认跳转ev.preventDefault();console.log(ev);this.url=ev.target.href;},},}).mount('.user');
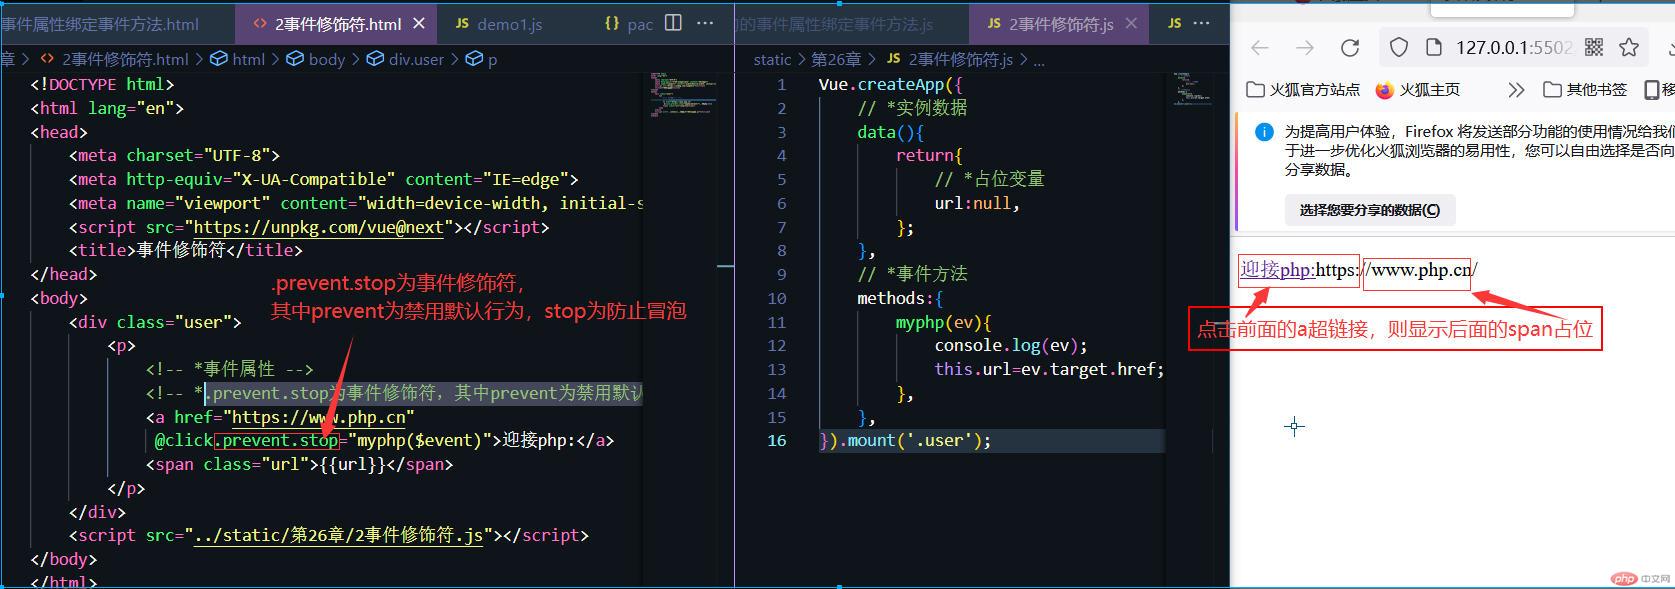
<!DOCTYPE html><html lang="en"><head><meta charset="UTF-8"><meta http-equiv="X-UA-Compatible" content="IE=edge"><meta name="viewport" content="width=device-width, initial-scale=1.0"><script src="https://unpkg.com/vue@next"></script><title>事件修饰符</title></head><body><div class="user"><p><!-- *事件属性 --><!-- *.prevent.stop为事件修饰符,其中prevent为禁用默认行为,stop为防止冒泡 --><a href="https://www.php.cn"@click.prevent.stop="myphp($event)">迎接php:</a><span class="url">{{url}}</span></p></div><script src="../static/第26章/2事件修饰符.js"></script></body></html>
Vue.createApp({// *实例数据data(){return{// *占位变量url:null,};},// *事件方法methods:{myphp(ev){console.log(ev);this.url=ev.target.href;},},}).mount('.user');
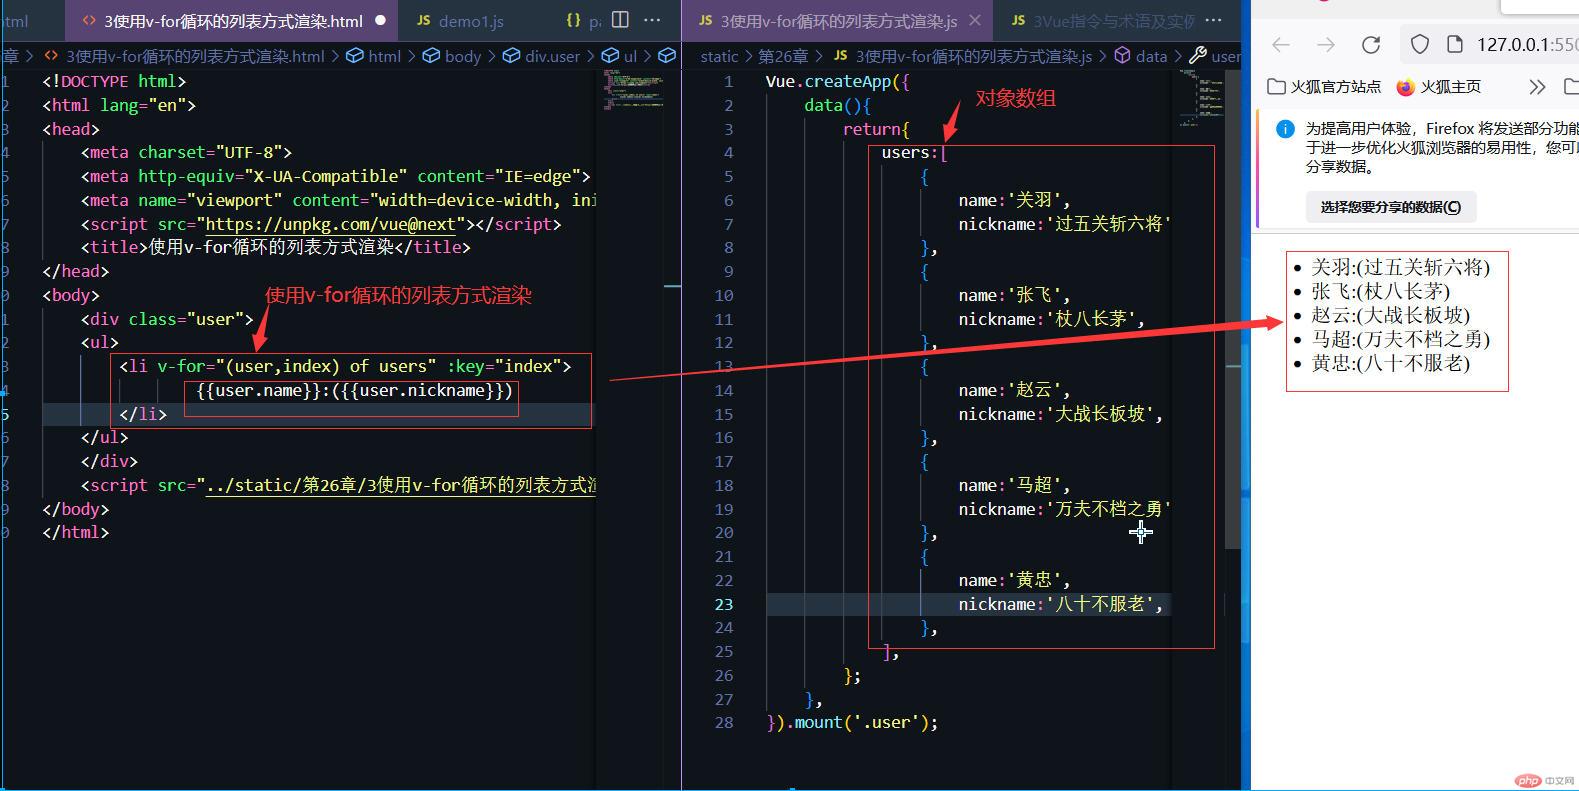
<!DOCTYPE html><html lang="en"><head><meta charset="UTF-8"><meta http-equiv="X-UA-Compatible" content="IE=edge"><meta name="viewport" content="width=device-width, initial-scale=1.0"><script src="https://unpkg.com/vue@next"></script><title>使用v-for循环的列表方式渲染</title></head><body><div class="user"><ul><li v-for="(user,index) of users" :key="index">{{user.name}}:({{user.nickname}})</li></ul></div><script src="../static/第26章/3使用v-for循环的列表方式渲染.js"></script></body></html>
Vue.createApp({data(){return{users:[{name:'关羽',nickname:'过五关斩六将',},{name:'张飞',nickname:'杖八长茅',},{name:'赵云',nickname:'大战长板坡',},{name:'马超',nickname:'万夫不档之勇',},{name:'黄忠',nickname:'八十不服老',},],};},}).mount('.user');
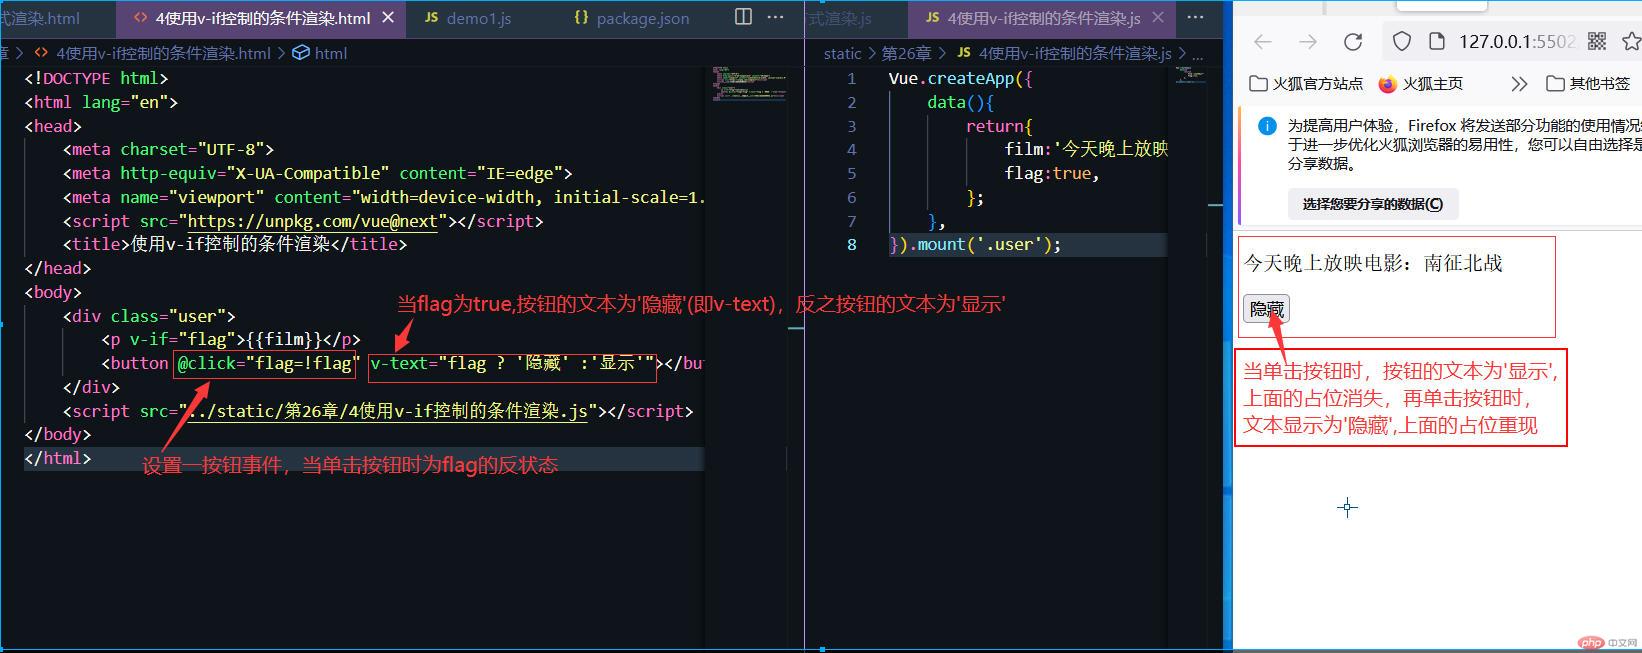
<!DOCTYPE html><html lang="en"><head><meta charset="UTF-8"><meta http-equiv="X-UA-Compatible" content="IE=edge"><meta name="viewport" content="width=device-width, initial-scale=1.0"><script src="https://unpkg.com/vue@next"></script><title>使用v-if控制的条件渲染</title></head><body><div class="user"><p v-if="flag">{{film}}</p><button @click="flag=!flag" v-text="flag ? '隐藏' :'显示'"></button></div><script src="../static/第26章/4使用v-if控制的条件渲染.js"></script></body></html>
Vue.createApp({data(){return{film:'今天晚上放映电影:南征北战',flag:true,};},}).mount('.user');
<!DOCTYPE html><html lang="en"><head><meta charset="UTF-8"><meta http-equiv="X-UA-Compatible" content="IE=edge"><meta name="viewport" content="width=device-width, initial-scale=1.0"><script src="https://unpkg.com/vue@next"></script><title>使用v-if-else控制的条件渲染</title></head><body><div class="user"><p v-if="age >= 3 && age<6">{{education[0]}}</p><p v-else-if="age>=6 && age<12">{{education[1]}}</p><p v-else-if="age>=12 && age<15">{{education[2]}}</p><p v-else-if="age>=15 && age<18">{{education[3]}}</p><p v-if="age>=18" >{{education[4]}}</p></div><script src="../static/第26章/5使用v-if-else控制的条件渲染.js"></script></body></html>
Vue.createApp({data(){return{education:['幼儿园','小学','初中','高中','大学'],age:16,};},}).mount('.user')

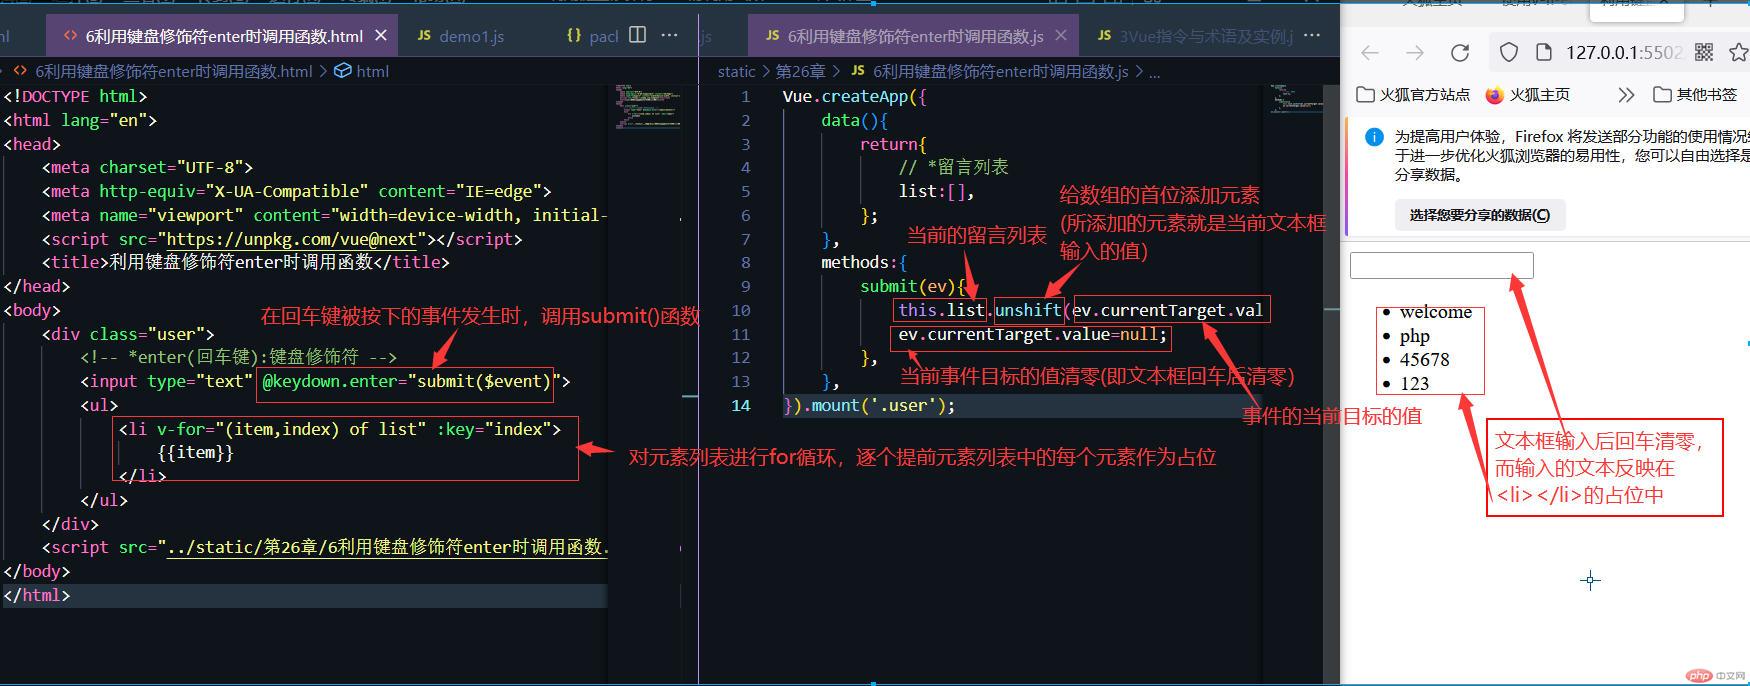
<!DOCTYPE html><html lang="en"><head><meta charset="UTF-8"><meta http-equiv="X-UA-Compatible" content="IE=edge"><meta name="viewport" content="width=device-width, initial-scale=1.0"><script src="https://unpkg.com/vue@next"></script><title>利用键盘修饰符enter时调用函数</title></head><body><div class="user"><!-- *enter(回车键):键盘修饰符 --><input type="text" @keydown.enter="submit($event)"><ul><li v-for="(item,index) of list" :key="index">{{item}}</li></ul></div><script src="../static/第26章/6利用键盘修饰符enter时调用函数.js"></script></body></html>
Vue.createApp({data(){return{// *留言列表list:[],};},methods:{submit(ev){this.list.unshift(ev.currentTarget.value);ev.currentTarget.value=null;},},}).mount('.user');
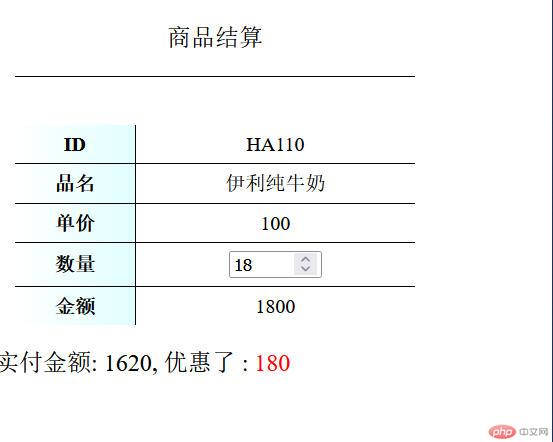
<!DOCTYPE html><html lang="en"><head><meta charset="UTF-8"><meta http-equiv="X-UA-Compatible" content="IE=edge"><meta name="viewport" content="width=device-width, initial-scale=1.0"><script src="https://unpkg.com/vue@next"></script><link rel="stylesheet" href="../static/第26章/css/7计算属性与侦听器属性.css"><title>Document</title></head><body><div class="user"><table><caption>商品结算</caption><tbody><tr><th>ID</th><td>HA110</td></tr><tr><th>品名</th><td>伊利纯牛奶</td></tr><tr><th>单价</th><td>100</td></tr><tr><th>数量</th><td><input type="number" v-model="num" style="width: 5em" /></td></tr><tr><th>金额</th><!-- <td>{{num * price}}</td> --><td>{{amount}}</td></tr></tbody></table><p style="font-size: 1.2em">实付金额: {{realAmount}}, 优惠了 :<span style="color: red">{{difAmount}}</span></p></div><script src="../static/第26章/7计算属性与侦听器属性.js"></script></body></html>
const app = Vue.createApp({data() {return {// 单价price: 100,// 数量num: 0,// 折扣discount: 1,};},// 计算属性(访问器属性)computed: {// 计算属性金额 = 单价 * 数量// get amount(){// }amount: {get() {console.log(this);return this.price * this.num;},set(value) {//...},},},// 侦听器属性watch: {// 访问器属性// 被侦听的属性,其实是一个方法,它有二个参数// 第一个参数是新值(当前值),第二个参数是原值(旧值)amount(current, origin) {console.log(current, origin);// 根据当前金额确定打折switch (true) {// 1000-2000: 9折case current >= 1000 && current < 2000:console.log(this);this.discount = 0.9;break;// 2000 -> 3000 : 8折case current >= 2000 && current < 3000:this.discount = 0.8;break;// 3000 -> 4000 : 7折case current >= 3000 && current < 4000:this.discount = 0.7;break;// 4000 -> 5000 : 6折case current >= 4000 && current < 5000:this.discount = 0.6;break;// 5000 : 5折case current >= 5000:this.discount = 0.5;}// 实付金额 = 原始金额 * 折扣率this.realAmount = this.amount * this.discount;// 优惠金额(差价) = 原始金额 - 实付金额this.difAmount = this.amount - this.realAmount;},},// 实例生命周期: 当实例与挂载点绑定成功时,自动执行mounted() {//初始化商品数量,默认为1this.num = 1;},}).mount('.user');
table {width: 20em;height: 10em;text-align: center;border-collapse: collapse;margin: 1em;}table caption {font-size: 1.2em;padding: 1em;margin-bottom: 2em;border-bottom: 1px solid;}tbody tr th:first-of-type {background: linear-gradient(to left, lightcyan, #fff);border-right: 1px solid;}body tbody tr:not(:last-of-type) > * {border-bottom: 1px solid;}
