Correction status:qualified
Teacher's comments:


案列一:
效果图:
功能:用jQuery 添加图片、按钮,并使按钮具有移动删除功能。

html代码:
<!DOCTYPE html>
<html lang="en">
<head>
	<meta charset="UTF-8">
	<title>相册管理</title>
	<link rel="stylesheet" type="text/css" href="css/4-9style.css">
	<script type="text/javascript" src="js/jquery.js"></script> //在线引入
	<script type="text/javascript" src="js/4-9demo.js"></script>
</head>
<body>
	<div class="wrap">
		<div class="header">
			<h2>相册管理</h2>
				<p>
					<label for="img_url">图片地址(URL):</label>
					<input type="text" name="text" id="img_url" value="images/zly.jpg">
				</p>
				<p>
					图片形状:
					<input type="radio" name="border" value="0" id="rect" checked><label for="rect">直角</label>
					<input type="radio" name="border" value="10%" id="radius" ><label for="radius">圆角</label>
					<input type="radio" name="border" value="50%" id="circle" ><label for="circle">圆形</label>
				</p>
				<p>
					图片是否添加阴影:
					<select name="shadow">
						<option value="0" selected>不添加</option>
						<option value="1">添加</option>
					</select>
				</p>
				<p>
					<button class="add">添加图片</button>
				</p>
				</div>
				<div class="main">
					<ul></ul>
				</div>


	</div>

</body>
</html>
点击 "运行实例" 按钮查看在线实例
style.css代码:
.wrap{
	width: 360px;
	border: 1px solid orange;
	margin: 10px ;
	background-color: lightyellow;
	border-radius: 10%;
	overflow: hidden;
}
.wrap h2{
	text-align: center;
}
.wrap .header{

	margin-left: 15px;
}
.add{
	width: 70px;height: 30px;
	border:none; background-color: lightskyblue;
	color: white;
}
.add:hover{
	background-color: orange;
	font-weight: bolder;
	cursor: pointer;
}

.main{
	overflow: hidden;
	width: 100%;
	/*border:1px solid silver;*/

}
.main ul{
	margin: 0;
	padding: 0;
}
.main ul li{
	list-style: none;
	float:left;
	width: 150px;height: 180px;
	margin-left:20px;
	margin-bottom: 10px;
	text-align: center;
}
.main ul li button{
	margin: 3px;
	border-radius: 10px;
	border:none;
	background-color: lightblue;
	color: white;
}
.main ul li button:hover{
	background-color: orange;
	font-weight: bolder;
	cursor: pointer;
}点击 "运行实例" 按钮查看在线实例
jQuery 代码:
$(document).ready(function(){
	// 1,给按钮添加事件
	$('button.add').on('click',function(){
		 // 一,获取图片的相关信息,地址
		 var img_url = $('#img_url').val()
		 // console.log(img_url)
		 // 二,如果用户没有添加图片,提示用户并返回
		 if (img_url.length==0) {
		 	alert('请输入正确的图片地址~')
		 	$('#img_url').focus()
		 	return false
		 }

		 // 三,获取图片类型
		 var img_type = $(':radio:checked').val()
		  // console.log(img_type)
		  // 四,获取图片阴影
		  var shadow='none'
		  if ($(':selected').val()==1) {
		  	 	shadow='2px 2px 2px #363636'
		  }

		  // 第二步:创建图片元素并添加相关设置
		  var img =$('<img>')
		  			.prop('src',img_url)
		  			.height(150)
		  			.width(150)
		  			.css({
		  				'box-shadow':shadow,
		  				'border-radius':img_type
		  			})


		  	//第三步: 给相册添加按钮移动删除功能,三个按钮,前,后,删除
		  	var before =$('<button>').text('前移')
		  	var after =$('<button>').text('后移')
		  	var remove =$('<button>').text('移除')

		  	// 将三个按钮添加到图片的后面
		  	var li =$('<li>').append(img,before,after,remove)
		  	// 将图片添加到页面中
		  	li.appendTo('ul')
	///////////////////////////////////////////////////////////////////////功能实现////////////////////////
			before.click(function(){
				$(this).parent().prev().before($(this).parent())
			});
			after.click(function(){
				$(this).parent().next().after($(this).parent())
			});
			remove.click(function(){
				$(this).parent().remove()
			});


	})


})点击 "运行实例" 按钮查看在线实例
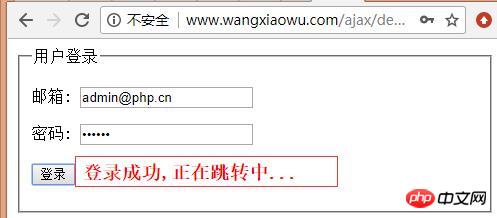
实例2:
功能:用Ajax 实现表单无刷新登录,解决了客户端与服务器的时间,通过Ajax请求数据,异步处理
重点:$.post()全局函数 基本语法:$.post(url,data,success,dataType)
url:请求的地址:api/user.php?m=login
data:需要发送到服务器的数据,以js对象方式进行包装
success(data,status,xhr):执行成功的回调函数
回调参数:data:从服务器返回的数据
status:当前请求的状态
xhr:ajax对象
dataType:从服务器返回的数据格式:xml,html,script,json,text,_default
效果图:

代码:
html代码:
<!DOCTYPE html>
<html lang="en">
<head>
	<meta charset="UTF-8">
	<title>3.Ajax入门</title>
</head>
<body>
	<form action="api/check.php" method="post">
		<fieldset>
			<legend>用户登录</legend>
			<p>
				<label for="email">邮箱:</label>
				<input type="email" name="email" id="email">
			</p>
			<p>
				<label for="password">密码:</label>
				<input type="password" name="password" id="password">
			</p>
			<p><button>登录</button>
			<span id="tips" style="font-size:1.2em;font-weight: bolder;color:red"></span></p>
			<!-- 取消原生提交动作 -->
			<!-- <p><button type="button">登录</button></p> -->
		</fieldset>
	</form>
</body>
</html>
<script type="text/javascript" src="js/jquery-3.3.1.js"></script>
<script type="text/javascript">
	/*
	*$.post()全局函数,处理ajax中的post请求
	*基本语法:$.post(url,data,success,dataType)
	*函数说明:url:请求地址
	*          data:需要发送到服务器的数据,以js对象的方式进行包装
	*          success(data,status,xhr):执行成功的回调函数
	*          回调参数:data 从服务器返回的数据
	*          			status 返回的状态
	*          			xhr:ajax对象
	*          		我们只关心data
	*          dataType: 从服务器返回的数据格式
	*          xml,html,script,json,text,_defoult

		 */
		$('button:first').click(function(){
	/*   	// alert(1)
		// 1,提交地址
		var url='api/user.php?m=login'
		// 2,要提交的数据
		var data={
			'email':$('#email').val(),
			'password':$('#password').val()
		}
		// 3,设置成功回调函数
		var success =function(res){
			if(res=='1'){
				$('#tips').text('登录成功,正在跳转中...')
					setTimeout(function(){
						location.href = 'api/index.php'
					},2000)

			}else{
				$('#tips').text('邮箱或密码错误,请重新输入...')
				$('#email').focus()
				setTimeout("tips.innerHTML = ''",2000)

			}
		}
		//4,设置返回的数据格式
		var dataType='json'
		// 5,调用全局函数$.post()
		$.post(url,data,success,dataType)
	*/

		//简化操作
		$.post(
			'api/user.php?m=login',
			{
			'email':$('#email').val(),
			'password':$('#password').val()
			},
		function(res){
			if(res=='1'){
				$('#tips').text('登录成功,正在跳转中...')
					setTimeout(function(){
						location.href = 'api/index.php'
					},2000)

			}else{
				$('#tips').text('邮箱或密码错误,请重新输入...')
				$('#email').focus()
				setTimeout("tips.innerHTML = ''",2000)

				}
			}
			)


		return false  //禁止原按钮的提交行为
	})


</script>点击 "运行实例" 按钮查看在线实例
user.php代码:
<?php
if ($_GET['m'] == 'login') {
	if($_POST['email']=='admin@php.cn' && $_POST['password']=='123456'){
		echo '1';
	}else{
		echo '0';
	}
}点击 "运行实例" 按钮查看在线实例
需要在Apache 环境中运行~~~