

在线相册管理器代码(html):
<!DOCTYPE html>
<html lang="en">
<head>
	<meta charset="UTF-8">
	<title>jquery在线相册管理器</title>
	<link rel="stylesheet" type="text/css" href="css/style.css">
	<script type="text/javascript" src="js/jquery-3.3.1.js"></script>
	<script type="text/javascript" src="js/demo.js"></script>
</head>
<body>
	<div class="wrap">
		<div class="head">
		    <h2><em>在线相册管理器</em></h2>
		    <p>
			    <label for="img_url">请输入图地址:</label>
			    <input type="text" name="img_url" id="img_url"  value="images/k.jpg">
		    </p>
		    <p>
	请选择图片类型:
			    <input type="radio" name="border"  value="0" id="a" checked=""><label for="a">直角</label>
			    <input type="radio" name="border" value="10%" id="b"><label for="b">圆角</label>
			    <input type="radio" name="border" value="50%" id="c"><label for="c">圆型</label>
		    </p>
		    <p>
			    图片是否添加阴影:
			    <select name="shadow">
				    <option value="0" selected="">添加</option>
				    <option value="1" >不添加</option>
			    </select>
		    </p>
		    <p><button class="add">添加图片</button></p>
	    </div>
	    <div class="main">
		    <ul></ul>
	    </div>
	</div>

</body>
</html>
点击 "运行实例" 按钮查看在线实例
在线相册管理器代码(js):
$(document).ready(function(){
	//先给按钮添加点击事件
	$('button.add').on('click',function(){


	//第一步:获取图片的相关信息
		//1.获取图片地址
		var img_url = $('#img_url').val()
		// console.log(img_url)

		//如果用户没有选择图片,提示用户并返回
		if(img_url.length==0){
			alert('图片地址不能为空')
			$('#img_url').focus()
			return false
		}

        //2.获取图片类型
		var img_type = $(':radio:checked').val()
		// console.log(img_type)


		//3.是否添加阴影?
		var shadow = 'none'
		if($(':selected').val()==0){
			shadow = '5px 5px 5px red'
		}
		// console.log(shadow)


    //第二步:创建图片元素,并把相关设置添加上
		var img = $('<img>')
		           .prop('src',img_url)//img的固有属性src
		           .width(150)
		           .height(150)
		           .css({
		           	'border-radius': img_type,
		           	'box-shadow': shadow
		           })
// console.log(pic)
		// //给相册添加图片移动与删除功能
		// //创建三个按钮: 前移,后移,删除
        var before = $('<button>').text('前移')
        var after = $('<button>').text('后移')
        var remove = $('<button>').text('删除')
        //将三个按钮添加到当前图片后面
       var li = $('<li>').append(img,before,after,remove)

       li.appendTo('ul')

		//前移: 将前一个图片做为插入点,在此之前插入当前图片
       before.on('click',function(){
       	 $(this).parent().prev().before( $(this).parent())
       })

         //后移: 将下一个图片做为插入点,在此之后插入当前图片
         after.on('click',function(){
       	 $(this).parent().next().after( $(this).parent())
        })
           //删除
        remove.click(function(){
         $(this).parent().remove()
     })
	})
})点击 "运行实例" 按钮查看在线实例
在线相册管理器代码(css):
.wrap{
	width: 360px;
	height: auto;
	background-color: lightpink;
	margin: 30px auto;
	color: gray;

}
.wrap .head{
	padding: 15px;
}
h2{
	text-align: center;
}
.add{
	width: 100px;
	height: 30px;
	background-color: lightgreen;
	border: none;
	color: white;
}

.add:hover{
    background-color: skyblue;
    font-size: 1.2em;
    font-weight: bolder;
    cursor: pointer;
}


.main{
	overflow: hidden;
}

.main ul{
	margin: 0;
	padding: 0;
}

.main ul li{
	list-style: none;
	float: left;
	width: 150px;
	height: 200px;
	margin-left:20px;
	margin-top: 10px;
	text-align: center;
}

.main ul li button{

	margin: 3px;
	border: none;
	border-radius: 20%;
	background-color: wheat;
}
.main ul li button:hover {
	background-color: orange;
	color:white;
	cursor: pointer;
}点击 "运行实例" 按钮查看在线实例
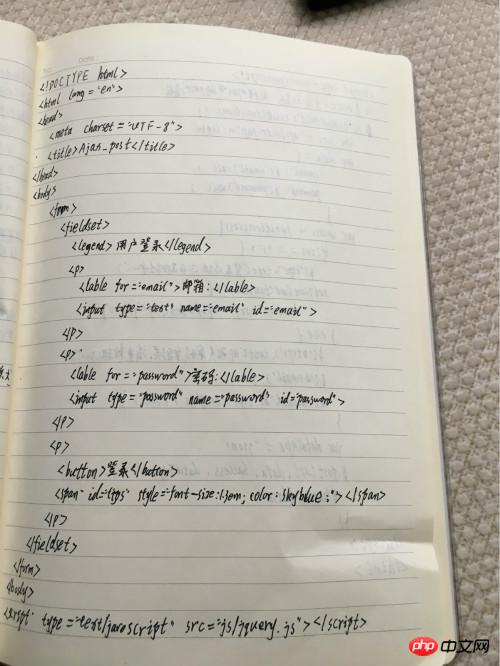
$.post()操作:
<!DOCTYPE html>
<html>
<head>
<meta charset="UTF-8">
<title>Ajax_post</title>
</head>
<body>
<form>
<fieldset>
<legend>用户登录</legend>
<p>
<label for="email">邮箱:</label>
<input type="text" name="email" id="email" >
</p>
<p>
<label for="password">密码:</label>
<input type="password" name="password" id="password">
</p>
<p>
<button>登录</button>
<span id="tips" style="font-size: 1.3em;color: skyblue;font-weight: bolder;"></span>
</p>
<!-- 取消原生提交动作 -->
<!-- <p><button type="button">登录</button></p> -->
</fieldset>
</form>
</body>
<script type="text/javascript" src="js/jquery.js"></script>
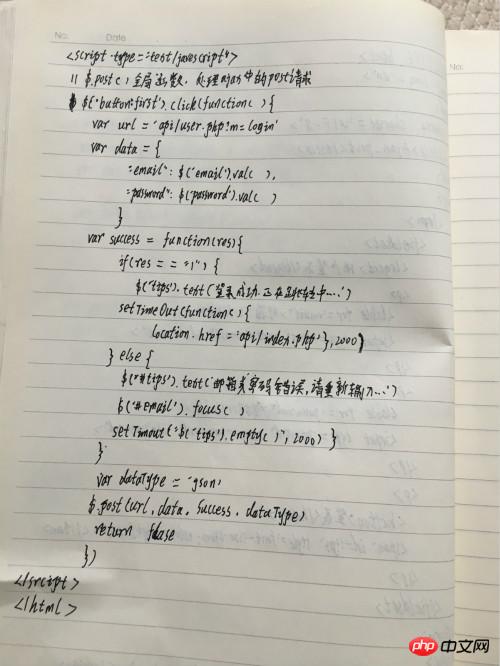
<script type="text/javascript">
// $.post()全局函数,处理ajax中的post请求
// 基本语法:$.post(url,data,success,dataType)
// 参数说明:
// url:请求的服务器地址:api/user.php?m=login
// data:需要发送到服务器的数据,以js对象方式进行包装
// success(data,status,xhr):执行成功的回调函数
// 回调参数:
// data:从服务器返回的数据
// status:当前请求的状态
// xhr:ajax对象
// 我们只关系data
// dataType:从服务器返回的数据格式:
// xml,html,script,json,text,_default
$('button:first').click (function(){
//1.ajax-post提交的地址
var url = 'api/user.php?m=login'
//2.要提交到服务器的数据
var data = {
"email": $('#email').val(),
"password": $('#password').val()
}
//3.设置执行成功的回调函数
var success = function(res){
if (res == '1') {
$('#tips').text('登录成功,正在跳转中...')
setTimeout(function(){
location.href = 'api/index.php'
},2000)
} else {
$('#tips').text('邮箱或密码错误,请重新输入...')
$('#email').focus()
setTimeout("$('#tips').empty()",2000)
}
}
//4.设置返回的数据格式为:json
var dataType = 'json'
//5.调用全局函数$.post()执行post请求
$.post(url, data, success, dataType)
// $.post(
// 'api/user.php?m=login',
// {
// "email": $('#email').val(),
// "password": $('#password').val()
// },
// function(data){
// if (data == '1') {
// $('#tips').text('登录成功,正在跳转中...')
// setTimeout(function(){
// location.href = 'api/index.php'
// },2000)
// } else {
// $('#tips').text('邮箱或密码错误,请重新输入...')
// $('#email').focus()
// setTimeout("$('#tips').empty()",2000)
// }
// }, 'json')
return false
})
</script>
</html>
手写代码:

