Correction status:qualified
Teacher's comments:


1、以下代码主要实现了简单的目录遍历的的功能:
<?php
// 目录遍历
$path = "../0827";
if(is_dir($path)){
$handle_dir = opendir($path) or die('文件夹打开失败');
 while (false != ($file = readdir($handle_dir))) {
  if(is_dir($path.'/'.$file)){
   if($file != "." && $file != ".."){
    print $file.'是文件夹'.'<br>';
   }
  }else{
   if($file != "." && $file != ".."){
    print $file.'<br>';
   }
  }
 }
}
closedir($handle_dir);
?>点击 "运行实例" 按钮查看在线实例
运行截图:

说明:这里我做了一些额外的处理,不仅检测文件,当遍历的目录中有子目录时,会筛选出来提示是目录;
2、文件上传在web开发中是必不可少的功能,所有的网站开发都会用到此功能,所以它是非常重要的,以下代码是文件上传与检测的实例:
<!DOCTYPE HTML>
<!DOCTYPE html>
<html>
<head>
 <meta http-equiv="Content-Type" content="text/html; charset=utf-8"/>
 <title>文件上传</title>
</head>
<body>
 <p>图片上传</p>
 <form method="post" action="" enctype="multipart/form-data" >
  文件名:
  <input type="file" name="myFile"><br />
  <input type="submit" name="submit" value="上传文件">
 </form>
</body>
</html>

<?php
//通过$_FILES接收上传文件的变量信息
$fileInfo=$_FILES['myFile'];
$filename=$fileInfo['name'];
$type=$fileInfo['type'];
$tmp_name=$fileInfo['tmp_name'];
$size=$fileInfo['size'];
$error=$fileInfo['error'];
echo '<pre>';
print_r($fileInfo);
//错误检测
if($fileInfo['error'] > 0){
 switch ($fileInfo['error']) {
  case 1:
   $mes='上传文件超过了PHP配置中的uploaded_max_filesize的大小';
   break;
  case 2:
   $mes='上传文件超过了表单中MAX_FILE_SIZE限制的大小';
   break;
  case 3:
   $mes='部分文件被上传';
   break;
  case 4:
   $mes='没有选择上传的文件';
   break;
  case 6:
   $mes='没有找到临时目录';
   break;
  case 7:
  case 8:
   $mes='系统错误';
   break;
 }
 exit($mes);
}
//检测文件类型
$ext=pathinfo($filename,PATHINFO_EXTENSION);
$allowExt=array('jpeg','jpg','png','gif');
if(!in_array($ext,$allowExt)){
 exit('非法文件类型');
}
//检测文件大小
$maxSize=31457280;//30M
if($size>$maxSize){
 exit('上传文件过大');
}
//检测文件是否为真实图片类型
$flag=true;
if($flag){
 if(@getimagesize($type)){
  exit('不是真正的图片类型');
 }
}
//检测文件是否为HTTP POST类型上传的
if(!is_uploaded_file($tmp_name)){
 exit('文件不是通过HTTP POST 方式上传的');
}
$path='upload';
//如果文件夹不存在,创建文件夹
if(!file_exists($path)){
 mkdir($path,0777,true);
 chmod($path,0777);
}
//确保文件名唯一,防止重名产生覆盖
$uniName=md5(uniqid(microtime(true),true)).'.'.$ext;

$destination=$path.'/'.$uniName;
if(@!move_uploaded_file($tmp_name, $destination)){
  echo'文件上传失败';
}else{
  echo'文件上传成功';
}
?>点击 "运行实例" 按钮查看在线实例
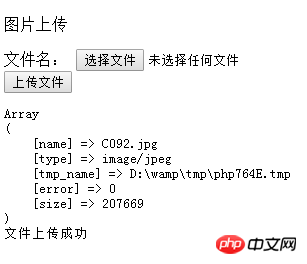
运行截图:

说明:以上代码实现了图片的上传与检测,其中用到了html及php相结合的知识。
总结:
1、目录遍历主要注意的地方是目录中默认存在两个隐藏的目录 “.”及 “..”,前一个代表当前层级目录,后一个代表上一级目录,遍历的时候需要把这两个目录过滤掉。
2、文件上传与检测的代码其实是固定的,只要多次联系就能熟练掌握并运用,其中有错误号的检测,文件类型的检测、文件大小的检测、文件是否为真实图片类型的检测、文件是否为HTTP POST类型上传的检测、上传文件夹的创建键及生成唯一的文件名,防止重名产生覆盖。