Correction status:qualified
Teacher's comments:


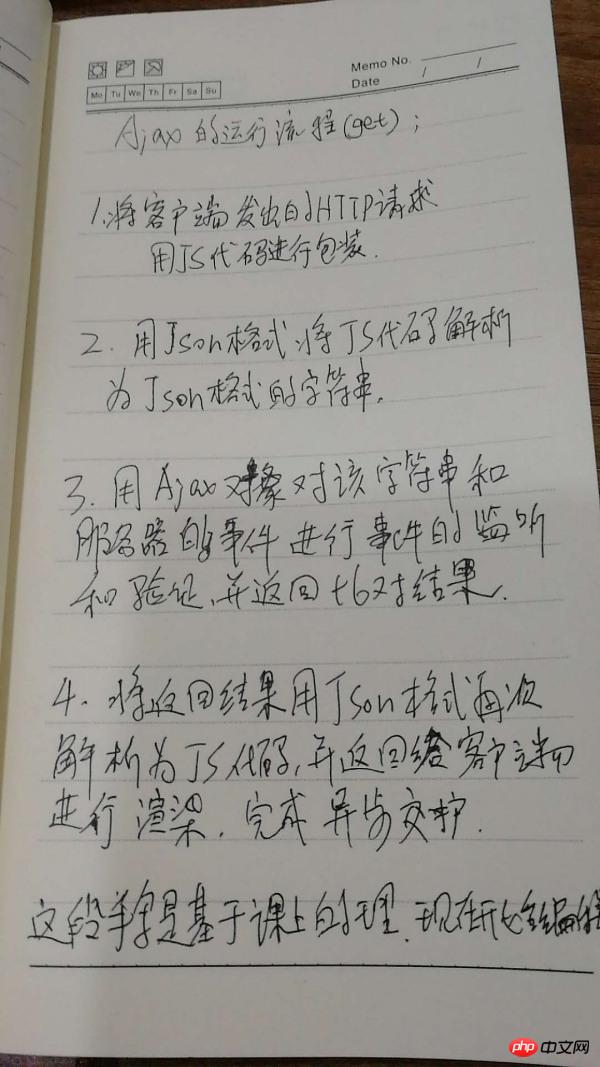
1、手写: Ajax的完整运行流程(以get为例),共四步。

2、编程: Ajax用户登录验证
<?php

$user = json_decode($_POST['data']);

$email = $user ->email;
$password = sha1($user ->password);

$pdo = new PDO('mysql:host=127.0.0.1;dbname=php','root','root');

$sql = "SELECT COUNT(*) FROM `user` WHERE `email`='{$email}' AND `password`='{$password}'";

$stmt =$pdo ->prepare($sql);

$stmt ->execute();

if ($stmt ->fetchColumn(0) == 1){
    echo json_encode(['status'=>1,'msg'=>'登录成功,正在跳转...']);
    exit;
}else{
    echo json_encode(['status'=>0,'msg'=>'对不起,邮箱或密码不正确,你懂得!']);
    exit;
}<?php echo '<h2>欢迎你,终于来了!</h2>';
<!DOCTYPE html>
<html lang="en">
<head>
    <meta charset="UTF-8">
    <title>Ajax之表单验证</title>
</head>
<body>
<h3>用户登录</h3>
<form>
<p>邮箱:<input type="email" name="email" ></p>
<p>密码:<input type="password" name="password"></p>
<p><button type="button">登登登</button></p>
</form>
<script >
    let dl = document.getElementsByTagName('button')[0];
    dl.onclick =function () {
        // 第一步:对象.创建xhr对象(XMLHttpRequest)
        let xhr = new XMLHttpRequest();
        // 第二步:事件.监听响应状态onreadystatechange()
        xhr.onreadystatechange = function () {
            // 属性: readyState 请求状态值,有四个值,我们只对数据就绪状态的值:4感兴趣;
            if (xhr.readyState === 4) {
                // 属性: status 请求状态码, 返回 200 时,表示已从服务器上成功的获取到了返回的文本;
                if (xhr.status === 200) {
                    // 如响应成功:属性: responseText, 从服务器端返回的文本内容;
                    // 首先创建新元素,以便放置返回的内容
                    let p = document.createElement('p');
                    p.style.color = 'red';
                    // 接下来,JSON出场,格式化转化的字符串进行信息验证,先创建一个json对象
                    let json = JSON.parse(xhr.responseText);
                    if (json.status === 1){
                        p.innerHTML = json.msg;
                    }else if (json.status === 0){
                        p.innerHTML = json.msg;
                    }
                    // 做完判断就可以将新元素插入到当前页面中了
                    document.forms[0].appendChild(p);
                    dl.disabled = true;
                    setTimeout(function () {
                        document.forms[0].removeChild(p);
                        dl.disabled = false;
                        if (json.status == 1){
                            location.href = 'welcome.php';
                        }
                    },2000);
                }else {
                    alert('响应失败'+xhr.status);
                }
            }else{
                // 老师说了,HTTP请求这时候还在请进可以插一下转来转去的gif图片~~
            }
        }
        // 第三步:此时监听事件结束,接下来设置请求参数(xhr.open 和xhr.send)
        xhr.open('post','login.php',true);
        // 注意:让我们来设置一下请求头信息,模拟成表格,来欺骗一下服务器,嘿嘿
        xhr.setRequestHeader('Content-Type','application/x-www-form-urlencoded');
        // 骗成功了,可以发送请求了
        let data = {
            email:document.getElementsByName('email')[0].value,
            password:document.getElementsByName('password')[0].value,
        };
        let data_json = JSON.stringify(data);
        xhr.send('data='+data_json);
    }

</script>
</body>
</html>点击 "运行实例" 按钮查看在线实例
3、Ajax的工作原理分析
终于到了Ajax和Json了 , 讲真 , 感觉比较抽象 ,但是突然间又觉得并不是那么难以理解了;
Ajax是一个欺骗程序 , 它不需要有实际的实例信息 , 只需要Json配合做一些伪造数据的事情 , Ajax就可以
依靠自身的流程来欺骗服务器进行各种的验证 ;
既然连服务器都欺骗了 , 那么除了开发者 , 普通黑客是无法攻破程序自身的防护的 ,
尤其是保障了数据库安全运行...我想这大概就是程序员和模版鼠标操作者的本质区别了吧;
不过既然有流程 , 再抽象也不会说是学不会的 , 只要多研究 , 多实验 ,还是能掌握一些基础的操作编程方法的.
所以如果Ajax的工作原理如果用一句话来概括 : 它更懂得客某端 , 更能适应客某端需求 ,并做出最佳动作反馈!