
 Web Front-end
Bootstrap Tutorial
A brief discussion on how to directly enter table row data in Bootstrap (1)
Web Front-end
Bootstrap Tutorial
A brief discussion on how to directly enter table row data in Bootstrap (1)
A brief discussion on how to directly enter table row data in Bootstrap (1)

This article will introduce to you how to use dataTable to directly enter table row data in the Bootstrap development framework. It has certain reference value. Friends in need can refer to it. I hope it will be helpful to everyone.

When developing Winform, we can often use table controls to directly enter data. However, we rarely see it on the Web. In fact, we can also use the dataTable object to directly enter data. Entering table row data can improve the convenience of data entry, especially when it comes to detailed data for some simple businesses. It seems to be more convenient and taller than pop-up window entry. This article mainly introduces the use of dataTable to directly enter table row data in the Bootstrap development framework. [Related recommendations: "bootstrap Tutorial"]
1. Direct data entry based on tables and Winform interface review
Directly start the Web interface Before entering the table row data, let's first take a look at the processing of the Winform interface. For example, in process management, I use the following interface for data processing of the reimbursement business table with master-slave details.
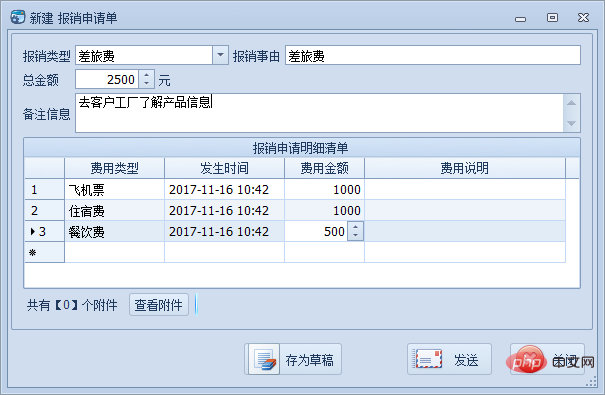
This kind of detailed form can be added and edited directly on the grid control Griview.
As for the Web interface, if we want to maintain a layout similar to this, we can also use dataTable to directly enter table row data.
When the above interface processes detailed data, you can directly use the new record, enter the data directly in the input box, and then save it. After saving, the data becomes read-only. , if you need to modify it, you can also click the edit button to modify it.
These detailed data only exist in JS objects and have not been saved to the backend database. We can obtain all the added data for submission during the final save (as shown in the OK button on the interface above). That’s it.
After submitting these data, we can use the Bootstrap Table plug-in to display the data in the viewing interface.
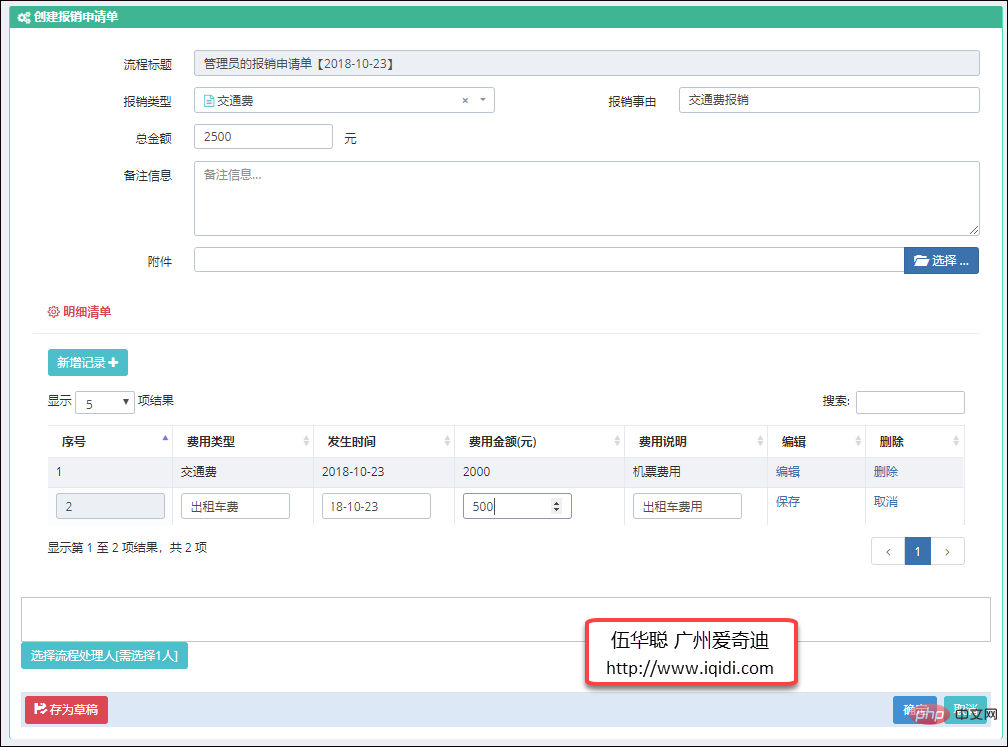
2. Implementation of using dataTable to directly enter table row data on the Web
The above interface shows how to use dataTable on the Web dataTable directly inputs table row data and data display. Here we begin to introduce their interface and implementation code.
The interface part mainly deals with this detail.
The HTML code of the interface view is as follows.
<div class="portlet light portlet-fit ">
<div class="portlet-title">
<div class="caption">
<i class="icon-settings font-red"></i>
<span class="caption-subject font-red sbold uppercase">明细清单</span>
</div>
</div>
<div class="portlet-body">
<div class="table-toolbar">
<div class="row">
<div class="col-md-6">
<div class="btn-group">
<button id="detail_editable_1_new" class="btn green">
新增记录
<i class="fa fa-plus"></i>
</button>
</div>
</div>
</div>
</div>
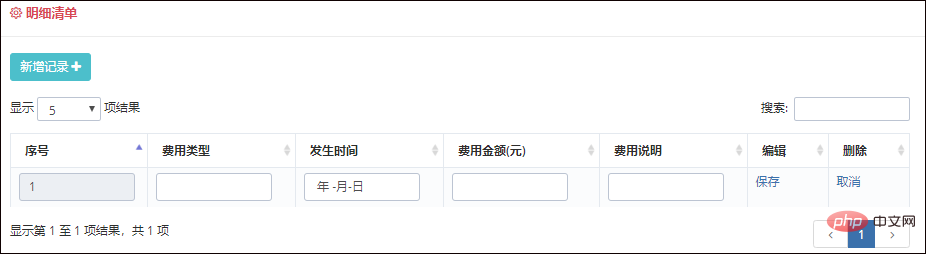
<table class="table table-striped table-hover table-bordered" id="detail_editable_1">
<thead>
<tr>
<th>序号</th>
<th> 费用类型 </th>
<th> 发生时间 </th>
<th> 费用金额(元) </th>
<th> 费用说明 </th>
<th> 编辑 </th>
<th> 删除 </th>
</tr>
</thead>
<tbody>
@*<tr>
<td> 1 </td>
<td> 交通费 </td>
<td> 2018-10-01 </td>
<td> 2000 </td>
<td> 备注信息 </td>
<td>
<a class="edit" href="javascript:;"> 编辑 </a>
</td>
<td>
<a class="delete" href="javascript:;"> 删除 </a>
</td>
</tr>*@
</tbody>
</table>
</div>
</div>The main one is the tag with ID detail_editable_1. This is the table that carries detailed information. We can define the header information we need, and the content of the input box can be dynamically added through the object of the dataTable plug-in. .
//定义dataTable对象
            var table = $('#detail_editable_1');
            var oTable = table.dataTable({
                "lengthMenu": [
                    [5, 15, 20, -1],
                    [5, 15, 20, "All"] // 改变每页的行数
                ],

                // 使用汉化
                "language": {
                    url: '//cdn.datatables.net/plug-ins/3cfcc339e89/i18n/Chinese.json'
                },

                //初始化
                "pageLength": 5,
                "columnDefs": [{ // 设置默认列设置
                    'orderable': true,
                    'targets': [0]
                }, {
                    "searchable": true,
                    "targets": [0]
                }],
                "order": [
                    [0, "asc"]
                ] // 将第一列设置为asc的默认排序
});Editing row records means dynamically adding some Input controls so that users can enter data, as shown in the following code.
//编辑行
function editRow(oTable, nRow) {
var aData = oTable.fnGetData(nRow);
var jqTds = $('>td', nRow);
jqTds[0].innerHTML = '<input type="text" class="form-control input-small" value="' + aData[0] + '" readonly>';
jqTds[1].innerHTML = '<input type="text" class="form-control input-small" value="' + aData[1] + '">';
jqTds[2].innerHTML = '<input type="date" class="form-control input-small" value="' + aData[2] + '">';
jqTds[3].innerHTML = '<input type="number" class="form-control input-small" value="' + aData[3] + '">';
jqTds[4].innerHTML = '<input type="text" class="form-control input-small" value="' + aData[4] + '">';
jqTds[5].innerHTML = '<a class="edit" href="">保存</a>';
jqTds[6].innerHTML = '<a class="cancel" href="">取消</a>';
}After saving the data, update the record into the corresponding TD object, as shown below.
//费用类型 发生时间 费用金额 费用说明
var objList = [];
//保存行数据,切换到普通模式
function saveRow(oTable, nRow) {
var jqInputs = $('input', nRow);
//更新行中每个input的值
oTable.fnUpdate(jqInputs[0].value, nRow, 0, false);
oTable.fnUpdate(jqInputs[1].value, nRow, 1, false);
oTable.fnUpdate(jqInputs[2].value, nRow, 2, false);
oTable.fnUpdate(jqInputs[3].value, nRow, 3, false);
oTable.fnUpdate(jqInputs[4].value, nRow, 4, false);
oTable.fnUpdate('<a class="edit" href="">编辑</a>', nRow, 5, false);
oTable.fnUpdate('<a class="delete" href="">删除</a>', nRow, 6, false);
oTable.fnDraw();
}Several action buttons on the interface, such as add, edit, save, delete and other button processing events are as follows.
var addRow = 1;
                $('#detail_editable_1_new').click(function (e) {
                    e.preventDefault();

                    if (nNew && nEditing) {
                        if (confirm("前面记录没有保存,您是否需要保存?")) {
                            saveRow(oTable, nEditing);
                            //$(nEditing).find("td:first").html("未保存");
                            nEditing = null;
                            nNew = false;
                        } else {
                            oTable.fnDeleteRow(nEditing); // cancel
                            nEditing = null;
                            nNew = false;
                            return;
                        }
                    }

                    //添加一条新的记录
                    var aiNew = oTable.fnAddData([addRow++, '', '', '', '', '', '']);
                    var nRow = oTable.fnGetNodes(aiNew[0]);
                    editRow(oTable, nRow);
                    nEditing = nRow;
                    nNew = true;
                });
                //删除操作
                table.on('click', '.delete', function (e) {
                    e.preventDefault();
                    if (confirm("您确认要删除该行记录吗?") == false) {
                        return;
                    }
                    //获取上一级tr行的数据
                    var nRow = $(this).parents('tr')[0];
                    var aData = oTable.fnGetData(nRow);

                    var found = false;
                    $.each(objList, function (i, item) {
                        if (item["seq"] == aData[0]) {
                            found = true;
                            objList.splice(i, 1);
                        }
                    });
                    oTable.fnDeleteRow(nRow);
                });
                //取消操作
                table.on('click', '.cancel', function (e) {
                    e.preventDefault();
                    if (nNew) {
                        oTable.fnDeleteRow(nEditing);
                        nEditing = null;
                        nNew = false;
                    } else {
                        restoreRow(oTable, nEditing);
                        nEditing = null;
                    }
                });
                //编辑操作
                table.on('click', '.edit', function (e) {
                    e.preventDefault();
                    nNew = false;

                    /*获取所击连接的行对象*/
                    var nRow = $(this).parents('tr')[0];

                    if (nEditing !== null && nEditing != nRow) {
                        /* 当前正在编辑 - 但不是此行 - 在继续编辑模式之前恢复旧版 */
                        restoreRow(oTable, nEditing);
                        editRow(oTable, nRow);
                        nEditing = nRow;
                    } else if (nEditing == nRow && this.innerHTML == "保存") {
                        /* 编辑该行,并准备保存记录 */
                        saveRow(oTable, nEditing);
                        nEditing = null;

                    } else {
                        /* No edit in progress - let's start one */
                        editRow(oTable, nRow);
                        nEditing = nRow;
                    }
                });
}In the last step, when submitting data, we traverse the entire table, obtain the data of each row, and put them into the JSON object list, and then submit it to the background for input. The following is the list of acquisition Data JS code
//获取表格的数据,并返回对象列表
            function GetData() {
                var list = [];
                var trs = table.fnGetNodes();
                for (var i = 0; i < trs.length; i++) {
                    var data = table.fnGetData(trs[i]);//获取指定行的数据

                    var obj = {};
                    //obj["seq"] = data[0];//序号
                    obj["FeeType"] = data[1];
                    obj["OccurTime"] = data[2];
                    obj["FeeAmount"] = data[3];
                    obj["FeeDescription"] = data[4];
                    list.push(obj);
                }
                return list;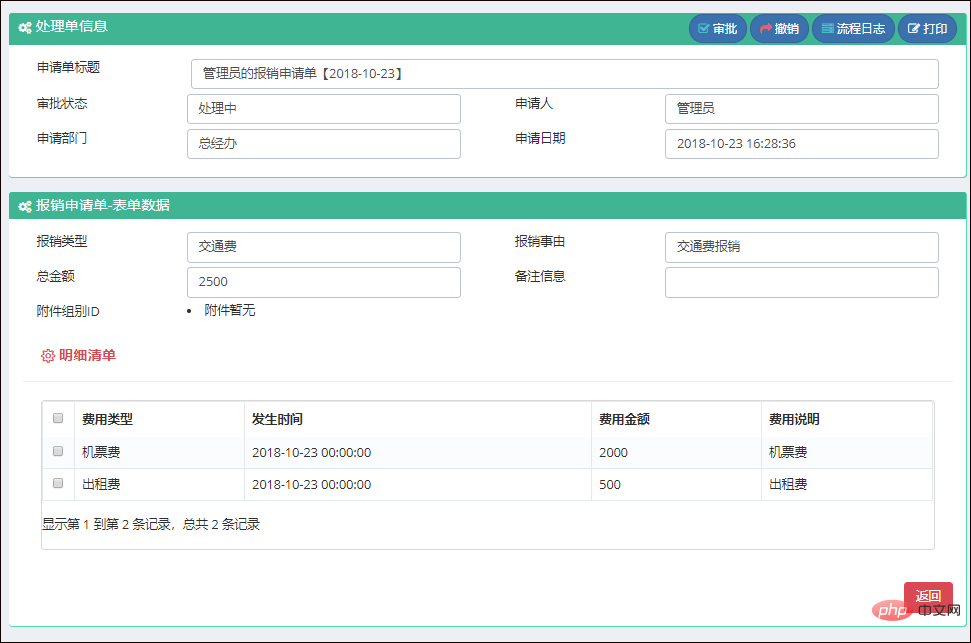
};After obtaining the detailed data of the form, we determine how to submit it to the MVC backend interface for processing. The following is the JS code for submitting detailed data to the MVC backend in the business.
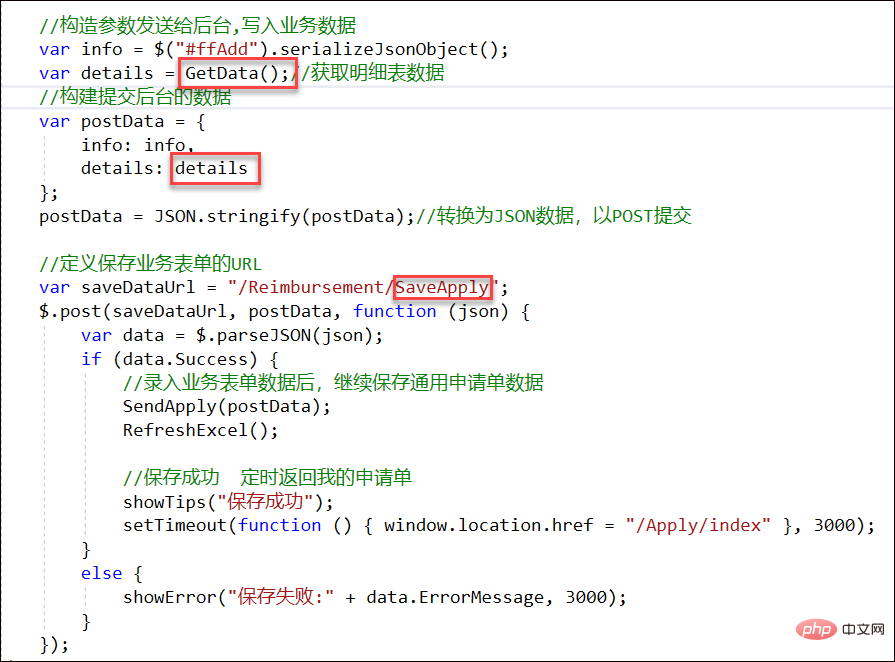
The C# processing logic code of the background MVC controller is as follows.
/// <summary>
        /// 保存申请单主从表数据
        /// </summary>
        /// <returns></returns>
        [HttpPost]
        public ActionResult SaveApply(JObject param)
        {
            dynamic obj = param;
            if (obj != null)
            {
                var result = new CommonResult();

                if (obj.info != null)
                {
                    //获取主信息
                    var info = (JObject.FromObject(obj.info)).ToObject<ReimbursementInfo>();

                    //转换为明细信息
                    List<ReimbursementDetailInfo> details = null;
                    if (obj.details != null)
                    {
                        details = (JArray.FromObject(obj.details)).ToObject<List<ReimbursementDetailInfo>>();
                    }

                    if (info != null)
                    {
                        //修改部分信息
                        OnBeforeInsert(info);
                        bool succeed = BLLFactory<Reimbursement>.Instance.Insert(info);
                        if (succeed)
                        {
                            if (details != null)
                            {
                                foreach (var detailInfo in details)
                                {
                                    //设置关键信息
                                    detailInfo.Apply_ID = info.Apply_ID;
                                    detailInfo.Header_ID = info.ID;
                                    BLLFactory<ReimbursementDetail>.Instance.InsertUpdate(detailInfo, detailInfo.ID);
                                }
                            }
                            result.Success = succeed;
                        }
                    }
                }
                return ToJsonContent(result);
            }
            else
            {
                throw new MyApiException("传递参数错误");
            }
}For the submitted data, the object information is converted using JObject, and for the detailed list, JArray.FromObject is used for conversion. The other part is how to save the interface of the main table and the detailed table.
The above processing logic and code are to process the front-end acquisition, submission processing, and back-end interface processing of the detailed table. The entire process is mainly used to introduce the use of dataTable to directly enter table row data in the Bootstrap development framework.
For more programming-related knowledge, please visit: Programming Video! !
The above is the detailed content of A brief discussion on how to directly enter table row data in Bootstrap (1). For more information, please follow other related articles on the PHP Chinese website!

Hot AI Tools

Undresser.AI Undress
AI-powered app for creating realistic nude photos

AI Clothes Remover
Online AI tool for removing clothes from photos.

Undress AI Tool
Undress images for free

Clothoff.io
AI clothes remover

AI Hentai Generator
Generate AI Hentai for free.

Hot Article
Hot Tools

Notepad++7.3.1
Easy-to-use and free code editor

SublimeText3 Chinese version
Chinese version, very easy to use

Zend Studio 13.0.1
Powerful PHP integrated development environment

Dreamweaver CS6
Visual web development tools

SublimeText3 Mac version
God-level code editing software (SublimeText3)
Hot Topics
 1381
1381
 52
52

 How to get the bootstrap search bar
Apr 07, 2025 pm 03:33 PM
How to get the bootstrap search bar
Apr 07, 2025 pm 03:33 PM
How to use Bootstrap to get the value of the search bar: Determines the ID or name of the search bar. Use JavaScript to get DOM elements. Gets the value of the element. Perform the required actions.
 How to do vertical centering of bootstrap
Apr 07, 2025 pm 03:21 PM
How to do vertical centering of bootstrap
Apr 07, 2025 pm 03:21 PM
Use Bootstrap to implement vertical centering: flexbox method: Use the d-flex, justify-content-center, and align-items-center classes to place elements in the flexbox container. align-items-center class method: For browsers that do not support flexbox, use the align-items-center class, provided that the parent element has a defined height.
 How to use bootstrap in vue
Apr 07, 2025 pm 11:33 PM
How to use bootstrap in vue
Apr 07, 2025 pm 11:33 PM
Using Bootstrap in Vue.js is divided into five steps: Install Bootstrap. Import Bootstrap in main.js. Use the Bootstrap component directly in the template. Optional: Custom style. Optional: Use plug-ins.
 How to write split lines on bootstrap
Apr 07, 2025 pm 03:12 PM
How to write split lines on bootstrap
Apr 07, 2025 pm 03:12 PM
There are two ways to create a Bootstrap split line: using the tag, which creates a horizontal split line. Use the CSS border property to create custom style split lines.
 How to resize bootstrap
Apr 07, 2025 pm 03:18 PM
How to resize bootstrap
Apr 07, 2025 pm 03:18 PM
To adjust the size of elements in Bootstrap, you can use the dimension class, which includes: adjusting width: .col-, .w-, .mw-adjust height: .h-, .min-h-, .max-h-
 How to insert pictures on bootstrap
Apr 07, 2025 pm 03:30 PM
How to insert pictures on bootstrap
Apr 07, 2025 pm 03:30 PM
There are several ways to insert images in Bootstrap: insert images directly, using the HTML img tag. With the Bootstrap image component, you can provide responsive images and more styles. Set the image size, use the img-fluid class to make the image adaptable. Set the border, using the img-bordered class. Set the rounded corners and use the img-rounded class. Set the shadow, use the shadow class. Resize and position the image, using CSS style. Using the background image, use the background-image CSS property.
 How to set up the framework for bootstrap
Apr 07, 2025 pm 03:27 PM
How to set up the framework for bootstrap
Apr 07, 2025 pm 03:27 PM
To set up the Bootstrap framework, you need to follow these steps: 1. Reference the Bootstrap file via CDN; 2. Download and host the file on your own server; 3. Include the Bootstrap file in HTML; 4. Compile Sass/Less as needed; 5. Import a custom file (optional). Once setup is complete, you can use Bootstrap's grid systems, components, and styles to create responsive websites and applications.
 How to view the date of bootstrap
Apr 07, 2025 pm 03:03 PM
How to view the date of bootstrap
Apr 07, 2025 pm 03:03 PM
Answer: You can use the date picker component of Bootstrap to view dates in the page. Steps: Introduce the Bootstrap framework. Create a date selector input box in HTML. Bootstrap will automatically add styles to the selector. Use JavaScript to get the selected date.
