How to install centos7? The following article will introduce to you how to install CentOS7 in vmware workstations. It has certain reference value. Friends in need can refer to it. I hope it will be helpful to everyone.

This article shows the installation process of CentOS7 based on vmware workstations. I will not introduce the installation and configuration of vmware workstations here. The basic process is equivalent to installing a software under windows.
1. Open vmware workstations, File->New Virtual Machine, the following interface will appear, select the "Custom (Advanced)" option, and continue with the next step:

2. This step is by default. Continue to the next step:

3. When the following interface appears, select the "Install operating system later" option and continue to the next step:

4. When the following interface appears, select "linux" for the guest operating system and "CentOS 64-bit" for the version. Continue to the next step:

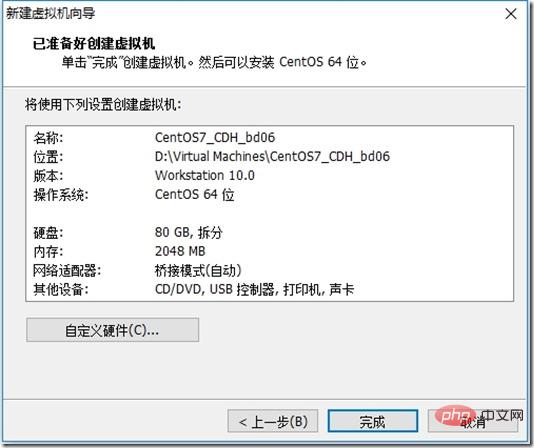
5. The following interface appears. Enter the custom virtual machine name. It is best to make the virtual machine name self-explanatory. Here is "CentOS7_CDH_bd06". Specify the virtual machine location. Here is "D:\Virtual Machines\ CentOS7_CDH_bd06", then continue with the next step:

6. The following interface appears, select the number of processors and the number of cores per processor, here are 2 and 4 respectively, next step Continue:

7. The following interface appears, specify the memory size occupied by the virtual machine, here is 2048M, continue to the next step:

8. The following interface appears. Select the network connection type. Here, select "Use Bridged Network". You can choose according to your needs during the installation of the virtual machine. The installation wizard has provided relatively standardized instructions for various modes. Here are additional instructions. As follows:
1) Use a bridged network: the virtual machine IP is in the same network segment as the local machine. The local machine and the virtual machine can communicate with each other through IP. When the local machine is connected to the Internet, the virtual machine can be connected to the Internet. At the same time, the virtual machine and the virtual machine can communicate with each other. Other hosts in this network segment can communicate with each other. This mode is often used in server environment architecture.
2) Use Network Address Translation (NAT): The virtual machine can connect to the Internet and communicate with the local machine, but cannot communicate with other hosts in the local network segment.
3) Use host-only mode network: the virtual machine cannot connect to the Internet, communicate with the local machine, and cannot communicate with other hosts in the local network segment.
Continue to the next step:

9. Default, continue to the next step:

10. Default, continue to the next step:

11, Default, continue to the next step:

12, The following interface appears, Enter the virtual machine disk size. The default 20g is generally not enough. It is recommended to set it slightly larger. Here, set the virtual machine disk size to 80G. Continue to the next step:

13. Default, Continue to the next step:

14. Default, click "Finish" to end virtual machine creation:

15. Exit After installing the wizard, we can see the newly created virtual machine in the left column of the virtual machine management interface, and the detailed configuration information of the virtual machine in the right column:

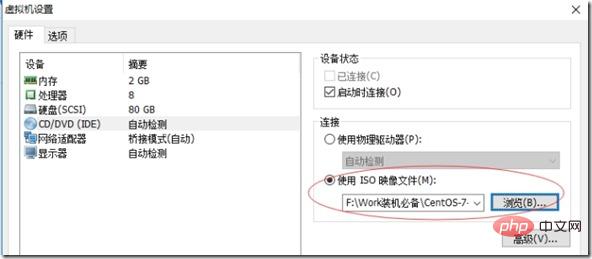
16 . Click the "Edit Virtual Machine Settings" option in the interface above, and the following interface will appear:

17. In the above picture, you need to specify the "CD/DVD (IDE)" installation image, remove the "USB Controller", "Sound Card" and "Printer", and then click OK. After following the above settings, the interface is as shown below :

18. Click to start the virtual machine to enter the CentOS7 operating system installation process:
19. When the virtual machine console interface appears, select Install CentOS liunx 7. Click the Enter key to continue:

20. Click the Enter key according to the prompts to continue:

21. The following interface English is selected by default, click Continue to continue:


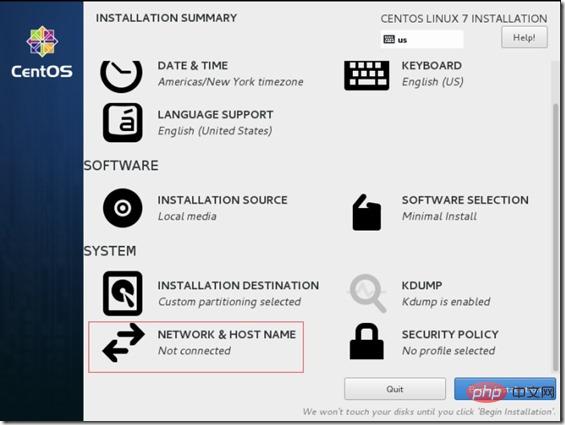
 ##24. After completing the disk planning, click on the red box in the picture below to modify the operating system host name. Here it is changed to db06 (as shown in the second picture), then click done to complete the host name configuration and return to the main configuration interface:

 25. In the picture below, in fact, starting from the configuration in step 24, we can find that the "begin installtion" button in the lower right corner has changed from the original The gray changes to blue, which means that the operating system installation is ready. Click "begin installtion" to proceed with the operating system installation process.
 26. All you need to do in the user settings in the picture below is to modify the root user password, click "root password", and set the password. If the password security is not high, such as mine The password here is "oracle", so you may need to click twice to confirm. When the root password is successfully set and returned to the installation interface, we can find that the red warning on the previous user setting interface has disappeared. Compare Figure 1 and Figure 3 below:


 27. In the picture below, the operating system installation has been completed. Click reboot to restart the operating system.
 28. Log in as root user (i.e. root/oracle) and modify the IP address (vi /etc/sysconfig/network-scripts/ifcfg-ens32):

Press the character key "i" to enter the edit mode and modify the /etc/sysconfig/network-scripts/ifcfg-ens32 file content as follows:
After pressing the "esc" key, enter: wq and press Enter to complete editing the configuration file.
Enter: service network restart command to restart the network card. Just change the IP address to take effect. Ping www.baidu.com to test network connectivity.
Okay, so far, the CentOS7 operating system has been installed successfully.
Recommended related tutorials: centos tutorial
The above is the detailed content of How to install centos7?. For more information, please follow other related articles on the PHP Chinese website!