Adding news to PHP native development news site
In the previous lesson, we completed the paging function of the news list, so starting from this lesson we will complete the addition, deletion, modification and check of news. Now that the check has been completed, the next step is to delete, edit and add! Today I will mainly introduce to you how to add it!
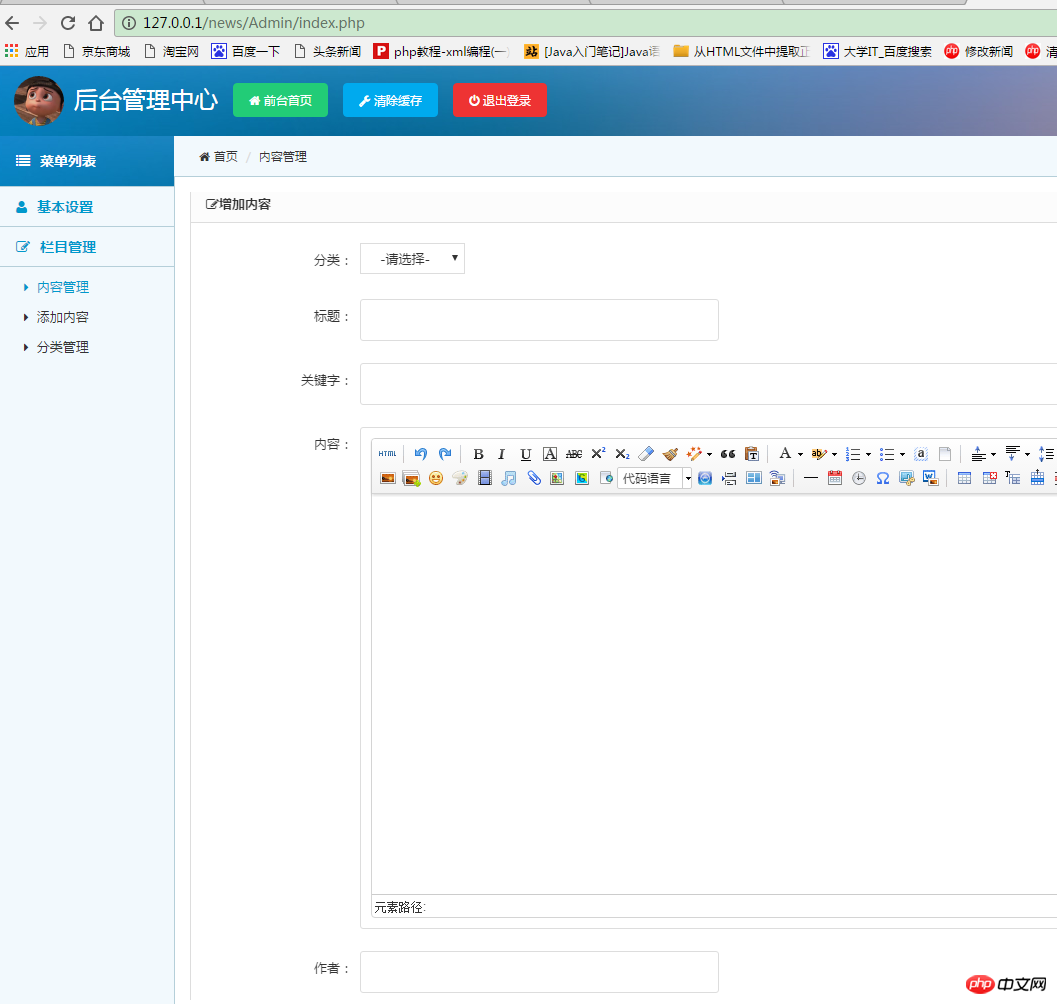
Similarly, we find the added template, select the required part according to the fields in the data table we created~To add news, we use the form form to submit and then insert it into the database
<form method="post" class="form-x" action="" enctype="multipart/form-data">
    <div class="form-group">
        <div class="label">
            <label>分类:</label>
        </div>
        <select name="category_id" style="padding:5px 15px; border:1px solid #ddd;">
                <option value="">-请选择-</option>
                <?php
                foreach( $arr_news_category as $val){
                    echo "<option value='{$val['id']}'>{$val['name']}</option>";
                }
                ?>
            </select>
        </select>
    </div>
    <div class="form-group">
        <div class="label">
            <label>标题:</label>
        </div>
        <div class="field">
            <input type="text" class="input w50" value="" name="title" data-validate="required:请输入标题" />
            <div class="tips"></div>
        </div>
    </div>
    <div class="clear"></div>
    <div class="form-group">
        <div class="label">
            <label>关键字:</label>
        </div>
        <div class="field">
            <input type="text" class="input" name="tag" value="" />
        </div>
    </div>

    <div class="form-group">
        <div class="label">
            <label>内容:</label>
        </div>
        <div class="field">
            <textarea name="content" class="input" id="content" style="height:450px; width: 98%; border:1px solid #ddd;"></textarea>
        </div>
    </div>
    <div class="form-group">
        <div class="label">
            <label>作者:</label>
        </div>
        <div class="field">
            <input type="text" class="input w50" name="author" value=""  />
            <div class="tips"></div>
        </div>
    </div>


    <div class="form-group">
        <div class="label">
            <label>图片:</label>
        </div>
        <div class="field">
            <input type="file" id="url1" name="pic" class="input tips" style="width:25%; float:left;"  value=""
            data-toggle="hover" data-place="right" data-image="" />
            <input type="button" class="button bg-blue margin-left" id="image1" value="+ 浏览上传"  style="float:left;">
            <div class="tipss">图片尺寸:500*500</div>
        </div>
    </div>


    <div class="form-group">
        <div class="label">
            <label>发布时间:</label>
        </div>
        <div class="field">
            <script src="../js/laydate/laydate.js"></script>
            <input type="text" class="laydate-icon input w50" name="created_at"
            onclick="laydate({istime: true, format: 'YYYY-MM-DD hh:mm:ss'})" value=""
            data-validate="required:日期不能为空" style="padding:10px!important;
            height:auto!important;border:1px solid #ddd!important;" />
            <div class="tips"></div>
        </div>
    </div>

    <div class="form-group">
        <div class="label">
            <label></label>
        </div>
        <div class="field">
            <button class="button bg-main icon-check-square-o" type="submit"> 提交</button>
        </div>
    </div>
</form>
In the form form we Use post to transmit data method="post"
action="" This is where to submit. I submit it to this page, but it is recommended that you create another processing page
enctype="multipart/ form-data" This is essential for uploading images!
Content The editor we use here is very simple. You can download one from the Internet, put it into your project, and then call and use<textarea></textarea>
<div class="form-group">
        <div class="label">
            <label>内容:</label>
        </div>
        <div class="field">
            <textarea name="content" class="input" id="content" style="height:450px; width: 98%; border:1px solid #ddd;"></textarea>
        </div>
    </div>
The most important thing to call the editor is <script> the code is as follows:
<script type="text/javascript">
    //实例化编辑器
    //建议使用工厂方法getEditor创建和引用编辑器实例,如果在某个闭包下引用该编辑器,直接调用UE.getEditor('editor')就能拿到相关的实例
    UE.getEditor('content',{initialFrameWidth:1500,initialFrameHeight:400,});

</script>
After the form is set up, we start writing the php processing page
The first step: connect to the database
<?php
// 连接mysql数据库
$link = mysqli_connect('localhost', 'root', 'root');
if (!$link) {
    echo "connect mysql error!";
    exit();
}
// 选中数据库 news为数据库的名字
$db_selected = mysqli_select_db($link, 'news');
if (!$db_selected) {
    echo "<br>selected db error!";
    exit();
}
// 设置mysql字符集 为 utf8
$link->query("set names utf8");
?>
Because we have to upload pictures here. So I uploaded and saved the image for processing:
<?php
if(count($_FILES['pic']) > 0){
    // 检查文件类型
    if(  !in_array($_FILES['pic']['type'], array('image/jpeg','image/png', 'image/gif')) ){
        echo "只运行上传jpg或png图片, 文件类型不合法,不允许上传";
    }
    // 检查文件大小
    if ($_FILES['pic']['size'] > 5*1024*1024){
            echo "文件最大尺寸为5M,不允许上传.";
        }
    $file_ext= pathinfo($_FILES['pic']['name'], PATHINFO_EXTENSION); // 获取文件后缀名
    $tmp_file = $_FILES['pic']['tmp_name']; // 临时文件
    $dest_file = pathinfo($tmp_file, PATHINFO_FILENAME).".".$file_ext; // 保存的文件名
    //move_uploaded_file($tmp_file, "d:/wamp/www/upload/".$dest_file);  // 使用绝对地址保存图片
    move_uploaded_file($tmp_file, "../../upload/".$dest_file); // 使用绝对路径地址保存图片
    $avatar_path ="../../upload/".$dest_file; // 注意,保存的时候,设置从服务器的根目录开始
}
?>
After the image is processed, we have to start transmitting the form and inserting the data into the database:
 <?php
 if ($_POST['created_at']){
        $current_time  = $_POST['created_at'];
    }else{
        $current_time = date("Y-m-d H:i:s");
    }
    $sql = "insert into new(category_id,title,content,tag,author,pic,created_at)
                    VALUES ('{$_POST['category_id']}',
                            '{$_POST['title']}',
                            '{$_POST['content']}',
                            '{$_POST['tag']}',
                            '{$_POST['author']}',
                            '{$avatar_path}',
                            '$current_time'
                            )";
    $result = mysqli_query($link,$sql);
    if($result){
        $url = "http://127.0.0.1/news/Admin/new/new_list.php";
        header("Location: $url");
        exit;
    }else{
        echo "添加新闻失败!";
        echo mysqli_error($link);
        exit;
    }
}
?>
Here we still have a category to choose, so We also need to query the classification table:
$sql  = "select * from new_category ";
$result = mysqli_query($link, $sql);
$arr_news_category = mysqli_fetch_all($result, MYSQL_ASSOC);
Then cycle out the classification in the category input box
    <div class="form-group">
        <div class="label">
            <label>分类:</label>
        </div>
        <select name="category_id" style="padding:5px 15px; border:1px solid #ddd;">
                <option value="">-请选择-</option>
                <?php
                foreach( $arr_news_category as $val){
                    echo "<option value='{$val['id']}'>{$val['name']}</option>";
                }
                ?>
            </select>
    </div>
This way, adding the news function is complete!
