PHP development basic tutorial file upload
1. PHP file upload
We often encounter many situations like this in our daily use:
-
Upload pictures in QQ space
Upload pictures in WeChat Moments
Send email and upload email data attachments
It is required to upload a photo or ID card during authentication
There are also various demands put forward by gou (gou) to analyze and upload different things.
We need to realize the requirements put forward by the product Wang.
Implementing file upload is one of the necessary skills for a PHP programmer.
By learning file upload, you will see the essence of file upload through the phenomenon of use!
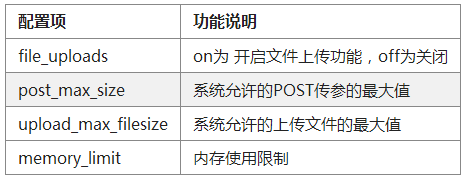
2. Please pay attention to the php.ini file when uploading files
Before we formally explain the uploading of this chapter, the first thing we should do is Pay attention to the php.ini file.
This is our first introduction to how to modify the php.ini file. If your configuration items are inconsistent with what we said, please pay attention to the modification.
Let’s understand each configuration item.
Let’s take a look at how to modify php.ini.
Open the php.ini configuration file in phpstudy.

There are too many php.ini files. If you can’t find them, you can use ctrl+f to search for related configuration items.

## Recommended size: file_size (file size) < upload_max_filesize < post_max_size < memory_limit
In addition, you need to pay attention to the script execution time. max_execution_time, the unit of this parameter is seconds.This parameter is to set the maximum execution time of the script.
You can also make appropriate changes according to your needs. Usually there is no need to modify it, the system default value is enough. When uploading very large files, this parameter may be modified.
3. Steps to Upload Files
In order to learn PHP better, we will summarize the extremely complex file upload of PHP Summarized into 6 steps. In actual use, you can successfully complete PHP file upload by following these 6 steps:1. Determine whether there is an error code
Detailed explanation of the error code returned by the system:
2. Customize to determine whether the file size exceeds the range
When developing the upload function. As developers, we, in addition to the maximum upload value specified in php.ini.
We usually also set a value, which is the upload size limit specified by the business.
For example:
Sina Weibo or QQ Zone only allows a single avatar picture of 2M. When uploading albums, you can upload more than 2M.
So, its system supports larger file uploads.
The judgment file size here is used to limit the uploaded file size we want to specify in actual business.
3. Determine whether the suffix name and mime type match
There are also bad people in the online world. They will insert viruses into pictures, upload viruses in attachments, and they will insert viruses or pornographic pictures into web pages.
We need to judge the suffix and mime type of the uploaded file.
MIME (Multipurpose Internet Mail Extensions) is a multipurpose Internet mail extension type. It is a type of method that sets a file with a certain extension to be opened by an application. When the file with the extension is accessed, the browser will automatically use the specified application to open it. It is mostly used to specify some client-defined file names and some media file opening methods.
When determining the suffix and MIME type, we will use a PHP function in_array(), which passes in two parameters.
The first parameter is the value to be judged;
The second parameter is the range array.
We use this function to determine whether the file extension and mime type are within the allowed range.
4. Generate file name
Our file was uploaded successfully, but it will not save the original name.
Because some people who have sensitive keywords in their original names will violate the relevant laws and regulations of our country.
We can use date(), mt_rand() or unique() to generate random file names.
5. Determine whether it is an uploaded file
When the file is uploaded successfully, the system will upload the uploaded temporary file to the system's temporary directory . Create a temporary file.
At the same time, a temporary file name will be generated. What we need to do is move the temporary files to the specified directory on the system.
It is unscientific not to move blindly before moving, or to move wrongly. Before moving, we need to use relevant functions to determine whether the uploaded file is a temporary file.
is_uploaded_file() passes in a parameter (the cache file name in $_FILES) to determine whether the passed name is an uploaded file
6. Move the temporary file to the specified location
Temporary files are real temporary files, we need to move them to our website directory.
Let others access the data in our website directory.
We use: move_uploaded_file().
This function moves the uploaded file to the specified location and names it.
Pass in two parameters:
The first parameter is the uploaded file that specifies the move;
The second parameter is the string concatenating the specified folder and name
4. Notes on file upload form
We start formal learning and learn how to upload files. To upload files, a form must be prepared on the web page.
This is a simple HTML page form. The form form prepares a special class for file content. When type=file is entered, the file content is uploaded by default.
Let’s take a look at the code and precautions of the form
<html>
    <head>
        <meta charset="utf-8" />
        <title>单文件上传</title>
    </head>
    <body>
        <form action="file.php" method="post" enctype="multipart/form-data">
            <input type="file" name="file">
            <input type="submit" value="上传">
        </form>
    </body>
</html>
Note:
The parameter method in the form form must be post. If it is get, the file cannot be uploaded
enctype must be multipart/form-data
5. Complete the file upload according to the array and steps
1. The file content submitted by the system function $_FILES
form form points to file.php .
We process uploaded files through PHP code in file.php.
We choose a picture named to upload. Assume the name of the picture is: hua.jpg, click to upload.
PHP has prepared a dedicated system function $_FILES for file data. All related data of uploaded files are stored in this system function.
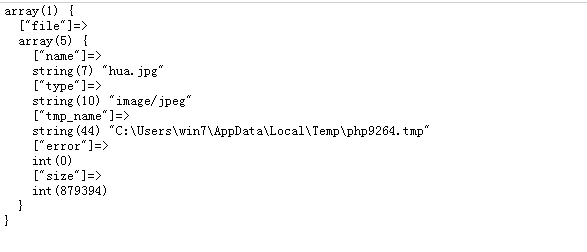
In the PHP file, we print $_FILES to observe the structure of this array:
<?php
//var_dump()或print_r()
//打印变量的相关信息,将变量的信息详细的展示出来
var_dump($_FILES);
?>
The array structure of the printed result is as follows:

The above array structure is obtained.
We can start the file processing process.
2. Determine the error code
<?php
if($_FILES['file']['error'] > 0){
    switch ($_FILES['file']['error']) {    //错误码不为0,即文件上传过程中出现了错误
        case '1':
            echo '文件过大';
            break;
        case '2':
            echo '文件超出指定大小';
            break;
        case '3':
            echo '只有部分文件被上传';
            break;
        case '4':
            echo '文件没有被上传';
            break;
        case '6':
            echo '找不到指定文件夹';
            break;
        case '7':
            echo '文件写入失败';
            break;
        default:
            echo "上传出错<br/>";
    }
}else{
    //错误码为0,即上传成功,可以进行后续处理,处理流程见下文
}
?>
The above code introduces the error code and the corresponding error in detail. We can generate accurate error prompts based on the error code. .
3. Determine whether the file exceeds the size
In actual projects, due to system hardware limitations and storage device limitations, it is impossible to allow users to upload without restrictions files, so we need to limit the size of files uploaded by users. Defining an appropriate limit size can make our application run more stably.
//判断错误
if($_FILES['file']['error'] > 0){
        //有错误可停止执行
}else{
    //当前上传文件无误,运行本段代码

    //判断文件是否超出了指定的大小
    //单位为byte
    $MAX_FILE_SIZE = 100000;
    if($_FILES['file']['size'] > $MAX_FILE_SIZE){
    //判断,如果上传的文件,大小超出了我们给的限制范围,退上传并产生错误提示
        exit("文件超出指定大小");
    }
Define the file size we specify as $MAX_FILE_SIZE. The counting unit of this variable is byte, which corresponds to the $_FILES['file']['size'] size of the uploaded file.
In the sample code, the limit is files with a size of approximately 100K and below.
4. Determine whether the mime type of the file is correct
More often, our file upload function needs to determine whether the file uploaded by the user meets the requirements. After uploading unavailable files, it will have a negative impact on the overall display effect of the online application. So we need to use the mime type and suffix name to determine whether the file uploaded by the user meets the requirements.
In the following sample code, we assume that the current project requirement is to specify uploaded images, requiring the uploading of files with the suffix GIF or jpg. When the user uploads a file that does not meet the requirements, an error message is returned.
/*判断后缀名和MIME类型是否符合指定需求
例如:
当前项目指定上传后缀为.jpg或.gif的图片,则$allowSuffix = array('jpg','gif');
*/
//定义允许的后缀名数组
$myImg = explode('.', $_FILES['file']['name']);

/*
explode() 将一个字符串用指定的字符切割,并返回一个数组,这里我们将文件名用'.''切割,结果存在$myImg中,文件的后缀名即为数组的最后一个值
*/
$myImgSuffix = array_pop($myImg);
/*
根据上传文件名获取文件的后缀名
使用in_array()函数,判断上传文件是否符合要求
当文件后缀名不在我们允许的范围内时退出上传并返回错误信息
*/
if(!in_array($myImgSuffix, $allowSuffix)){
        exit("文件后缀名不符");
}
/*
mime类型和文件后缀名的对应关系,我们可以通过很多途径查询到,为了避免用户自主修改文件后缀名造成文件无法使用。
mime类型也必须做出限制检查mime类型,是为了防止上传者直接修改文件后缀名
导致文件不可用或上传的文件不符合要求。
*/
//数组内容为允许上传的mime类型
$allowMime = array(
            "image/jpg",
            "image/jpeg",
            "image/pjpeg",
            "image/gif"
            );
if(!in_array($_FILES['file']['type'], $allowMime)){                      //判断上传文件的mime类型是否在允许的范围内
      exit('文件格式不正确,请检查');
    //如果不在允许范围内,退出上传并返回错误信息
}
5. Generate the specified path and file name
Generate the file storage path according to the file arrangement of the project. In order to avoid errors caused by duplicate file names, a random file name is generated according to a certain format.
//指定上传文件夹
$path = "upload/images/";
/*
根据当前时间生成随机文件名,本行代码是使用当前时间 + 随机一个0-9的数字组合成文件名,后缀即为前面取到的文件后缀名
*/
$name = date('Y').date('m').date("d").date('H').date('i').date('s').rand(0,9).'.'.$myImgSuffix;
6. Determine whether the file is uploaded
is_uploaded_file() function is a dedicated function to determine whether the target file is an uploaded file.
<?php
//使用is_uploaded_file()判断是否是上传文件,函数介绍见上文
if(is_uploaded_file($_FILEs['file']['tmp_name'])){
}
?>
7. Move the file to the specified location
Use the move_uploaded_file() function to move the file to the specified location and name it. It should be noted that the Linux system has permissions for the target directory and whether the disk space is sufficient, otherwise the upload operation will fail.
/*
使用move_uploaded_file()移动上传文件至指定位置,第一个参数为上传文件,第二个参数为我们在前面指定的上传路径和名称。
*/

if(move_uploaded_file($_FILEs['file']['tmp_name'], $path.$name)){
            //提示文件上传成功
            echo "上传成功";
        }else{
/*
文件移动失败,检查磁盘是否有足够的空间,或者linux类系统中文件夹是否有足够的操作权限
*/
            echo '上传失败';
        }
    }else{
        echo '不是上传文件';
    }
}
?>
The complete code is as follows:
<?php
if ($_FILES['file']['error'] > 0) {
    switch ($_FILES['file']['error']) {
        //错误码不为0,即文件上传过程中出现了错误
        case '1':
            echo '文件过大';
            break;
        case '2':
            echo '文件超出指定大小';
            break;
        case '3':
            echo '只有部分文件被上传';
            break;
        case '4':
            echo '文件没有被上传';
            break;
        case '6':
            echo '找不到指定文件夹';
            break;
        case '7':
            echo '文件写入失败';
            break;
        default:
            echo "上传出错<br/>";
    }
} else {

    $MAX_FILE_SIZE = 100000;
    if ($_FILES['file']['size'] > $MAX_FILE_SIZE) {
        exit("文件超出指定大小");

    }

    $allowSuffix = array(
        'jpg',
        'gif',
    );

    $myImg = explode('.', $_FILES['file']['name']);

    $myImgSuffix = array_pop($myImg);

    if (!in_array($myImgSuffix, $allowSuffix)) {
        exit("文件后缀名不符");
    }

    $allowMime = array(
        "image/jpg",
        "image/jpeg",
        "image/pjpeg",
        "image/gif",
    );

    if (!in_array($_FILES['file']['type'], $allowMime)) {
        exit('文件格式不正确,请检查');
    }

    $path = "upload/images/";
    $name = date('Y') . date('m') . date("d") . date('H') . date('i') . date('s') . rand(0, 9) . '.' . $myImgSuffix;

    if (is_uploaded_file($_FILEs['file']['tmp_name'])) {

        if (move_uploaded_file($_FILEs['file']['tmp_name'], $path . $name)) {
            echo "上传成功";
        } else {
            echo '上传失败';
        }

    } else {
        echo '不是上传文件';
    }

}
?>
6. Multiple file upload
Introduces the process of uploading a single file in PHP. But sometimes, for convenience, we need to meet the need to upload multiple files at the same time. The principle of multi-file upload is the same, but when processing data, the uploaded data needs to be specially processed.
<html>
    <head>
        <meta charset="utf-8" />
        <title>单文件上传</title>
    </head>
    <body>
        <form action="morefile.php" method="post" enctype="multipart/form-data">
         <input type="file" name="file[]">
         <input type="file" name="file[]">
         <input type="submit" value="上传">
     </form>
    </body>
</html>
Here is a simple upload page, and the form submits two files at the same time. We can submit content through this page.
Note:
input type="file" name="file[]" is added after file compared to before. A square bracket
writes two or more input type="file" name="file[]"
We use $_FILES to receive File information, print and view the array:
<?php
var_dump($_FILES); //打印$_FILES查看数组结构
?>
The array structure is shown on the right
We can see that two files are stored in an array , the key name is the same as the uploaded single file. Therefore, we need to use a for() loop to retrieve the required data from the two files respectively.
The data of two files are saved in $_FILES at the same time. We need to use a simple loop to read the information of a single file and move the file to the location we want to put.
for ($i=0; $i < count($_FILE['file']['name']); $i++) {
/*
用is_uploaded_file()函数判断是上传文件
并且没有出现错
*/
    if(is_uploaded_file($_FILEs['file']['tmp_name'][$i]) && $_FILEs['file']['error'][$i] == 0){
        if(move_uploaded_file($_FILEs['file']['tmp_name'][$i],'upload/'.$_FILE['file']['name'][$i])){
    //用move_uploaded_file()函数移动文件到指定的位置并使用文件原名
    echo "上传成功";
        }else{
            echo '上传失败';
        }
    }else{
       echo '上传失败';
    }
}
For the detailed judgment process, see single file upload. Only basic judgment is made here, and there is no reminder about the file size and format.
Please judge the file size and format by yourself according to the business and provide error reminders.
7. File upload progress processing
When the file is too large, or the user's network status is average, the upload process usually takes a while , if users are left waiting with a blank screen at this time, I believe most users will simply close the application, so the need to monitor the upload progress and report to users in real time is placed on the desktop by Product Wang. A high-quality upload progress prompt will instantly make your app look up to.
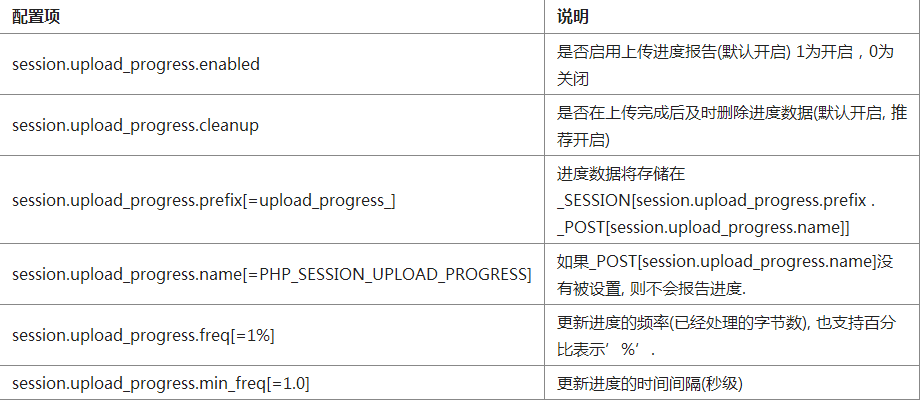
Before PHP 5.4, you always needed to install additional extensions to monitor the file upload progress. Starting from 5.4, the new feature of session.upload_progress is introduced. We only need to enable the configuration in php.ini to monitor the file upload progress through the session. in php.ini.
Note: To study this chapter, you need to have a basic foundation in session, javascript and ajax.
We need to configure, pay attention to check and modify the php.ini file:

After the configuration is turned on, we can record a complete file upload progress through the session. In the session, an array with the following results will appear:
 $_SESSION["upload_progress_test"] = array(
    //请求时间
     "start_time" => 1234567890,
     // 上传文件总大小
     "content_length" => 57343257,
     //已经处理的大小
     "bytes_processed" => 453489,
     //当所有上传处理完成后为TRUE,未完成为false
     "done" => false,

     "files" => array(
      0 => array(
        //表单中上传框的名字

       "field_name" => "file1",

       //上传文件的名称
       "name" => "test1.avi",

       //缓存文件,上传的文件即保存在这里
       "tmp_name" => "/tmp/phpxxxxxx",

       //文件上传的错误信息
       "error" => 0,

       //是否上传完成,当这个文件处理完成后会变成TRUE
       "done" => true,

       //这个文件开始处理时间
       "start_time" => 1234567890,

       //这个文件已经处理的大小
       "bytes_processed" => 57343250,
      ),

      1 => array(
       "field_name" => "file2",
       "name" => "test2.avi",
       "tmp_name" => NULL,
       "error" => 0,
       "done" => false,
       "start_time" => 1234567899,
       "bytes_processed" => 54554,
      ),
     )
    );
This array records the progress of file upload in detail, and the status of the files that have been processed is true. Next, we use a jQuery AJAX example to learn the file upload progress process.
First, in the form, you need to add an input tag with type=hidden, and the tag value is customized (it is recommended to use a meaningful value, because this value will be used in the background)
<form id="upload-form" action="upload.php" method="POST" enctype="multipart/form-data" style="margin:15px 0" target="hidden_iframe">
    <input type="hidden" name="<?php echo ini_get("session.upload_progress.name"); ?>" value="test" />
    <p><input type="file" name="file1" /></p>
    <p><input type="submit" value="Upload" /></p>
</form>
<div id="progress" style="margin-bottom:15px;display:none;">
    <div>0%</div>
</div>
Here, a div with an ID of progress is added as a container to display the upload progress. We use js's setTimeout() to execute ajax regularly to obtain the file upload progress, and the background file returns the progress percentage of the file upload.
<script src="../jquery/1.8.2/jquery.min.js"></script>
<script type="text/javascript">
function fetch_progress(){
    $.get('progress.php',{ '<?php echo ini_get("session.upload_progress.name"); ?>' : 'test'}, function(data){
        var progress = parseInt(data);
        $('#progress .label').html(progress + '%');
        if(progress < 100){
            setTimeout('fetch_progress()', 100);    //当上传进度小于100%时,显示上传百分比
        }else{
            $('#progress .label').html('完成!'); //当上传进度等于100%时,显示上传完成
        }
    }, 'html');
}

$('#upload-form').submit(function(){
    $('#progress').show();
    setTimeout('fetch_progress()', 100);//每0.1秒执行一次fetch_progress(),查询文件上传进度
});
</script>
The above code returns the file upload progress every 0.1 seconds through JQ's ajax. And display the progress percentage in the div tag.
The background code needs to be divided into two parts. upload.php handles uploading files. progress.php gets the upload progress in the session and returns the progress percentage.
I won’t go into details about file upload here. Please refer to the above for detailed steps. upload.php:
<?php
if(is_uploaded_file($_FILES['file1']['tmp_name'])){                                            //判断是否是上传文件
    //unlink($_FILES['file1']['tmp_name']);
    move_uploaded_file($_FILES['file1']['tmp_name'], "./{$_FILES['file1']['name']}");     //将缓存文件移动到指定位置
}
?>
主要关注progress.php:
<?php
/*
开启session。请注意在session_start()之前,请不要有想浏览器输出内容的动作,否则可能引起错误。
*/

session_start();

//ini_get()获取php.ini中环境变量的值
$i = ini_get('session.upload_progress.name');

//ajax中我们使用的是get方法,变量名称为ini文件中定义的前缀 拼接 传过来的参数
$key = ini_get("session.upload_progress.prefix") . $_GET[$i];
//判断 SESSION 中是否有上传文件的信息
if (!empty($_SESSION[$key])) {
    //已上传大小
    $current = $_SESSION[$key]["bytes_processed"];
    //文件总大小
    $total = $_SESSION[$key]["content_length"];

    //向 ajax 返回当前的上传进度百分比。
    echo $current < $total ? ceil($current / $total * 100) : 100;
}else{
    echo 100;
}
?>
At this point, the file progress code has been completed. With the front-end, we can do A cool file upload function!
Learning experience: Remember the six steps of file upload


