CSS syntax, how to create and use selectors
CSS Introduction
Basic knowledge required
Before continuing to learn, you need to have a basic understanding of the following knowledge:
· HTML
· How to display HTML elements
· Styles are usually stored in style sheets· Styles were added to HTML 4.0 to solve the problem of separation of content and presentation
· External Style table can greatly improve work efficiency
· External style table is usually stored in CSS files
# · Multiple style definition can be layered as one
style solution to solve A common problem arisesHTML tags were originally designed to define document content. By using tags such as <h1>, <p>, <table>, the original intention of HTML is to express information such as "This is a title", "This is a paragraph", "This is a table". At the same time, the document layout is completed by the browser without using any formatting tags.
Style sheets greatly improve work efficiencyStyle sheets define how HTML elements are displayed, just like the font tag and color attributes of HTML 3.2. Styles are usually saved in external .css files. External style sheets give you the ability to change the layout and appearance of all pages in your site at the same time by simply editing a simple CSS document.
CSS can be called a breakthrough in the field of WEB design because it allows the style and layout of multiple pages to be controlled at the same time. As a website developer, you can define styles for each HTML element and apply them to as many pages as you wish. To make a global update, simply change the style and all elements in the site will update automatically.
Multiple styles will be cascaded into a
Style sheet allows style information to be specified in multiple ways. Styles can be specified in individual HTML elements, in the header element of an HTML page, or in an external CSS file. You can even reference multiple external stylesheets within the same HTML document.
Cascading orderWhen the same HTML element is defined by more than one style, which style will be used?
Generally speaking, all styles will be cascaded in a new virtual style sheet according to the following rules, with number 4 having the highest priority.
1. Browser default settings2. External style sheet
3. Internal style sheet (located inside the <head> tag)
4. Inline styles (inside HTML elements)
Therefore, inline styles (inside HTML elements) have the highest priority, which means that they will take precedence over the following style declarations: style declarations in the <head> tag, style declarations in external style sheets, Or a style declaration in the browser (the default).
CSS basic syntax
CSS syntax
CSS rules consist of two main parts: the selector, and a or multiple statements.
selector {declaration1; declaration2; ... declarationN }
Selectors are usually HTML elements that you need to change the style of.
Each declaration consists of an attribute and a value.
The property is the style attribute you wish to set. Each attribute has a value. Properties and values are separated by colons.
selector {property: value}
The following line of code defines the text color within the h1 element as red and sets the font size to 14 pixels.
In this example, h1 is the selector, color and font-size are attributes, and red and 14px are values.
h1 {color:red; font-size:14px;}
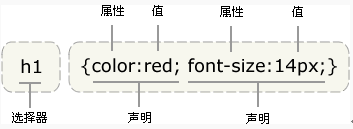
The diagram below shows you the structure of the above code :
Tip: Please use curly braces to surround declarations.
Different writing methods and units of values
In addition to the English word red, we can also use the hexadecimal color value #ff0000:
p { color: #ff0000; }
In order to save bytes, we can use the abbreviation form of CSS:
p { color: #f00; }
We can also pass Two methods use RGB values:
p { color: rgb(255,0,0); }
p { color: rgb(100%,0%,0%); }
Please note that when using RGB percentage, the percentage sign must be written even when the value is 0. But in other cases there is no need to do this. For example, when the size is 0 pixels, there is no need to use px units after 0, because 0 is 0, no matter what the unit is.
Remember to write quotation marks
Tip: If the value is several words, you need to add quotation marks to the value:
p {font-family: "sans serif";}
Multiple declarations:
Tip: If you want to define more than one declaration, you need to separate each declaration with a semicolon. The example below shows how to define a centered paragraph with red text. The last rule does not require a semicolon, because the semicolon is a delimiting symbol in English, not a closing symbol. However, most experienced designers will add a semicolon at the end of each declaration. The advantage of this is that it will minimize the possibility of errors when you add or subtract declarations from existing rules. . Like this:
p {text-align:center;color:red;}
You should only describe one attribute per line, which can enhance the readability of the style definition. Sex, like this:
p {
text-align: center;
color: black;
font-family: arial;
}
Space and Case
Most style sheets contain more than one rule, and most rules contain more than one declaration. Multiple declarations and the use of whitespace make the style sheet easier to edit:
body {
color: #000;
background: #fff;
margin: 0;
padding: 0;
font-family: Georgia, Palatino, serif;
}
Whether it contains spaces will not affect the working effect of CSS in the browser. Similarly, unlike XHTML, CSS Case insensitivity. There is one exception: when it comes to working with HTML documents, class and id names are case-sensitive.
CSS Advanced Syntax
Grouping of selectors
You can group selectors so that the grouped Selectors can share the same declaration. Use commas to separate selectors that need to be grouped. In the example below, we have grouped all heading elements. All title elements are green.
h1,h2,h3,h4,h5,h6 {
color: green;
}
CSS derived selector
Derived Selectors
You can make markup more concise by defining styles based on the context of an element's position.
In CSS1, selectors that apply rules in this way are called contextual selectors because they rely on context to apply or avoid a rule. In CSS2, they are called derived selectors, but no matter what you call them, they do the same thing.
Derived selectors allow you to style a tag based on the context of the document. By judiciously using derived selectors, we can make our HTML code cleaner.
For example, if you want the strong element in the list to be in italics instead of the usual bold, you can define a derived selector like this:
li strong {
font -style: italic;
font-weight: normal;
}
Please note the context of the blue code marked <strong>:
< ;p><strong>I am in bold, not italics, because I am not in the list, so this rule does not work for me</strong></p>
<ol> ;
<li><strong>My words are in italics. This is because the strong element is inside a li element. </strong></li>
<li>I am a normal font. </li>
</ol>
In the above example, only the strong element in the li element is styled in italics, and there is no need to define a special class or class for the strong element. id, the code is more concise.
Look at the following CSS rules:
strong {
color: red;
}
h2 {
color: red;
}
h2 strong {
color: blue;
}
The following is the HTML it affects:
<p>The strongly emphasized word in this paragraph is<strong>red</strong>.</p>
<h2>This subhead is also red.</h2>
<h2>The strongly emphasized word in this subhead is<strong>blue</strong>.</h2>
CSS id selector
id selector
The id selector can specify a specific style for HTML elements marked with a specific id.
id selector is defined with "#".
The following two id selectors, the first one can define the color of the element as red, and the second one can define the color of the element as green:
#red {color:red;}
#green {color:green;}
In the following HTML code, the p element with the id attribute red is displayed in red, and the p element with the id attribute green is displayed in green.
<p id="red">This paragraph is in red. </p>
<p id="green">This paragraph is green. </p>
Note: The id attribute can only appear once in each HTML document. To find out why, see XHTML: Website Refactoring.
id selector and derived selector
In modern layouts, the id selector is often used to create derived selectors.
#sidebar p {
font-style: italic;
text-align: right;
margin-top: 0.5em;
}
The above style will only be applied to paragraphs that appear within the element whose id is sidebar. This element is most likely a div or table cell, although it could also be a table or other block-level element. It can even be an inline element, such as <em></em> or <span></span>, but such usage is illegal because it cannot be used within the inline element <span> Embed <p> (if you forget why, see XHTML: Website Refactoring).
One selector, multiple uses
Even if the element marked as sidebar can only appear once in the document, this id selector can also be used as a derived selector. Used many times:
#sidebar p {
font-style: italic;
text-align: right;
margin-top: 0.5em;
}
#sidebar h2 {
font-size: 1em;
font-weight: normal;
font-style: italic;
margin: 0;
line-height: 1.5;
text-align: right;
}
Here, what is obviously different from other p elements in the page is that the p element inside the sidebar has received special treatment. At the same time, what is obviously different from all other h2 elements in the page is that the h2 element in the sidebar has also been treated. different special treatments.
Individual selector
The id selector can function independently even if it is not used to create a derived selector:
#sidebar {
border: 1px dotted #000;
padding: 10px;
}
According to this rule, the element with the id of sidebar will have a pixel-wide black dotted border, and will be surrounded by There is 10 pixels wide padding (internal white space). Older versions of Windows/IE browsers may ignore this rule unless you specifically define the element to which this selector belongs:
div#sidebar {
border: 1px dotted #000;
padding: 10px;
}
CSS class selector
In CSS, the class selector is displayed with a period:
.center {text-align: center}
In the above example, all HTML elements with the center class are centered.
In the following HTML code, both h1 and p elements have the center class. This means that both will obey the rules in the ".center" selector.
<h1 class="center">
This heading will be center-aligned
</h1>
<p class="center">
This paragraph will also be center-aligned.
</p>
Note: Numbers cannot be used as the first character of the class name! It won't work in Mozilla or Firefox.
Like id, class can also be used as a derived selector:
.fancy td {
color: #f60;
background: #666;
}
In the above example, the table cells inside the larger element with the class name fancy will display orange text on a gray background. (A larger element named fancy might be a table or a div)
Elements can also be selected based on their class:
td.fancy {
color: # f60;
background: #666;
}
In the above example, the table cell with the class name fancy will be orange with a gray background.
<td class="fancy">
You can assign class fancy to any table element as many times as you want. Cells marked with fancy will be orange with a gray background. Cells that are not assigned a class named fancy are not affected by this rule. It's also worth noting that paragraphs with class fancy will not be orange with a gray background, and of course any other elements marked as fancy will not be affected by this rule. This is all due to the way we wrote this rule, the effect is limited to table cells marked as fancy (i.e. using the td element to select the fancy class).
How to create CSS
How to insert a style sheet
When a style sheet is read, the browser will format the HTML document according to it. There are three ways to insert a style sheet:
External style sheet
An external style sheet is ideal when styles need to be applied to many pages. With external style sheets, you can change the look of your entire site by changing one file. Each page links to the style sheet using the <link> tag. The <link> tag is in the head (of the document):
<head>
<linkrel="stylesheet" type="text/css" href="mystyle.css" />
</head>
The browser will read the style declaration from the file mystyle.css and format the document according to it.
External style sheets can be edited in any text editor. The file cannot contain any html tags. Style sheets should be saved with a .css extension. Here is an example of a style sheet file:
hr {color: sienna;}
p {margin-left: 20px;}
body {background-image: url("images/back40. gif");}
Do not leave spaces between attribute values and units. If you use "margin-left: 20 px" instead of "margin-left: 20px" it will only work in IE 6, but not in Mozilla/Firefox or Netscape.
Internal style sheets
When a single document requires special styling, an internal style sheet should be used. You can define an internal style sheet in the head of the document using the <style> tag, like this:
<head>
<style type="text/css">
hr {color: sienna;}
p {margin-left: 20px;}
body {background-image: url("images/back40.gif");}
</style>
</head>
Inline styles
Inline styles lose many of the advantages of style sheets by mixing presentation with content. . Use this approach with caution, for example when the style only needs to be applied once to an element.
To use inline styles, you need to use the style attribute within the relevant tag. The Style property can contain any CSS property. This example shows how to change the color and left margin of a paragraph:
<p style="color: sienna; margin-left: 20px">
This is a paragraph
</ p>
Multiple styles
If some properties are defined by the same selector in different style sheets, the property values will be inherited from the more specific style sheet.
For example, the external style sheet has three properties for the h3 selector:
h3 {
color: red;
text-align: left;
font- size: 8pt;
}
The internal style sheet has two attributes for the h3 selector:
h3 {
text-align: right;
font-size: 20pt;
}
If this page with an internal style sheet is linked to an external style sheet at the same time, then the style obtained by h3 is:
color: red;
text-align: right;
font-size: 20pt;
That is, the color attribute will be inherited from the external style sheet, and the text alignment (text-alignment) and font size (font-size) Will be replaced by rules in the internal style sheet.


