HTML5 WebSocket
WebSocket is a protocol for full-duplex communication on a single TCP connection that HTML5 began to provide.
In the WebSocket API, the browser and the server only need to perform a handshake action, and then a fast channel is formed between the browser and the server. Data can be transmitted directly between the two.
The browser sends a request to the server to establish a WebSocket connection through JavaScript. After the connection is established, the client and the server can directly exchange data through the TCP connection.
After you obtain the Web Socket connection, you can send data to the server through the send() method, and receive the data returned by the server through the onmessage event.
The following API is used to create WebSocket objects.
var Socket = new WebSocket(url, [protocal] );
The first parameter url in the above code, Specify the URL to connect to. The second parameter protocol is optional and specifies acceptable subprotocols.
WebSocket Properties
The following are the properties of the WebSocket object. Suppose we use the above code to create a Socket object:
| Properties | describe |
Socket.readyState | The read-only attribute readyState represents the connection status and can be the following values:
|
| Read-only property bufferedAmount The number of UTF-8 text bytes that have been put into the queue by send() and are waiting for transmission, but have not yet been sent. |
WebSocket Events
The following are related events for the WebSocket object. Suppose we use the above code to create a Socket object:
## openSocket. onopenTriggered when the connection is established messageSocket.onmessageTriggered when the client receives data from the server errorSocket.onerrorTriggered when a communication error occurs closeSocket .oncloseTriggered when the connection is closedWebSocket methods
The following are the relevant methods of the WebSocket object. Assume that we use the above code to create a Socket object:
| Event | Event handler | Description |
WebSocket Example
The WebSocket protocol is essentially a TCP-based protocol.
In order to establish a WebSocket connection, the client browser must first initiate an HTTP request to the server. This request is different from the usual HTTP request and contains some additional header information, including the additional header information "Upgrade: WebSocket" Indicates that this is an HTTP request to apply for a protocol upgrade. The server parses these additional header information and then generates response information and returns it to the client. The WebSocket connection between the client and the server is established, and both parties can communicate freely through this connection channel. information, and this connection will continue to exist until either the client or the server actively closes the connection.
HTML and JavaScript on the client side
Currently, most browsers support the WebSocket() interface, you can use the following Examples of browsers to try: Chrome, Mozilla, Opera and Safari.
php_websocket.html file content
<!DOCTYPE HTML>
<html>
   <head>
   <meta charset="utf-8">
   <title>php中文网(php.cn)</title>
      <script type="text/javascript">
         function WebSocketTest()
         {
            if ("WebSocket" in window)
            {
               alert("您的浏览器支持 WebSocket!");

               // 打开一个 web socket
               var ws = new WebSocket("ws://localhost:9998/echo");
               ws.onopen = function()
               {
                  // Web Socket 已连接上,使用 send() 方法发送数据
                  ws.send("发送数据");
                  alert("数据发送中...");
               };
               ws.onmessage = function (evt)
               {
                  var received_msg = evt.data;
                  alert("数据已接收...");
               };
               ws.onclose = function()
               {
                  // 关闭 websocket
                  alert("连接已关闭...");
               };
            }

            else
            {
               // 浏览器不支持 WebSocket
               alert("您的浏览器不支持 WebSocket!");
            }
         }
      </script>
   </head>
   <body>

      <div id="sse">
         <a href="javascript:WebSocketTest()">运行 WebSocket</a>
      </div>

   </body>
</html>
Install pywebsocket
Before executing the above program, we need to create A service that supports WebSocket. Download mod_pywebsocket from pywebsocket, or use the git command to download:
git clone https://github.com/google/pywebsocket.git
mod_pywebsocket requires python environment support
mod_pywebsocket is a Web Socket extension for Apache HTTP. The installation steps are as follows:
Unzip the downloaded file.
Enter the pywebsocket directory.
Execute command:
$ python setup.py build
$ sudo python setup.py install
View documentation:
##$ pydoc mod_pywebsocket
Start the service
Execute the following command in the pywebsocket/mod_pywebsocket directory:
$ sudo python standalone.py -p 9998 -w ../example/
The above command will open a service with port number 9998, use -w To set the directory where the handler echo_wsh.py is located.
Now we can open the php_websocket.html file created earlier in the Chrome browser. If your browser supports WebSocket(), click "Run WebSocket", you can see the pop-up window of each step of the entire process, process Gif demonstration:
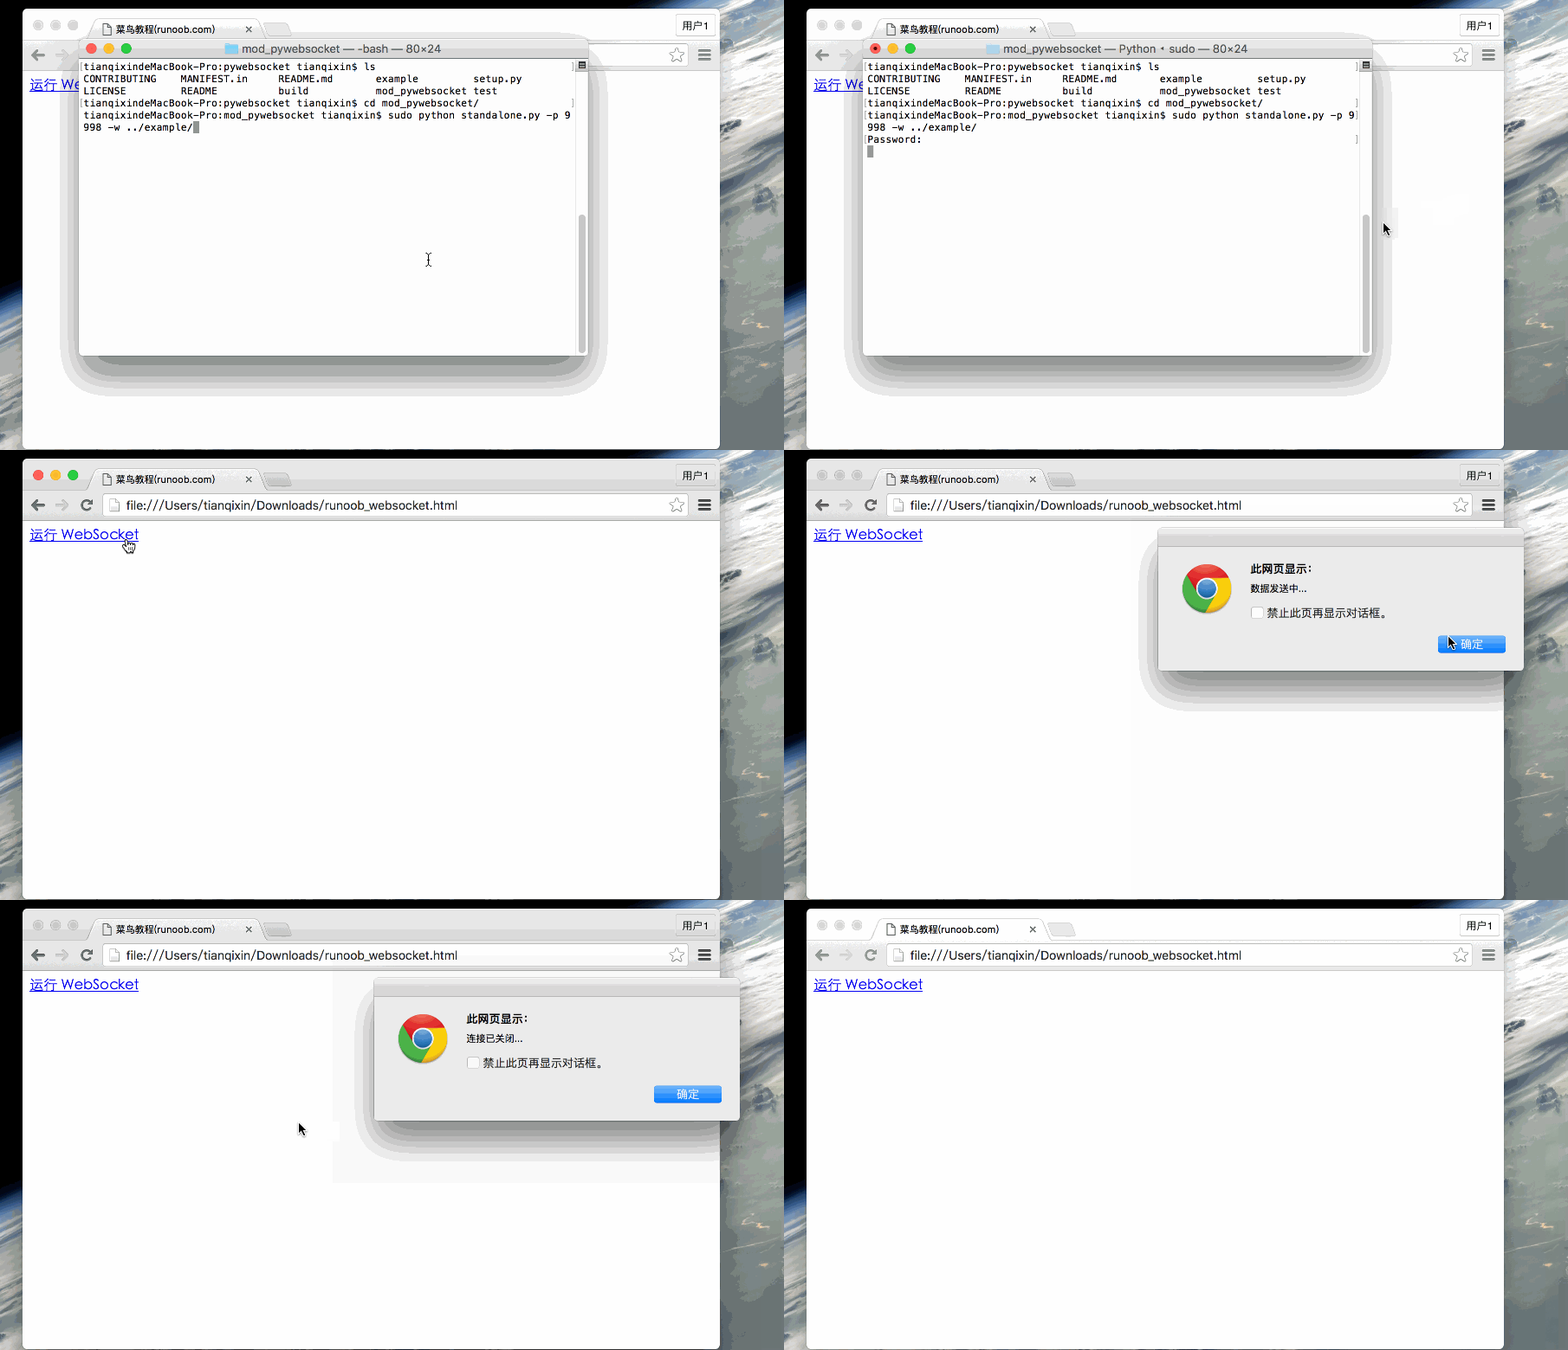
In our After stopping the service, "Connection closed..." will pop up.
- Course Recommendations
- Courseware download
-

ElementaryHTML basic tutorial
31697 people are watching -
ElementaryHTML+CSS basic introductory tutorial
82547 people are watching -
ElementaryHTML/CSS 5-hour basic introductory tutorial
26321 people are watching -

ElementaryHan Shunping 2016 latest HTML basic video tutorial
10529 people are watching -

ElementaryAjax basic tutorial
15617 people are watching -

ElementaryjQuery basic tutorial
8717 people are watching -
ElementaryEcshop basic tutorial
12223 people are watching -
ElementaryNode.js basic tutorial
28268 people are watching -
ElementaryNode.js basic tutorial
6911 people are watching -
ElementaryJavascript basic tutorial
27731 people are watching -

ElementaryServlet basic tutorial
15734 people are watching -
ElementaryJavaScript basic syntax and basic statement video tutorial
10790 people are watching
Students who have watched this course are also learning
- Let's briefly talk about starting a business in PHP
- Quick introduction to web front-end development
- Large-scale practical Tianlongbabu development of Mini version MVC framework imitating the encyclopedia website of embarrassing things
- Getting Started with PHP Practical Development: PHP Quick Creation [Small Business Forum]
- Login verification and classic message board
- Computer network knowledge collection
- Quick Start Node.JS Full Version
- The front-end course that understands you best: HTML5/CSS3/ES6/NPM/Vue/...[Original]
- Write your own PHP MVC framework (40 chapters in depth/big details/must read for newbies to advance)
| Method | Description |


