
border: border-width border-style border-color;
border-width: border width, cannot be a percentage, because it will not Changes according to the width of the device; similarly, outline | text-shadow | box-shadow cannot be used;
border-style: border style, generally more solid, dashed (dashed line), dotted (dotted line) ) also has;
border-color: border color, the default color is the text color of the element, if not set, the text color is inherited from the parent element;
The border can be set individually according to the direction, Up, down, left and right, border-top | border-bottom | border-left | border-right;
So the properties can also be set individually, border-top-width | border-top-style | border-top-color;
Single attributes can also be written in combination:
border-width: top, right, bottom, left; (clockwise)
border-width: top, left, bottom;
border-width: up, down, left and right;
border-width: four directions;
border-style | border-color can also be set like this;
Also You can use a combination of writing methods according to the direction:
border-left: border width, border style, border color;
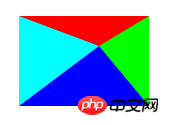
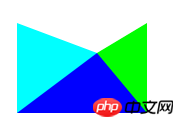
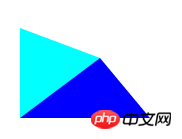
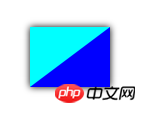
border The intersection of is a diagonal line. Masters use this feature to make triangles. With other attributes, various graphics can be made;
The principle is to control the border color in four directions. You can make a triangle; then control the width, you can make a variety of obtuse and acute triangles;

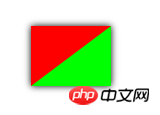

#
<!DOCTYPE html><html>
    <head>
        <meta charset="UTF-8">
        <title></title>
        <style type="text/css">
            .triangle{
                border-style:solid;
                border-width: 30px 50px 60px 80px;
                /*我们可以控制各方向边框的宽度,做出各种不同的三角形*/
                border-color: #f00 #0f0 #00f #0ff;
                /*四个方向的颜色自由设置,当设置其他三个方向或两个方向的颜色为transparent(透明色)时,另一方向就成了一个三角形*/
                width: 0;/*盒子宽度为0,四个方向的border宽度一致,可以用border做正方形*/
                margin: 100px;
            }
        </style>
    </head>
    <body>
        <p class="triangle"></p>
</body></html>##I prefer to write according to the direction Triangle, easy to understand like this:

            .triangle{
                border-left: 10px solid transparent;
                border-right: 10px solid transparent;
                border-bottom: 10px solid #0ff;
                /*我们一般根据方向来写三角形,这样容易记忆;箭头指向的反方向的颜色设置为你想要的,然后箭头方向不要写,另外两个方向的颜色设置为transperent透明*/
            }
3. Small triangle The shadow
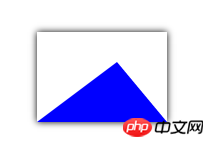 If you don’t want the shadow, it will be very difficult It’s easy to solve, just delete the box-shadow of the triangle;
In practical applications, we need shadows in many cases, but the shadows appear on the two sides of the triangle. The following figure shows the container Shadow set;
当我们把之前的箭头删掉,就是如图: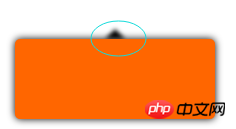
完成品: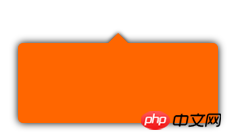 PS:滤镜也有兼容性问题,建议用谷歌浏览器测试;
以下是代码:
<!DOCTYPE html><html>
    <head>
        <meta charset="UTF-8">
        <title></title>
        <style type="text/css">
            .note{
                margin: 100px;
                width: 200px;
                height: 80px;
                background: #f60;
                position: relative;
                border-radius: 5px;
                box-shadow: 0 0 10px 0px #000;
                /*水平偏移---垂直偏移---模糊度---扩张半径---颜色*/
            }
            .triangle{
                border-left: 10px solid transparent;
                border-right: 10px solid transparent;
                border-bottom: 10px solid #f60;
                /*我们一般根据方向来写三角形,这样容易记忆;箭头指向的反方向的颜色设置为你想要的,然后箭头方向不要写,另外两个方向的颜色设置为transperent透明*/
                position: absolute;
                top: -10px;
                left: 50%;
                margin-left: -10px;
            }
            .filter{
                border-left: 10px solid transparent;
                border-right: 10px solid transparent;
                border-bottom: 10px solid #000;
                position: absolute;
                top: -10px;
                left: 50%;
                margin-left: -10px;
                z-index: -1;
                filter: blur(2px);
                /*这又设计到滤镜的知识*/
            }
        </style>
    </head>
    <body>
        <p class="wrapper">
            <p class="note">
                <span class="triangle"></span>
                <span class="filter"></span>
            </p>
        </p>
</body></html>写个三角形,沉在箭头下边,颜色设置成边框颜色,位置比箭头稍高一些(容器边框宽度值),就可以了;
接下来我使用:after 和 :before 写的三角形和边框,同理上面的阴影也可以这样;
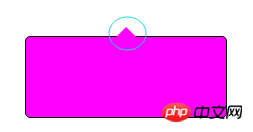
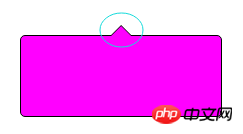
<!DOCTYPE html><html>
    <head>
        <meta charset="UTF-8">
        <title></title>
        <style type="text/css">
            .note{
                margin: 100px;
                width: 200px;
                height: 80px;
                background: #f0f;
                position: relative;
                border-radius: 5px;
                border: 1px solid #000;
            }
            .note:after{
                content: "";
                border-left: 10px solid transparent;
                border-right: 10px solid transparent;
                border-bottom: 10px solid #f0f;
                /*我们一般根据方向来写三角形,这样容易记忆;箭头指向的反方向的颜色设置为你想要的,然后箭头方向不要写,另外两个方向的颜色设置为transperent透明*/
                position: absolute;
                top: -10px;
                left: 50%;
                margin-left: -10px;
            }
            .note:before{
                content: "";
                border-left: 10px solid transparent;
                border-right: 10px solid transparent;
                border-bottom: 10px solid #000;
                position: absolute;
                top: -11px;
                /*写个三角形,沉在箭头下边,颜色设置成边框颜色,位置比箭头稍高一些(容器边框宽度值),就可以了*/
                left: 50%;
                margin-left: -10px;
                z-index: -1;
            }
        </style>
    </head>
    <body>
        <p class="wrapper">
            <p class="note"></p>
        </p>
    </body></html>
css3属性border-radius,“边框半径”,值可以用px、em、pt、百分比等;
border-radius支持四个角使用不同弧度,方向依次是左上--右上--右下--左下(是从左上开始,顺时针);
border-radius还可以单独对每个角设置:
border-top-left-radius
border-top-right-radius
border-bottom-right-radius
border-bottom-left-radius
单独设置可以写两个值,第一个值是水平半径,第二个值是垂直半径;如果只有一个值,那么水平和垂直相等;
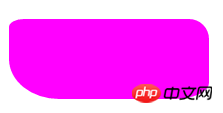
<!DOCTYPE html><html>
    <head>
        <meta charset="UTF-8">
        <title></title>
        <style type="text/css">
            *{
                padding: 0;
                margin: 0;
            }
            .test{
                width: 200px;
                height: 80px;
                margin: 100px;
                background: #f0f;
                border-radius: 15px 20px 35px 50px / 10% 25% 1em 50%;
                /*水平-----/-----垂直,中间用“/”隔开*/
                /*左上水平   右上水平   右下水平   左下水平  /  左上垂直   右上垂直   右下垂直   左下垂直*/
                /*这种方法不推荐使用,太乱了,傻傻分不清楚*/
            }
        </style>
    </head>
    <body>
        <p class="test"></p>
</body></html>当然,这个属性我们用的最多的就是画圆形,把值设成宽度的一半及以上(50%及以上),border-radius:50%,我就不举列子了;
outline制作多重边框
有的需求是边框外面还有边框,我们可以用outline来写,有一个相关的属性outline-offset,可以控制描边与边缘的位置关系,可以设置成负值;
outline制作多重边框,最多只能两层,而且不能是弧形的;
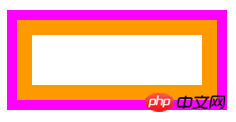
<!DOCTYPE html><html>
    <head>
        <meta charset="UTF-8">
        <title></title>
        <style type="text/css">
            *{
                padding: 0;
                margin: 0;
            }
            .test{
                margin: 100px;
                width: 200px;
                height: 80px;
                border:10px solid #f0f;
                outline: 15px solid #f90;
                outline-offset: -25px;
            }
        </style>
    </head>
    <body>
        <p class="test"></p>
</body></html>box-shadow制作多重边框
box-shadow可以做很多层(多了会很卡,电脑性能问题),而且配合border-radius属性可以做出弧形;
box-shadow是不占据空间的,所以无法响应事件,我们可以利用inset设置成内阴影,在扩大空间就好了;
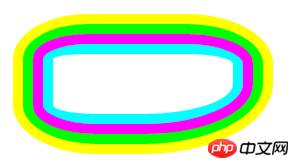
<!DOCTYPE html><html>
    <head>
        <meta charset="UTF-8">
        <title></title>
        <style type="text/css">
            *{
                padding: 0;
                margin: 0;
            }
            .test{
                margin: 100px;
                width: 200px;
                height: 80px;
                border:10px solid #f0f;
                border-radius: 25% 30% 50% 29%;
                box-shadow: 0 0 0 10px #0f0 , 0 0 0 20px #ff0 , 0 0 0 10px #0ff inset;
                /*水平偏移---垂直偏移---模糊度---扩张半径---颜色*/
                /*可以写多个阴影,用逗号隔开*/
                /*inset是内阴影*/
                /*由于box-shadow属性并不占据空间,所以是无法响应事件的,我们可以利用inset内阴影,再用padding扩充空间就好了*/
            }
        </style>
    </head>
    <body>
        <p class="test"></p>
</body></html>更多Summary and interpretation of border triangle shadows and multiple borders相关文章请关注PHP中文网!


