
1 Written in front
Recently I am organizing the style of the pages on cnblogs. By default, the tags in the [Essay Category] on the right side are displayed one per line. And I want to set the tags in the [Essay Category] on the right to display multiple tags in one line. The number of tags displayed depends on the size of the tags, and the background color of each tag will change when the mouse is placed on it. The effect is as shown below.
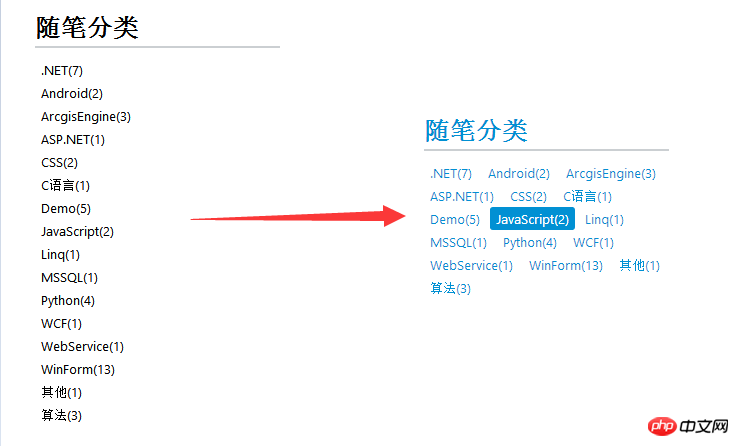
Let’s analyze how to change the display mode of the label on the left to the one on the right
In Before analyzing the block elements, we first create an html web page for later analysis. The html code is as follows.
<html>
    <head>
        <meta charset="utf-8">
        <style type="text/css">
            body{
                width:500px;
                margin:20px auto;
                color:black;
            }
            a{
                color:inherit;
                text-decoration:none;
            }
            p{
                width:320px;
                border:1px solid red;
            }
            p ul {
                padding-left:10px;
            }
        </style>
        <link rel="stylesheet" type="text/css" href="pagestyle.css">
    </head>
    <body>
        <p>
            <ul>
                <li><a href="#">.NET(7)</a> </li>
                <li><a  href="#">Android(2)</a> </li>
                <li><a href="#">ArcgisEngine(3)</a> </li>
                <li><a  href="#">ASP.NET(1)</a> </li>
                <li><a  href="#">CSS(1)</a> </li>
                <li><a  href="#">C语言(1)</a> </li>
                <li><a  href="#">Demo(5)</a> </li>
                <li><a href="#">JavaScript(2)</a> </li>
                <li><a  href="#">Linq(1)</a> </li>
                <li><a  href="#">MSSQL(1)</a> </li>
                <li><a  href="#">其他(1)</a> </li>
                <li><a href="#">算法(3)</a> </li>
            </ul>
        </p>
</body></html>Of course, we set some simple styles for this HTML, remove the list symbol, and the underline of the a tag. Currently, there is no code in the pagestyle.css file. The effect of the above code is as follows.
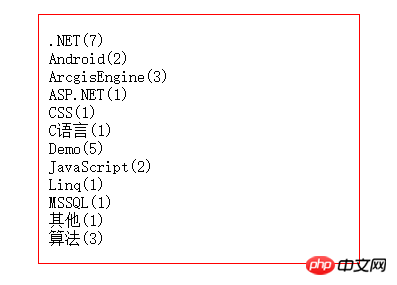
We can find that each list li element is displayed in a single line, and their height is equivalent to the internal content. Now we add an outer border to the li element And set the padding appropriately and write the following code in pagestyle.css.
li{
    border:1px solid green;
    margin-top:2px;
padding:5px 0 5px 0;}The effect is as follows. 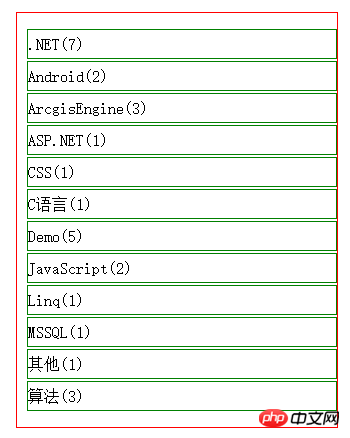
By setting a border for the li element, you can know that the li element occupies one line by default. Its width is the same as the width of the parent container, and the height is the height of their actual content + padding. . The li element belongs to the c block element. Let’s summarize what are the characteristics of CSS block elements.
The block element occupies one line by default, the width is the same as the parent container, and the height is the height of the content + padding.
Block elements can control the margins between the block element and other elements and the white space between its own frame and content by setting the margin and padding values (Inner margin ).
Block elements can set width and height.
Setting the height, padding, and margin of the block element will increase the document flow of the parent container. Of course, this must be provided that the parent container does not set a fixed height.
As mentioned above, block elements always occupy one line, and the width is the same as the parent container. When we manually set the width of the li element to a very small width, will the li element below run to the top? The answer is that it will definitely not come up, because the block element is always so domineering. Even if its width is very small, it still has to occupy a line. If you don’t believe it, take a look at the code and effect below.
li{
    border:1px solid green;
    margin-top:2px;
    padding:5px 0 5px 0;
width:150px;/*手动设置宽度*/}We set the width of the li element to 150, the effect is as follows.
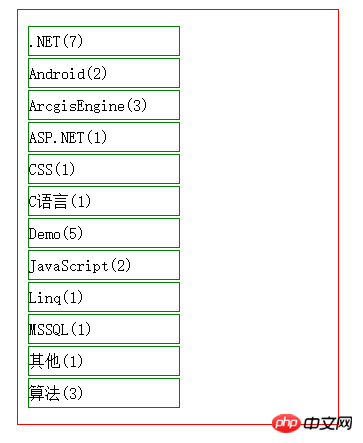
We can see that the width of the li element has changed, but it is still on its own line.
Common block elements include p, h1-h6, p, ul, ol, li, etc. Generally, the parent elements in layouts use block elements.
As mentioned in Section 2 above, the li element is a block element and occupies one line, and the tags in the blog garden all use the li element. Then we need to change the tags of the blog garden to display multiple tags on one line. What should we do? Now it’s the turn of inline elements to come on stage.
Inline elements, as the name implies, are elements displayed in one line. In css, there is a <a href="http://www.php.cn/wiki/927.html" target="_blank">display</a> attribute, which can change the default display mode of html elements. It can change block elements into inline elements, and inline elements into is a block element. The display attribute has four optional values, namely block: block element; inline: inline element; inline-block: inline block element; none: element is not displayed.
Let’s add a display attribute to the css style of the li element to see the effect. code show as below.
li{
    border:1px solid green;
    margin-left:5px;/*左边距*/
    margin-top:7px;/*设置高度*/
display:inline;}The effect is as follows.
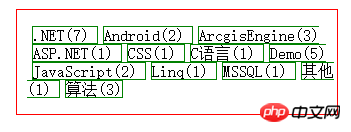
By setting the display attribute of the li element and changing it to an inline element, the li element can display multiple li elements in one line, one next to another. From the effect, we find that Setting margin-left:5px has an effect, but setting margin-top:7px has no effect. This is the nature of inline elements.
对行内元素设置高度相关的都是没有效果的,如设置margin-top,margin-bottom,padding-top,padding-bottom,height这些属性都是无效的。
对行内元素设置宽度也是无效的,行内元素的宽度只有左右内边距和内容宽度来决定。
行内元素对其高度有关的属性设置都无效,导致li元素两行之间都紧靠在一起,显然在美观上不能满足我们的要求。但是css提供了另外一个属性也就是行高<a href="http://www.php.cn/wiki/864.html" target="_blank">line-height</a>,该属性可以设置行与行之间的高。,下面我给li元素的父容器ul元素设置行高。代码如下。
ul{
    line-height:1.5em;}li{
    border:1px solid green;
    margin-left:5px;
    margin-top:7px;
display:inline;}效果如下。
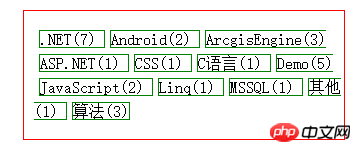
通过设置ul元素的行高,实现了行内元素上下之间的间隔。虽然离我理想中的效果差不太远了,但是还是有些不近人意。上下边框和元素的内容挨的太近(内边距无),当鼠标移动到上面的时候,效果可能会不太好。不过我们还是按照我们理想中的效果试试。代码如下。
ul{
    line-height:1.5em;}li{
    /*border:1px solid green;*//*不要边框的显示*/
    margin-left:13px;
    display:inline;/*行内元素*/
    padding:11px 20px;}li:hover{
    background-color:blue;
color:white;}效果如下。

前面说到设置行内元素与高度相关的属性都是无效的,但是上面设置的padding-top和padding-bottom好像是有效果的哈。但是实质上设置padding的上下内边距并没有增加行高,也没有撑大父容器的文档流,而且我们可以看到背景颜色显示的时候,还有覆盖了上下li元素的内容了。
行内元素设置padding的上下边距,并不会撑大父容器的文档流,但是会有效果,在上一篇文章CSS盒子模型中说到html中所有元素都是一个盒子,而背景颜色显示的范围是padding+content的范围。
上面的效果我们再美化一下css效果(修改行高和上下边距),差不多就能够达到我们想要的效果了,但是从上面效果图的右边来看,有时候一个行内元素在一行中没显示完的时候,会有一小部分在下面一行显示,如果最后出现效果图右边这种情况,那就比较尴尬了。
常见的行内元素有:a、img、input、select等。
行内块并不是兼具两者都有的特征,从字面上来理解,就是可以在行内显示的块元素,在第2节讲到块元素即使设置了宽度,也会独占一行,并会跟其他元素同行,那么行内块元素在这点上就与块元素不同。
行内块元素对其设置高度,宽度,padding和margin都是有效果的。
行内块元素不会独占一行,如果该行内块元素在设置完宽度、padding、margin之后,父容器后面的宽度还能够容的下第二元素,那么第二个元素就会与第一个元素同行显示,否则,另起一行。
两个同行显示的行内块元素,对其上下的元素的间隔距离,以其中最大的间距为主。
关于第三点特征我们可以写代码实验一下。把ul元素下面的第一个li元素设置class属性。代码如下:
<li class="first"> <a href="#">.NET(7)</a> </li>
css的代码如下。
li{
    /*border:1px solid green;*//*不要边框的显示*/
    margin-left:13px;
    display:inline-block;/*行内块元素*/}li:hover{
    background-color:blue;
    color:white;}ul .first{
margin-bottom:50px;/*设置第一个li元素的下边距50px*/}效果如下。
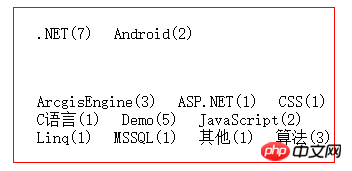
我们可以发现第一行有两个li元素,第一li元素我们设置了下边距为50px,而第二个没有设置默认为0,导致最终这一行与下一行的边距为第一个li元素的下边距50px,和我们预想的效果一致。
经过对行内块元素的总结,发现行内块元素能够很好的满足我们的需求。下面把li元素设置为行内块显示方式,对其进行美化,代码如下。
li{
    display:inline-block;/*行内块元素*/
    margin-bottom:5px;/*下边距5px*/
    padding:5px 7px;/*上下内边距5p,左右内边距7px*/
    border-radius:5px;/*圆角*/}li:hover{
    background-color:blue;
color:white;}效果如下。
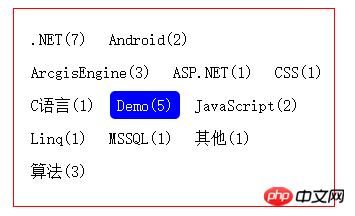
In fact, there are only two default element types in CSS, block elements and inline elements. Inline block elements need to be set using display.
After a day of organizing my blog style, I organized the blog style into a very concise style. The pages are all in black and white style. When the mouse interacts, the corresponding elements will change It’s light blue, I personally like this style. Through this sorting, I have revisited several important concepts in CSS, such as CSS box model, selector, element type, etc.
The above is the detailed content of Learn more about CSS element types. For more information, please follow other related articles on the PHP Chinese website!


