
 Web Front-end
CSS Tutorial
Detailed explanation of the example of using css to achieve the picture magnifying glass effect (picture)
Web Front-end
CSS Tutorial
Detailed explanation of the example of using css to achieve the picture magnifying glass effect (picture)
Detailed explanation of the example of using css to achieve the picture magnifying glass effect (picture)

This article explains how to use css to achieve PictureMagnifying glass effect ? The following is a detailed explanation of the CSS example of the picture magnifying glass effect.
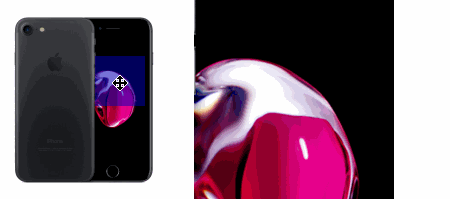
The effect is as shown in the figure (in the example, I secretly linked a picture of Tmall, I hope it’s okay-.-):
The implementation process is simple, but we still start the analysis from css. The process is as follows (the picture is a square as an example):
css:
/* 图片容器 */
    .imgBox{
      width: 200px; /* 各位大老爷们看着办 */
      height: 200px; /* 各位大老爷们看着办 */
      position: relative; /* 必需 */
    }

    /* 图片标签 */
    .mainImg{
      width: 100%; /* 各位大老爷们看着办,尽量100%好看些[斜眼笑] */
      height: 100%; /* 各位大老爷们看着办,尽量100%好看些[斜眼笑] */
    }

    /* 遮罩层-既放大区域 */
    .glass{
      position: absolute; /* 必需 */
      width: 50px; /* 遮罩层宽度 此处是放大4倍,所以为200/4=50 */
      height: 50px; /* 遮罩层高度 此处是放大4倍,所以为200/4=50  */
      top: -9999px; /* 绝对位置,先放远些 */
      left: -9999px; /* 绝对位置,先放远些 */
      cursor: move; /* 鼠标样式,好看些 */
      background: rgba(0,0,180,0.5); /* 遮罩层样式,好看些 */
    }

    /* 大图所在的容器 */
    .imgMax{
      position: absolute;  /* 必需 */
      overflow: hidden; /* 必需,盖掉超出的大图[斜眼笑] */
      left: 210px; /* 必需,此处为距原图左边10像素 */
      top: 0; /* 必需,此处为距上边0像素 */
      width: 200px; /* 放大图片容器的宽度 此处此处是放大4倍,为200,保持和原图容器一般大,若此处为400,则是放大2*4倍,那么相应的放大图片应该是200*4*2=1600 */
      height: 200px; /* 放大图片容器的高度 此处此处是放大4倍,为200,保持和原图容器一般大,若此处为400,则是放大2*4倍,那么相应的放大图片应该是200*4*2=1600 */
      display: none; /* 先隐藏 */
    }
    .maxImg{
      position: absolute; /* 必需 */
      width: 800px; /* 此处是放大4倍,所以为200*4=800  受放大图片所在的容器影响,规则如上 */
      height: 800px; /* 此处是放大4倍,所以为200*4=800  受放大图片所在的容器影响,规则如上 */
    }
What you need to pay attention to in the above css are several positions and scaling ratios. Pay attention to the adjustments.
After writing the style, let’s take a look at the layout:
html:
<!-- 图片容器 -->
    <pclass="J_imgBox imgBox">
      <!-- 需要放大的图片-原始图 -->
      <imgclass="J_mainImg mainImg" src="http://img.alicdn.com/bao/uploaded/i7/TB1Xpe_NXXXXXXRXFXXGTq09XXX_035318.jpg_430x430q90.jpg"/>
      <!-- 遮罩-既放大的区域 -->
      <pclass="J_glass glass"></p>
      <!-- 大图的容器 -->
      <pclass="J_imgMax imgMax">
        <!-- 大图 -->
        <imgclass="J_maxImg maxImg"/>
      </p>
    </p>
Next is the main js code, with comments as always:
js:
(function(){
/* 放大镜函数
** @imgContainer 需要实现放大镜效果的图片容器 此处是 class 为 J_imgBox 的 p
*/
function imgZoom(imgContainer){
// 取大图url,不知道淘宝图片规则如何,反正看了详情页的大图和小图url对比,随便写了个替换
var imgUrl = imgContainer.querySelector('.J_mainImg').src.replace(/.(jpg|jpeg|png|gif)(_)(d+)(x)(d+)(q90)?/g,'');
// 取大图标签的节点
var maxImg = imgContainer.querySelector('.J_maxImg');
// 给该节点的src属性赋值为大图的url
maxImg.src = imgUrl;
// 取大图所在的容器
var maxImgContainer = imgContainer.querySelector('.J_imgMax');
// 取遮罩块
var glassBlock = imgContainer.querySelector('.J_glass');
// 取消放大镜效果
var hideMaxImg = function(){
glassBlock.style.top = '-9999px';
glassBlock.style.left = '-9999px';
maxImgContainer.style.display = 'none';
}
// 鼠标移出图片区域,取消放大镜效果
imgContainer.onmouseout = function(event){
event.stopPropagation();
hideMaxImg();
};
// 鼠标在图片区域内移动事件
imgContainer.onmousemove = function(event) {
event.stopPropagation();
// 取图片容器的大小及其相对于视口的位置,需要实时取,所以放在move事件里
var clientRect = event.currentTarget.getBoundingClientRect();
// 获取距鼠标距的上和左的坐标
var leftX = event.clientX - clientRect.left;
var leftY = event.clientY - clientRect.top;
// 动态设置遮罩块的left和top位置 这里需要减去遮罩层的一半,因为鼠标位于遮罩块中心点
var pointerLeft = leftX - 25;
var pointerTop = leftY - 25;
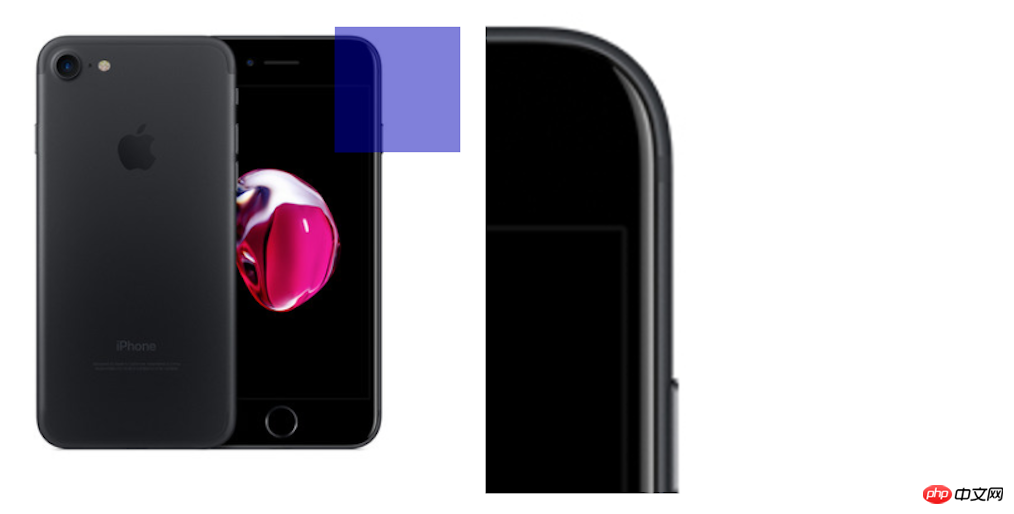
// 如果鼠标坐标移动超出原始图片区域边缘 则取消放大镜效果 因为这里存在快速移动鼠标到大图区域时,鼠标仍处在外层的图片区域内,并不会触发mouseout事件(虽然中间隔了小小的间距,但是快速移动仍能产生这个bug,如代码下面的图所示)
if((pointerLeft+25) > clientRect.width || pointerLeft clientRect.height || pointerTop ){
hideMaxImg();
return !1;
};
// 遮罩块在最左边的时候,鼠标仍在图片区域内,可在遮罩块左边缘至中心线区域内移动,且这时遮罩块为距左0像素
if(pointerLeft ){
pointerLeft = 0;
};
// 同上 右边限制
if(pointerLeft > clientRect.width - 50){
pointerLeft = clientRect.width - 50;
};
// 同上 顶部限制
if(pointerTop ){
pointerTop = 0;
};
// 同上 底部限制
if(pointerTop > clientRect.height - 50){
pointerTop = clientRect.height - 50;
};
// 设置遮罩块的位置
glassBlock.style.left = pointerLeft;
glassBlock.style.top = pointerTop;
// 取遮罩快距离左边的位置和图片区域的宽高比,用于计算大图偏移距离,展示遮罩块所对应的图片区域
var percentLeft = pointerLeft/clientRect.width;
var percentHeight = pointerTop/clientRect.height;
// 设置大图偏移距离 因为其父元素存在 overflow:hidden 所以只会展示对应区块
maxImg.style.left = -(percentLeft*maxImg.clientWidth)+'px';
maxImg.style.top = -(percentHeight*maxImg.clientHeight)+'px';
};
}
var elem = document.querySelectorAll('.J_imgBox');
elem.forEach(function(item,idx){
imgZoom(item)
})
})()
bug fixing picture:
After reading this, do you feel that it is not too simple? Next, let’s take a look at the more practical knowledge points that can be extracted from the above code in daily development:
Element .getBoundingClientRect()
Element.getBoundingClientRect() method returns the size of the element and its position relative to the viewport
Example:
<bodystyle="width:1400;height:1000">
      <pid="testp" style="width:10px;height:20px;background:#f00"></p>
      <script>
        (function(){
          var elem = document.getElementById('testp');
          document.body.addEventListener('click',function(){
              console.log(elem.getBoundingClientRect())
          },false)
        })()
      </script>
    </body>
Effect As shown in the picture:
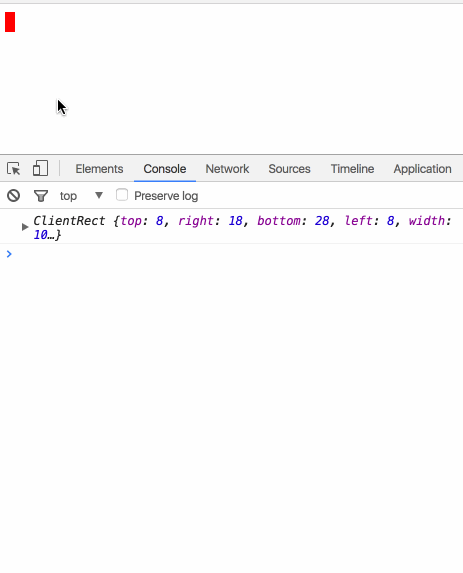
It is not difficult to see from the renderings that when I move the view and then click the body, the printed object Can correctly return the size of the element and its position relative to the viewport
This method can also be used to trigger the corresponding event when an element is scrolled to the bottom/top, which is quite convenient.
1.event.target and event.currentTarget
target: points to the element that triggered the event
currentTarget: points to the element that is bound to the event handle
Only when the bound
event handlerprogram and the program that triggers the event handler are the same object, the two are the same Example code:
html:
  <pid="ap">
      123
      <pid="bp">456</p>
    </p>
js:
  document.getElementById('ap').addEventListener('click',function(e){
    if(e.target === e.currentTarget) {
      console.log('target === currentTarget')
    }else{
      console.log('target !== currentTarget')
    }
    console.log('target',e.target)
    console.log('currentTarget',e.currentTarget)
  },false)
Rendering:
 From the rendering, we It can be seen that when 456 is clicked, the target points to the bp where 456 is located, and the currentTarget points to the ap, because the event is bound to the ap, but the trigger is on the bp, and the bp is within the ap. When 123 is clicked , then the target is consistent with currentTarget, and both binding and triggering are on the ap.
2.event.preventDefault() & event.stopPropagation()
preventDefault: If the event can be canceled, cancel the event without stopping the further propagation of the event
stopPropagation: Prevent further propagation of the current event in the capture and bubbling phases
3.event.stopPropagation() & event.stopImmediatePropagation()
stopPropagation: Prevent the current event in the capture and bubbling phases Further propagation
stopImmediatePropagation: Prevent other event listening on the element from calling the same event and prevent bubbling
Example of the difference between the two:
html:
  <pid="ap">
      123
      <pid="bp">456</p>
    </p>
js:
  document.getElementById('ap').addEventListener('click',function(){
    console.log('click ap')
  },false)
  document.getElementById('bp').addEventListener('click',function(e){
    e.stopImmediatePropagation();
    console.log('click bp')
  },false)
  document.getElementById('bp').addEventListener('click',function(){
    console.log('click me too')
  },false)
The execution result of the above code is:
clickbp
Comment out e.stopImmediatePropagation(); The result is:
clickbp
clickmetoo
clickap
Although these are simple knowledge points, they are also very practical in daily development. I hope I can start from the details and review them as much as possible. -~
The above is the detailed content of Detailed explanation of the example of using css to achieve the picture magnifying glass effect (picture). For more information, please follow other related articles on the PHP Chinese website!

Hot AI Tools

Undresser.AI Undress
AI-powered app for creating realistic nude photos

AI Clothes Remover
Online AI tool for removing clothes from photos.

Undress AI Tool
Undress images for free

Clothoff.io
AI clothes remover

Video Face Swap
Swap faces in any video effortlessly with our completely free AI face swap tool!

Hot Article
Hot Tools

Notepad++7.3.1
Easy-to-use and free code editor

SublimeText3 Chinese version
Chinese version, very easy to use

Zend Studio 13.0.1
Powerful PHP integrated development environment

Dreamweaver CS6
Visual web development tools

SublimeText3 Mac version
God-level code editing software (SublimeText3)
Hot Topics
 1658
1658
 14
1415
52
1309
25
1257
29
1231
24
14
1415
52
1309
25
1257
29
1231
24

 How to use bootstrap in vue
Apr 07, 2025 pm 11:33 PM
How to use bootstrap in vue
Apr 07, 2025 pm 11:33 PM
Using Bootstrap in Vue.js is divided into five steps: Install Bootstrap. Import Bootstrap in main.js. Use the Bootstrap component directly in the template. Optional: Custom style. Optional: Use plug-ins.
 Understanding HTML, CSS, and JavaScript: A Beginner's Guide
Apr 12, 2025 am 12:02 AM
Understanding HTML, CSS, and JavaScript: A Beginner's Guide
Apr 12, 2025 am 12:02 AM
WebdevelopmentreliesonHTML,CSS,andJavaScript:1)HTMLstructurescontent,2)CSSstylesit,and3)JavaScriptaddsinteractivity,formingthebasisofmodernwebexperiences.
 The Roles of HTML, CSS, and JavaScript: Core Responsibilities
Apr 08, 2025 pm 07:05 PM
The Roles of HTML, CSS, and JavaScript: Core Responsibilities
Apr 08, 2025 pm 07:05 PM
HTML defines the web structure, CSS is responsible for style and layout, and JavaScript gives dynamic interaction. The three perform their duties in web development and jointly build a colorful website.
 How to insert pictures on bootstrap
Apr 07, 2025 pm 03:30 PM
How to insert pictures on bootstrap
Apr 07, 2025 pm 03:30 PM
There are several ways to insert images in Bootstrap: insert images directly, using the HTML img tag. With the Bootstrap image component, you can provide responsive images and more styles. Set the image size, use the img-fluid class to make the image adaptable. Set the border, using the img-bordered class. Set the rounded corners and use the img-rounded class. Set the shadow, use the shadow class. Resize and position the image, using CSS style. Using the background image, use the background-image CSS property.
 How to write split lines on bootstrap
Apr 07, 2025 pm 03:12 PM
How to write split lines on bootstrap
Apr 07, 2025 pm 03:12 PM
There are two ways to create a Bootstrap split line: using the tag, which creates a horizontal split line. Use the CSS border property to create custom style split lines.
 How to set up the framework for bootstrap
Apr 07, 2025 pm 03:27 PM
How to set up the framework for bootstrap
Apr 07, 2025 pm 03:27 PM
To set up the Bootstrap framework, you need to follow these steps: 1. Reference the Bootstrap file via CDN; 2. Download and host the file on your own server; 3. Include the Bootstrap file in HTML; 4. Compile Sass/Less as needed; 5. Import a custom file (optional). Once setup is complete, you can use Bootstrap's grid systems, components, and styles to create responsive websites and applications.
 How to resize bootstrap
Apr 07, 2025 pm 03:18 PM
How to resize bootstrap
Apr 07, 2025 pm 03:18 PM
To adjust the size of elements in Bootstrap, you can use the dimension class, which includes: adjusting width: .col-, .w-, .mw-adjust height: .h-, .min-h-, .max-h-
 How to use bootstrap button
Apr 07, 2025 pm 03:09 PM
How to use bootstrap button
Apr 07, 2025 pm 03:09 PM
How to use the Bootstrap button? Introduce Bootstrap CSS to create button elements and add Bootstrap button class to add button text
