Sharing of introductory examples of css3 linear gradient
Gradient is presented on the page in the form of a background image. The essence of gradient is background-image. In CSS3, gradients can be divided into linear-gradient and radial-gradient. A linear gradient is a gradient along a gradient line, while a radial gradient is a gradient around an ellipse or circle.
2. Linear gradient linear-gradient
2.1 Basic syntax
background-image: linear-gradient( [
[] is a character class in regular expressions, here it can be understood as a small unit;
| means or, either choose the front or the back;
? It means 0 or 1 meaning. That is, if you do not specify the direction, you can directly use the gradient color;
+plus sign means 1 or more.
2.1.1 Angle
Question: If angle is 45deg and the gradient color changes from deepink to yellow, which of the following pictures is correct?
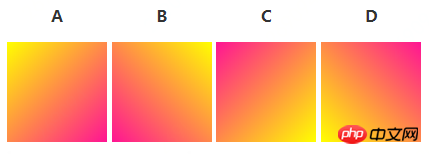
Correct answer: B
This understanding is somewhat different from the familiar css3 rotation at a certain angle, for example, css3 The effect of rotating 90 degrees is like this:
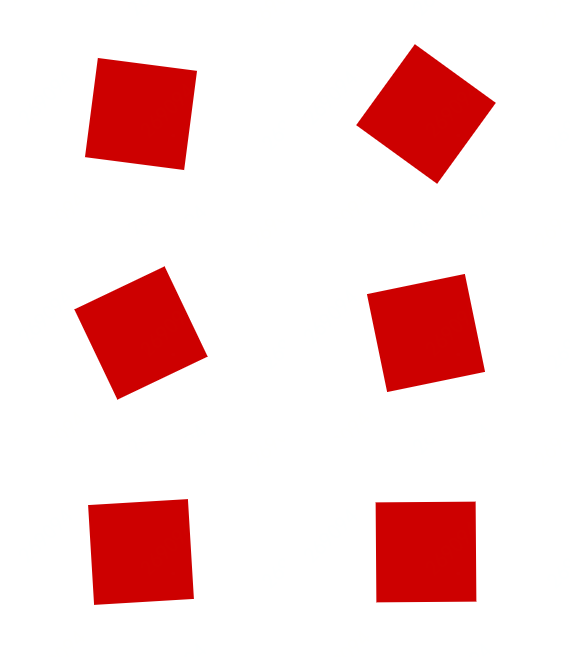
In a linear gradient, the gradient angle defaults to a clockwise rotation starting from the vertical direction from bottom to top. We can understand it as the direction of rotation of the clock hand, as shown in the following figure:
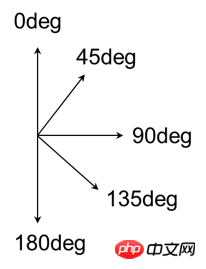
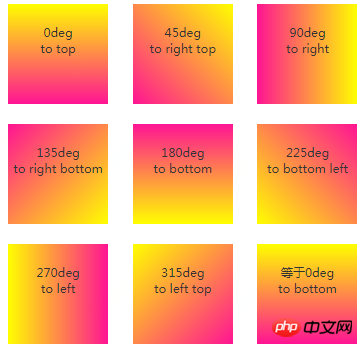
The gradient angle specifies the direction of the linear gradient, 0deg means gradient from top to bottom; 90deg means from top to bottom. Gradient from left to right; 180deg means gradient from bottom to top; 270deg means gradient from right to left; 360deg means gradient from bottom to top. The angle effect of the gradient is as shown in the figure:
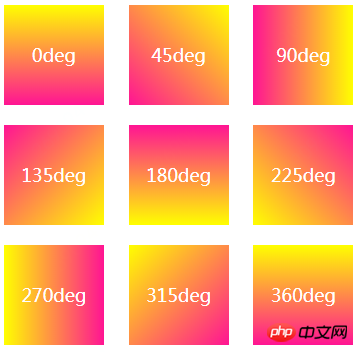
In the above example, the effect of 0deg->360deg is actually a clockwise rotation.
2.1.2 side-or-corner
The Chinese meaning of side-or-corner means side or corner. Optional values in the vertical direction are: top , center , bottom , and optional values in the horizontal direction are left , center , and right . The default value is center bottom, which is a gradient from top to bottom. Can be used in combination with the to + side-or-corner keywords. If to is not added, it indicates the starting point of the gradient, and adding to indicates the direction of the gradient. For example: to top is equivalent to 0deg, to right is equivalent to 90deg, to bottom is equivalent to 180deg, to left is equivalent to 270deg. The relevant effects are shown in the figure below:
Note when used in different versions of browsers:
New versions of browsers can directly use w3c Standard syntax, lower version browsers need to use each browser prefix;
IE10 and below does not support gradients;
New versions of chrome and firefox have The private prefix is removed, and the direction is different between adding the private prefix and not adding the private prefix (if the private prefix is added, the right is 0deg, and then turns counterclockwise);
oper Supported starting from 37, there is no private prefix, and it will be ignored if added;
This article will explain the linear gradient linear-gradient in W3C standard syntax, and the radial gradient radial-gradient will be explained in the next article Introduced in the article
2.1.3 color-stop
Specifies the color, starting point, and end. Translated into Chinese: color + space + percentage or length value.
background: linear-gradient(#fb3 20%, #58a 80%);
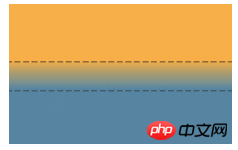
Now the top 20% of the area is filled with the solid color #fb3, and the bottom 20% of the area is filled with the solid color of #58a , the real gradient area is between 20% and 80% of the height. If the two color stops are brought closer together, the two color stops will overlap:
background: linear-gradient(#fb3 50%, #58a 50%);

"If multiple color stops have the same position , they will produce an infinitely small transition area, and the starting and ending colors of the transition are the first and last specified values. From the effect, the color will change suddenly at that position, rather than a smooth gradient process. ”
——CSS Images (Third Edition) (http://w3.org/TR/css3-images)
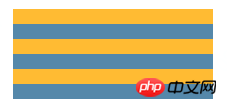
Because gradients are images generated by code, we can treat them like other Treat it like any background image, and can also resize it via background-size:
<p></p>
.box{
  width: 200px;
  height: 90px;
  background: linear-gradient(#fb3 50%, #58a 50%);
  background-size: 100% 30px;
}
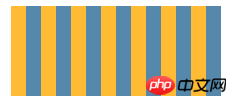
If it is Vertical stripes, code and effects are as follows:
<p></p>
.box{
  width: 210px;
  height: 90px;
  background: linear-gradient(to right, #fb3 50%, #58a 50%);
  background-size: 30px 100%;
}
为了避免每次改动条纹宽度时都要修改两个数字,我们可以再次从规范那里找到捷径。
“如果某个色标的位置值比整个列表中在它之前的色标的位置值都要小,则该色标的位置值会被设置为它前面所有色标位置值的最大值。”
——CSS 图像(第三版)( http://w3.org/TR/css3-images )
对于水平和垂直渐变条纹我们很好理解。如果是斜向渐变,我们想得到条纹的宽度为15px,我们可以这样写:
<p></p>
.box{
  width: 200px;
  height: 100px;
  background: linear-gradient(45deg,
    #fb3 25%, #58a 0, #58a 50%,
    #fb3 0, #fb3 75%, #58a 0);
  background-size: 30px 30px;
}
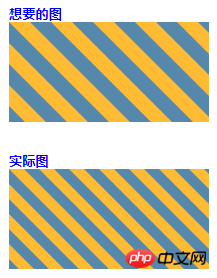
对比想要的图以及实际效果图,为什么得到线条的宽度比我们想要的线条宽度要小,难道是浏览器出问题了,no,是我们自己错了。这就需要深入理解渐变的长度了。
2.2 线性渐变的渐变长度的理解
如何确定渐变线的长度?我们可以从官网的解释中找到答案:
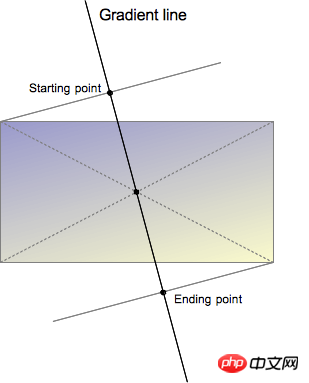
渐变线是过渐变区域中心的一条直线,而渐变的起点和终点是在与渐变线的垂直线上。如果给定渐变的区域和渐变的方向,我们就能够确定渐变的起始点和总长度了。因此在下面的css样式中:
.box{
  width: 200px;
  height: 100px;
  background: linear-gradient(45deg, #fb3 25%, #58a 0, #58a 50%, #fb3 0, #fb3 75%, #58a 0);
  background-size: 30px 30px;
}
我们可以用下面的这幅图来计算渐变的长度,我们指定了区域的大小时30px,根据 勾股定理 ,可以计算直角三角形的斜边长度。因此,我们计算得到的条纹的宽度实际是: 15/1.414=10.606 ,比我们需要的宽度15p要小。
$$ 15/√2 $$
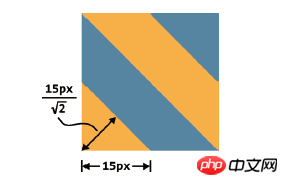
这就意味着,如果想要让条纹的宽度变化为我们原本想要的15px,就需要将 background-size 指定为 2*15*1.4=42.426px 。
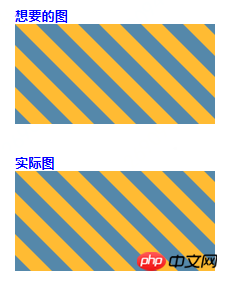
我们来看下修改后的效果,修改 background-size 后,得到了我们想要的效果图。
2.3 线性渐变的案例
2.3.1 利用线性渐变生成条纹
在上面的例子中,我们已经使用线性渐变生成了水平和垂直条纹,这里就不在赘述。
2.3.2 利用线性渐变生成多背景图片
在CSS3中,backgrounds支持多背景,越前面的背景越处于上面 ,也就是背景可以无限累加,而 渐变的本质是background-image ,所以我们可以实现任意数量的渐变背景图的叠加效果。
有如下图片:

我们添加透明值: linear-gradient(to bottom left, #fc3, rgba(255,255,255,0))
.demo{
  width: 250px;
  height: 156px;
  background: linear-gradient(to bottom left, #fc3, rgba(255,255,255,0)), url(./flower.jpg);
}
得到的效果如下:

我们可以利用这一点,来给背景添加不同的效果,如让图片不可见(修改为: linear-gradient(to bottom left, #fff, rgba(255,255,255,0)) )。
2.3.3 利用线性渐变生成比例可控的虚线
在实际开发中,如果需要虚线,我们一般会设置 border-style:dashed ,然而这种方法存在一个问题: 实线和虚线的比例是一定的 。在Chrome和Firefox浏览器下,颜色区的宽高比是 3:1 ,颜色和透明区的宽度比例是 1:1 :

而在IE浏览器下,颜色区的宽高比是 2:1 ,颜色区和透明区的宽度比例也是 2:1 :

如果设计师设计的UI中,要求虚线的颜色区的宽高比是 5:3 ,实线与虚线的比例是 1:1 ,此时使用 border-style:dashed 就达不到设计师设计的效果了。有两种方法可以解决这个问题:
要求设计师改UI,这么low X的事难道是我们前端工程师做的吗?
查阅资料,使用其他方法实现设计师想要的效果,正确选择!
这里,我们就可以使用 linear-gradient 到达设计师想要的效果:
.demo{
  height: 3px;
  background: linear-gradient(to right, #000, #000 5px, transparent 5px, transparent);
  background-size: 10px 100%;
}
对应的效果如下:

2.3.4 利用线性渐变生成带线框的三角
考虑下面的场景,我们需要生成一个对话框:

我们可能绝大多数使用下面的做法:
.talk {
  display: inline-block;
  max-width: 80%;
  border: 1px solid blue;
  border-radius: 3px;
  padding: 6px 10px;
  font-size: 14px;
  position: relative;
}
.talk:before {
  content: '';
  position: absolute;
  width: 6px;
  height: 6px;
  border: 1px solid blue;
  border-right: 0;
  border-bottom: 0;
  left: -4px;
  top: 13px;
  transform: rotate(-45deg);
  background-color: #fff;
}
如果背景不是白色:
.talk {
  display: inline-block;
  max-width: 80%;
  border: 1px solid blue;
  border-radius: 3px;
  padding: 6px 10px;
  background: linear-gradient(to right, deeppink, yellow);
  font-size: 14px;
  position: relative;
}

可以看到如果背景色不是白色,旋转后的效果就有一个多余的三角形,不是我们想要的效果,我们可能尝试这样修改css代码:
.talk:before {
   content: '';
   position: absolute;
   display: inline-block;
   width: 0;
   height: 0;
   border-top: 5px solid transparent;
   border-right: 5px solid blue;
   border-bottom: 5px solid transparent;
   left: -5.1px;
   top: 12px;
}

额,比上面的效果好多了,但是三角与边框交接的区域多了一个线条,与我们想要的效果还是有出入,此时我们使用线性渐变看看,如下css所示:
.talk:before {
  content: "";
  position: absolute;
  width: 6px;
  height: 6px;
  background: linear-gradient(to top, blue, blue) no-repeat,
              linear-gradient(to right, blue, blue) no-repeat,
              linear-gradient(135deg, #fff, #fff 5.2px, hsla(0, 0%, 100%, 0) 5.2px) no-repeat;
  background-size: 60px 1px, 1px 60px, 60px 60px;
  transform: rotate(-45deg);
  left: -4px;
  top: 13px;
}

哇,看起来不错额,今晚可以和妹子约起了。。。 
2.3.5 利用线性渐变生成加号和减号
考虑有以下需求:

切图,使用小图片;
传统方法,使用 ::before 和 ::after 伪元素配合实现;
使用线性渐变实现;
<a></a>
<a></a>
传统方法:
.btn {
  display: inline-block;
  background: #f0f0f0 no-repeat center;
  border: 1px solid #d0d0d0;
  width: 24px;
  height: 24px;
  border-radius: 2px;
  color: #666;
  transition: color .2s;
}
.btn-plus{
  position: relative;
}

.btn-plus:before{
  content: '';
  position: absolute;
  width: 10px;
  height: 2px;
  background-color: currentColor;
  left: 50%;
  top: 50%;
  margin-top: -1px;
  margin-left: -5px;
}
.btn-plus:after{
  content: '';
  position: absolute;
  width: 2px;
  height: 10px;
  background-color: currentColor;
  left: 50%;
  top: 50%;
  margin-top: -5px;
  margin-left: -1px;
}
使用线性渐变方法:
.btn {
  display: inline-block;
  background: #f0f0f0 no-repeat center;
  border: 1px solid #d0d0d0;
  width: 24px;
  height: 24px;
  border-radius: 2px;
  color: #666;
  transition: color .2s;
}
.btn-plus {
  background-image:
    linear-gradient(to top, currentColor, currentColor),
    linear-gradient(to top, currentColor, currentColor);
  background-size: 10px 2px, 2px 10px;
}

.btn-minus {
  background-image: linear-gradient(to top, currentColor, currentColor);
  background-size: 10px 2px;
}

这种方法生成加号和等号与传统使用 ::before 和 ::after 以及配合 background-color 和 border 相比,使用渐变背景生成的好处是居中定位方便。
2.3.6 利用线性渐变生成切角效果
直接看代码:
<p></p>
.clip{
  width: 150px;
  height: 150px;
  background: #58a;
  background:
    linear-gradient(135deg, transparent 15px, deeppink 0)
    top left,
    linear-gradient(-135deg, transparent 15px, yellow 0)
    top right,
    linear-gradient(-45deg, transparent 15px, blue 0)
    bottom right,
    linear-gradient(45deg, transparent 15px, green 0)
    bottom left;
  background-size: 50% 50%;
  background-repeat: no-repeat;
}

利用线性渐变还可以实现折角效果(计算稍微复杂,详细计算步骤可以看《css揭秘》相关章节),如:

2.3.7 利用线性渐变实现信封效果
<p>重复渐变实现信封效果</p>
.demo2{
   width: 300px;
   font-size: 18px;
   padding: 10px;
   border: 10px solid transparent;
   background: linear-gradient(white, white) padding-box,
     repeating-linear-gradient(-45deg, red 0, red 12.5%, transparent 0, transparent 25%,
       #58a 0, #58a 37.5%, transparent 0, transparent 50%) 0 / 60px 60px;
}

2.3.8 利用线性渐变实现裁剪效果
<p>这里是文字</p>
.clip{
  padding: 1em;
  border: 10px solid transparent;
  background: linear-gradient(white, white) padding-box,
    repeating-linear-gradient(-45deg, black 0, black 25%, transparent 0, transparent 50%) 0 / 10px 10px;
  animation: ants 12s linear infinite;
  max-width: 20em;
}

@keyframes ants {
  from { background-position: 0 0; }
  to { background-position: 100% 100%; }
}
在浏览器中的效果如下:

如果将 boder 修改为 1px solid transparent ,可以看到下面的效果:

2.4 更多线性渐变的应用
更多关于线性渐变的应用可以查看 这里
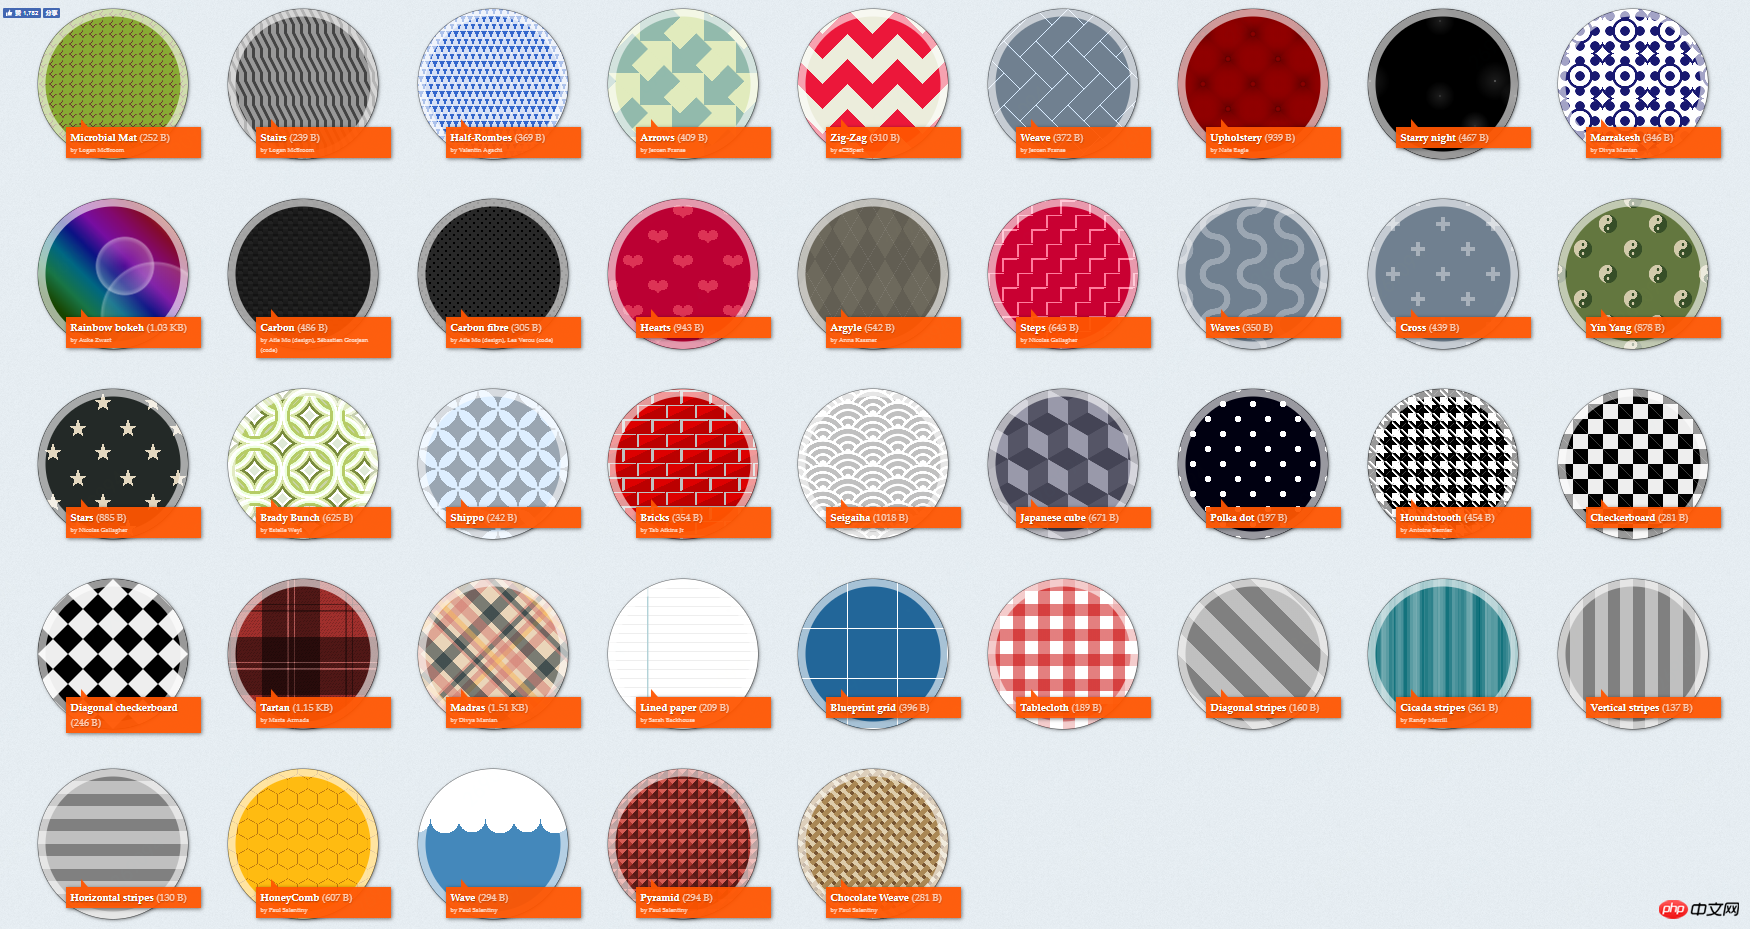
这里的图形都是使用线性渐变实现的,可见CSS3中线性渐变功能之强大!
4 更多关于线性渐变的东西
除了线性渐变 linear-gradient ,css3中还支持重复线性渐变 reapting-linear-gradient 。
-
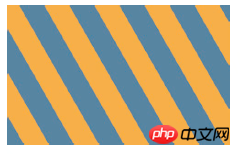
利用重复线性渐变实现斜向条纹的效果,与线性渐变相比,不需要苦苦思考生成一个重复单元,直接改变渐变的角度以及尺寸即可。
background: repeating-linear-gradient(60deg,#fb3, #fb3 15px, #58a 0, #58a 30px);
Copy after login
5 写在最后
如果想对提高自己的csss水平,推荐《CSS揭秘》,很不错额。

感谢阅读,希望能帮助到你。
相关推荐:
The above is the detailed content of Sharing of introductory examples of css3 linear gradient. For more information, please follow other related articles on the PHP Chinese website!

Hot AI Tools

Undresser.AI Undress
AI-powered app for creating realistic nude photos

AI Clothes Remover
Online AI tool for removing clothes from photos.

Undress AI Tool
Undress images for free

Clothoff.io
AI clothes remover

Video Face Swap
Swap faces in any video effortlessly with our completely free AI face swap tool!

Hot Article

Hot Tools

Notepad++7.3.1
Easy-to-use and free code editor

SublimeText3 Chinese version
Chinese version, very easy to use

Zend Studio 13.0.1
Powerful PHP integrated development environment

Dreamweaver CS6
Visual web development tools

SublimeText3 Mac version
God-level code editing software (SublimeText3)

Hot Topics
 1657
1657
 14
14
 1415
1415
 52
52
 1309
1309
 25
25
 1257
1257
 29
29
 1229
1229
 24
24
 How to use bootstrap in vue
Apr 07, 2025 pm 11:33 PM
Using Bootstrap in Vue.js is divided into five steps: Install Bootstrap. Import Bootstrap in main.js. Use the Bootstrap component directly in the template. Optional: Custom style. Optional: Use plug-ins.
 Understanding HTML, CSS, and JavaScript: A Beginner's Guide
Apr 12, 2025 am 12:02 AM
WebdevelopmentreliesonHTML,CSS,andJavaScript:1)HTMLstructurescontent,2)CSSstylesit,and3)JavaScriptaddsinteractivity,formingthebasisofmodernwebexperiences.
 The Roles of HTML, CSS, and JavaScript: Core Responsibilities
Apr 08, 2025 pm 07:05 PM
HTML defines the web structure, CSS is responsible for style and layout, and JavaScript gives dynamic interaction. The three perform their duties in web development and jointly build a colorful website.
 How to write split lines on bootstrap
Apr 07, 2025 pm 03:12 PM
There are two ways to create a Bootstrap split line: using the tag, which creates a horizontal split line. Use the CSS border property to create custom style split lines.
 How to insert pictures on bootstrap
Apr 07, 2025 pm 03:30 PM
There are several ways to insert images in Bootstrap: insert images directly, using the HTML img tag. With the Bootstrap image component, you can provide responsive images and more styles. Set the image size, use the img-fluid class to make the image adaptable. Set the border, using the img-bordered class. Set the rounded corners and use the img-rounded class. Set the shadow, use the shadow class. Resize and position the image, using CSS style. Using the background image, use the background-image CSS property.
 How to set up the framework for bootstrap
Apr 07, 2025 pm 03:27 PM
To set up the Bootstrap framework, you need to follow these steps: 1. Reference the Bootstrap file via CDN; 2. Download and host the file on your own server; 3. Include the Bootstrap file in HTML; 4. Compile Sass/Less as needed; 5. Import a custom file (optional). Once setup is complete, you can use Bootstrap's grid systems, components, and styles to create responsive websites and applications.
 How to use bootstrap button
Apr 07, 2025 pm 03:09 PM
How to use the Bootstrap button? Introduce Bootstrap CSS to create button elements and add Bootstrap button class to add button text
 How to resize bootstrap
Apr 07, 2025 pm 03:18 PM
To adjust the size of elements in Bootstrap, you can use the dimension class, which includes: adjusting width: .col-, .w-, .mw-adjust height: .h-, .min-h-, .max-h-


