
This time I will bring you a detailed explanation of the positioning properties of CSS. What are the precautions when using CSS positioning properties? The following is a practical case, let’s take a look.
There are three positioning attributes of CSS, namely absolute positioning, relative positioning, and fixed positioning.
position: absolute;  <!-- 绝对定位 -->
position: relative;  <!-- 相对定位 -->
position: fixed;     <!-- 固定定位 -->
The following are introduced one by one.
Relative positioning
Relative positioning: Adjust the position of the element relative to its original position (can be used to fine-tune the position of the box).
The background attributes we learned before are in the following format: background-position: Right offset and downward offset;
But this time The positioning attribute is in the following format:
position: relative;
    left: 50px;
    top: 50px;
Example of relative positioning:
<!doctype html>
<html lang="en">
 <head>
  <meta charset="UTF-8">
  <meta name="Generator" content="EditPlus®">
  <meta name="Author" content="">
  <meta name="Keywords" content="">
  <meta name="Description" content="">
  <title>Document</title>
    <style type="text/css">
        body{
            margin: 0px;
        }
        .p1{
            width: 200px;
            height: 200px;
            border: 1px solid red;
        }
        .p2{
            position: relative;/*相对定位:相对于自己原来的位置*/
            left: 50px;/*横坐标:正值表示向右偏移,负值表示向左偏移*/
            top: 50px;/*纵坐标:正值表示向下偏移,负值表示向上偏移*/
            width: 200px;
            height: 200px;
            border: 1px solid red;
        }
    </style>
 </head>
 <body>
    <p class="p1">有生之年</p>
    <p class="p2">狭路相逢</p>
 </body>
</html>Effect:
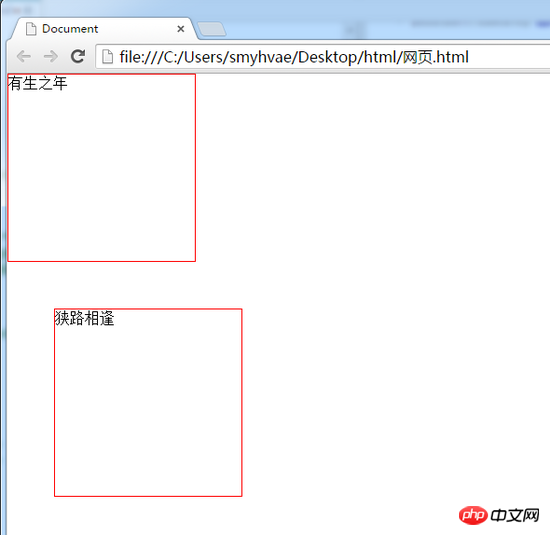
##Relative positioning is not Off-standard
Relative positioning: If it does not go off-standard, it will leave a hole in its hometown,others will not squeeze its position away.
In other words, the real position of relative positioning is still in the hometown, but the shadow has gone out and can float everywhere.The purpose of relative positioning
There are pitfalls in relative positioning, so if it is needed, it is generally not used for the "capping" effect (putting one p between another p) superior). Page, the effect is minimal. Just two functions: (1) Fine-tune the element (2) Use it as a reference for absolute positioning. ##left:Move the box to the rightright:Move the box to the left
top:Move the box downbottom:Move the box upPS: Negative numbers indicate the opposite direction. ↘:position: relative; left: 40px; top: 10px;
position: relative;
    right: 100px;
    top: 100px;
position: relative;
    right: 100px;
    bottom: 100px;
position: relative;
    left: 200px;
    bottom: 200px;
If we want to describe the direction of the above picture, we can first describe it like this:
position: relative;
    left: 200px;
    top: 100px;
Because 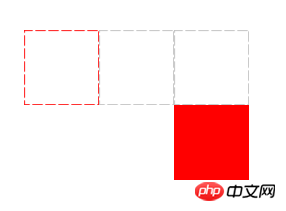 left: 200px
right: -200px
, so There are actually four ways to write this picture.Absolute positioning
Format examples are as follows:
position: absolute;  /*绝对定位*/
    left: 10px;  /*横坐标*/
    top/bottom: 20px;  /*纵坐标*/
Absolute positioning out of standard
Absolutely positioned boxes break away from the standard document flow.So, all the properties of the standard document flow are no longer followed after absolute positioning.
After absolute positioning, the label will not distinguish between so-called inline elements and block-level elements. You can set the width and height withoutdisplay:block
.Absolute positioning reference point (important)
top is used to describe , then the reference point is the top left of the page corner
instead of the upper left corner of the browser:(2) If
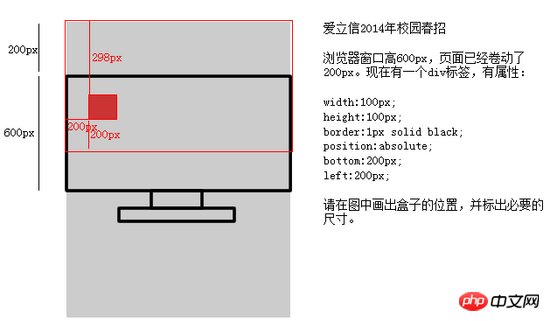
bottom is used to describe, then the reference point is 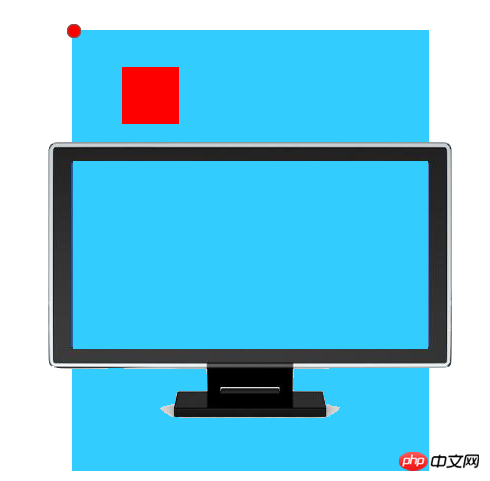 browse The window size of the first screen of the device is
In order to understand "
first screen "The meaning of the two words, let's take a look at the dynamic diagram: 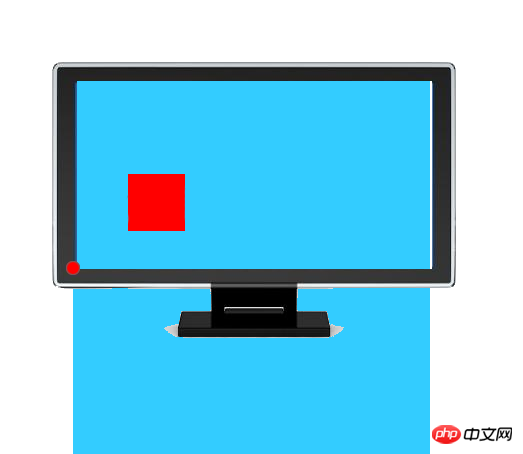
Question:
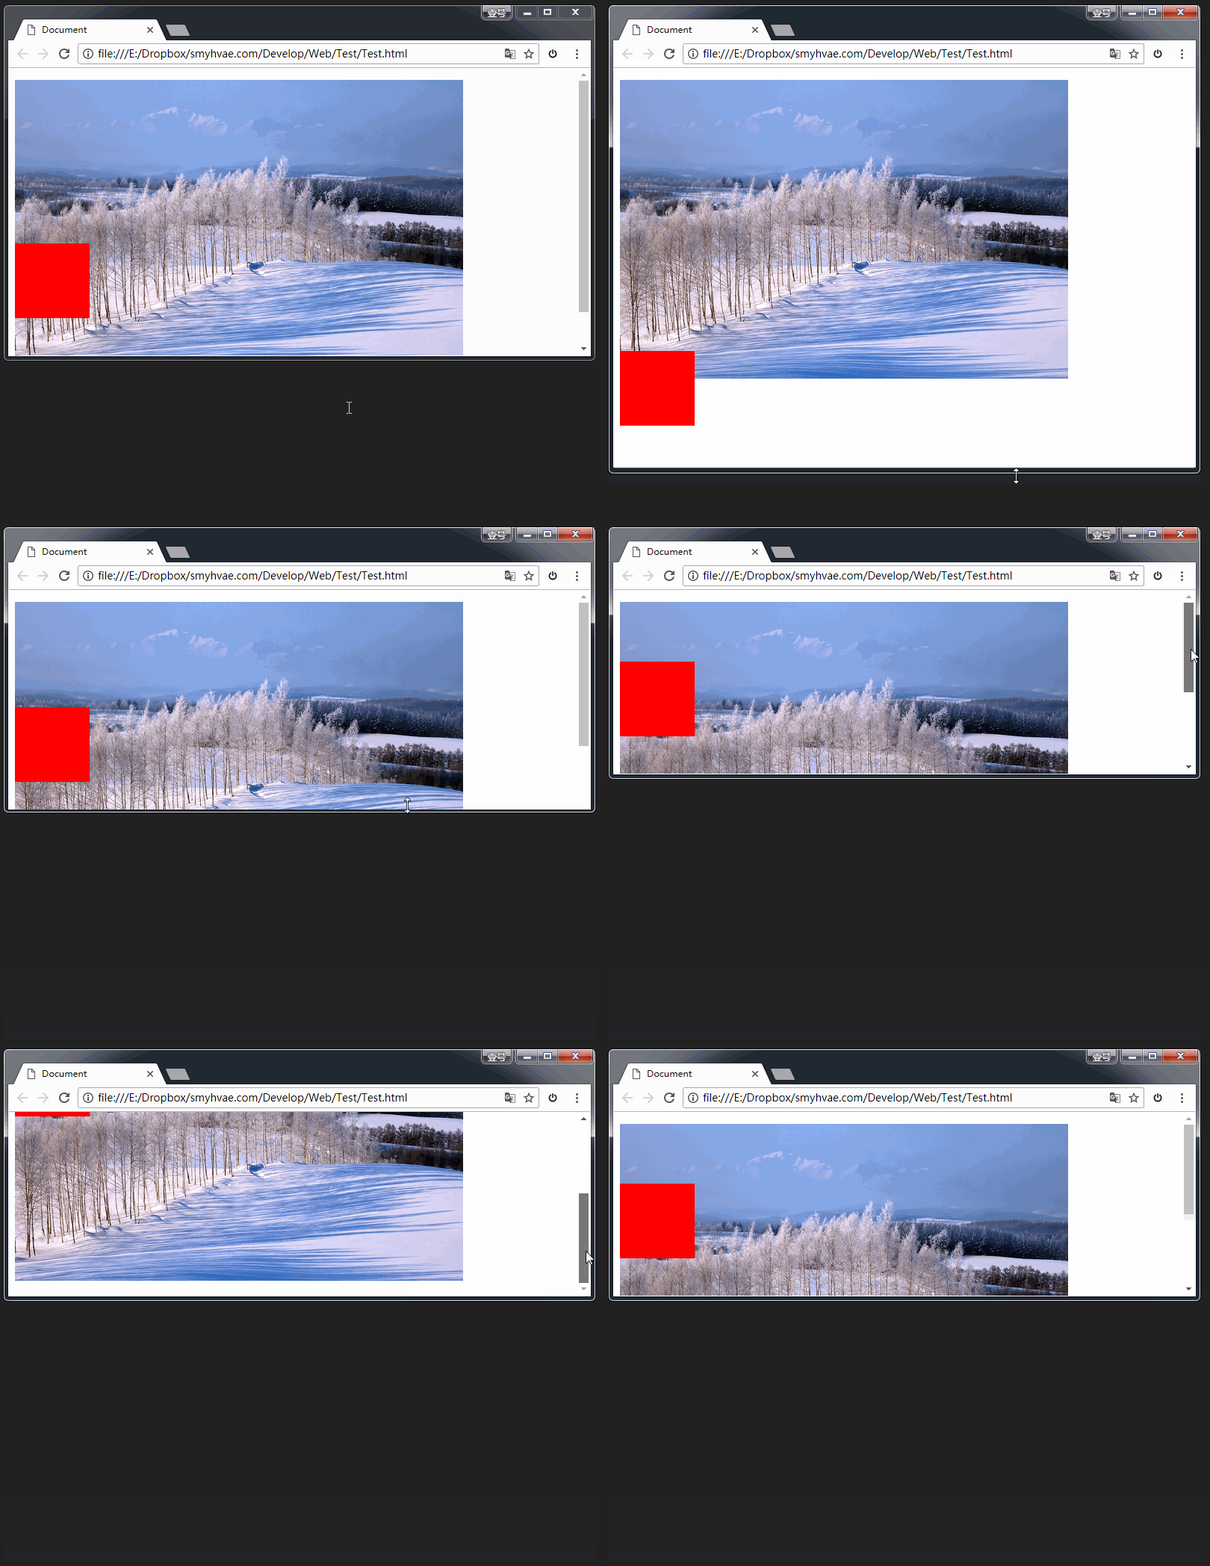
Answer:
用bottom的定位的时候,参考的是浏览器首屏大小对应的页面左下角。
以盒子为参考点
一个绝对定位的元素,如果父辈元素中也出现了已定位(无论是绝对定位、相对定位,还是固定定位)的元素,那么将以父辈这个元素,为参考点。
如下:(子绝父相)
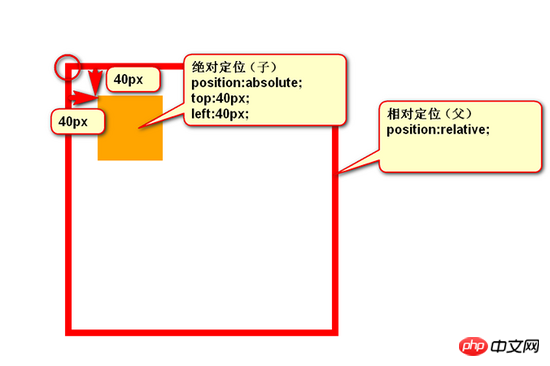
以下几点需要注意。
(1) 要听最近的已经定位的祖先元素的,不一定是父亲,可能是爷爷:
<p class="box1">        相对定位
            <p class="box2">    没有定位
                <p></p>           绝对定位,将以box1为参考,因为box2没有定位,box1就是最近的父辈元素
            </p>
        </p>
再比如:
<p class="box1">        相对定位
            <p class="box2">    相对定位
                <p></p>           绝对定位,将以box2为参考,因为box2是自己最近的父辈元素
            </p>
        </p>
(2)不一定是相对定位,任何定位,都可以作为儿子的参考点:
子绝父绝、 子绝父相 、子绝父固,都是可以给儿子定位的。但是在工程上,如果子绝、父绝,没有一个盒子在标准流里面了,所以页面就不稳固,没有任何实战用途。
工程应用:
“ 子绝父相 ”有意义:这样可以保证父亲没有脱标,儿子脱标在父亲的范围里面移动。于是,工程上经常这样做:
父亲浮动,设置相对定位(零偏移),然后让儿子绝对定位一定的距离。
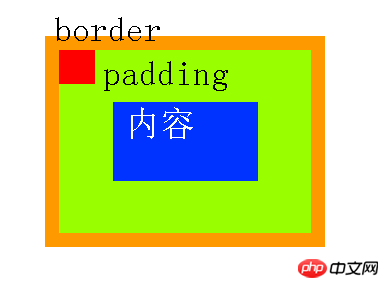
(3)绝对定位的儿子,无视参考的那个盒子的padding:
下图中,绿色部分是父亲p的padding,蓝色部分p是p的内容区域。此时,如果p相对定位,p绝对定位,那么,
p将无视父亲的padding,在border内侧为参考点,进行定位:
工程应用:
绝对定位非常适合用来做“压盖”效果。我们来举个lagou.com上的例子。
现在有如下两张图片素材:
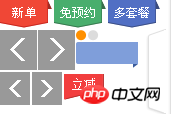

要求作出如下效果:
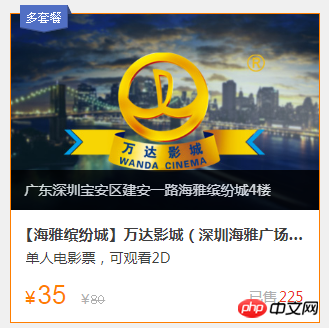
代码实现如下:
<!DOCTYPE html>
<html lang="en">
<head>
    <meta charset="UTF-8">
    <title>Document</title>
    <style type="text/css">
        .box{
            margin: 100px;
            width: 308px;
            height: 307px;
            border: 1px solid #FF7E00;
            position: relative;  /*子绝父相*/
        }
        .box .image img{
            width: 308px;
            height: 196px;
        }
        .box .dtc{
            display: block;  /*转为块级元素,才能设置span的宽高*/
            width: 52px;
            height: 28px;
            background-image: url(http://img.smyhvae.com/20180116_1115.png);
            background-position: -108px 0px; /*这里用到了精灵图*/
            position: absolute;  /*采用绝对定位的方式,将精灵图盖在最上层*/
            top: -9px;
            left: 13px;
        }
        .box h4{
            background-color: black;
            color: white;
            width:308px;
            height: 40px;
            line-height: 40px;
            position: absolute;
            top: 156px;
        }
    </style>
</head>
<body>
    <p class="box">
        <span class="dtc"></span>
        <p class="image">
            <img src="http://img.smyhvae.com/20180116_1116.jpg" alt="">
        </p>
        <h4>广东深圳宝安区建安一路海雅缤纷城4楼</h3>
    </p>
</body>
</html>代码解释如下:
为了显示“多套餐”那个小图,我们需要用到精灵图。
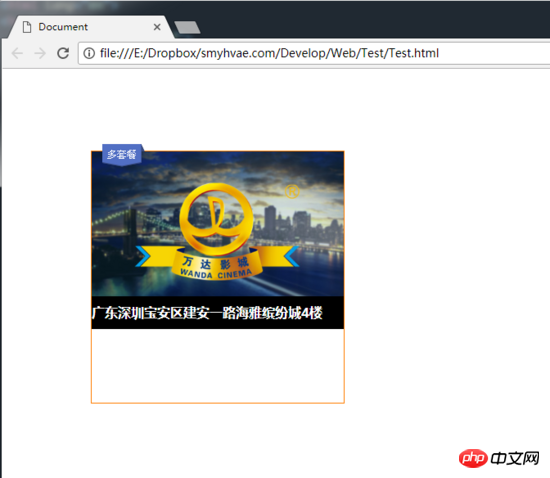
“多套餐”下方黑色背景的文字都是通过“子绝父相”的方式的盖在大海报image的上方的。
代码的效果如下:
让绝对定位中的盒子居中
我们知道,如果想让一个 标准流中的盒子居中 (水平方向看),可以将其设置 margin: 0 auto 属性。
可如果盒子是绝对定位的,此时已经脱标了,如果还想让其居中,可以这样做:
<p>
    width: 600px;
    height: 60px;
    position: absolute;  绝对定位的盒子
    left: 50%;           首先,让左边线居中
    top: 0;
    margin-left: -300px;  然后,向左移动宽度(600px)的一半
</p>
如上方代码所示,我们先让这个宽度为600px的盒子,左边线居中,然后向左移动宽度(600px)的一半,就达到效果了。
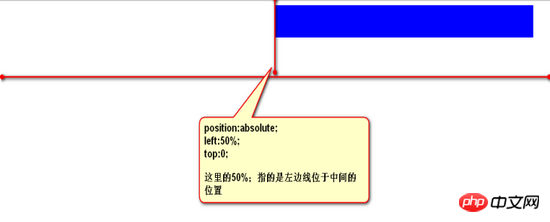
我们可以总结成一个公式:
left:50%; margin-left:负的宽度的一半
固定定位
固定定位:就是相对浏览器窗口进行定位。无论页面如何滚动,这个盒子显示的位置不变。
备注:IE6不兼容。
用途1:网页右下角的“返回到顶部”
比如我们经常看到的网页右下角显示的“返回到顶部”,就可以固定定位。
<style type="text/css">
        .backtop{
            position: fixed;
            bottom: 100px;
            right: 30px;
            width: 60px;
            height: 60px;
            background-color: gray;
            text-align: center;
            line-height:30px;
            color:white;
            text-decoration: none;   /*去掉超链接的下划线*/
        }
</style>用途2:顶部导航条
我们经常能看到固定在网页顶端的导航条,可以用固定定位来做。
需要注意的是,假设顶部导航条的高度是60px,那么,为了防止其他的内容被导航条覆盖,我们要给body标签设置60px的padding-top。
顶部导航条的实现如下:
<!DOCTYPE html PUBLIC "-//W3C//DTD XHTML 1.0 Transitional//EN" "http://www.w3.org/TR/xhtml1/DTD/xhtml1-transitional.dtd">
<html xmlns="http://www.w3.org/1999/xhtml" xml:lang="en">
<head>
    <meta http-equiv="Content-Type" content="text/html;charset=UTF-8">
    <title>Document</title>
    <style type="text/css">
        *{
            margin: 0;
            padding: 0;
        }
body{
            /*为什么要写这个?*/
            /*不希望我们的页面被nav挡住*/
            padding-top: 60px;
            /*IE6不兼容固定定位,所以这个padding没有什么用,就去掉就行了*/
            _padding-top:0;
        }
        .nav{
            position: fixed;
            top: 0;
            left: 0;
            width: 100%;
            height: 60px;
            background-color: #333;
            z-index: 99999999;
        }
        .inner_c{
            width: 1000px;
            height: 60px;
            margin: 0 auto;
        }
        .inner_c ul{
            list-style: none;
        }
        .inner_c ul li{
            float: left;
            width: 100px;
            height: 60px;
            text-align: center;
            line-height: 60px;
        }
        .inner_c ul li a{
            display: block;
            width: 100px;
            height: 60px;
            color:white;
            text-decoration: none;
        }
        .inner_c ul li a:hover{
            background-color: gold;
        }
        p{
            font-size: 30px;
        }
        .btn{
            display: block;
            width: 120px;
            height: 30px;
            background-color: orange;
            position: relative;
            top: 2px;
            left: 1px;
        }
    </style>
</head>
<body>
    <p class="nav">
        <p class="inner_c">
            <ul>
                <li><a href="#">网页栏目</a></li>
                <li><a href="#">网页栏目</a></li>
                <li><a href="#">网页栏目</a></li>
                <li><a href="#">网页栏目</a></li>
                <li><a href="#">网页栏目</a></li>
                <li><a href="#">网页栏目</a></li>
                <li><a href="#">网页栏目</a></li>
                <li><a href="#">网页栏目</a></li>
                <li><a href="#">网页栏目</a></li>
                <li><a href="#">网页栏目</a></li>
            </ul>
        </p>
    </p>
</body>
</html>5、z-index属性:
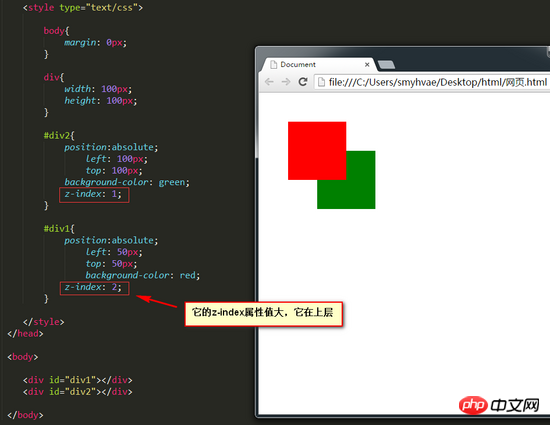
z-index属性:表示谁压着谁。数值大的压盖住数值小的。
有如下特性:
(1)属性值大的位于上层,属性值小的位于下层。
(2)z-index值没有单位,就是一个正整数。默认的z-index值是0。
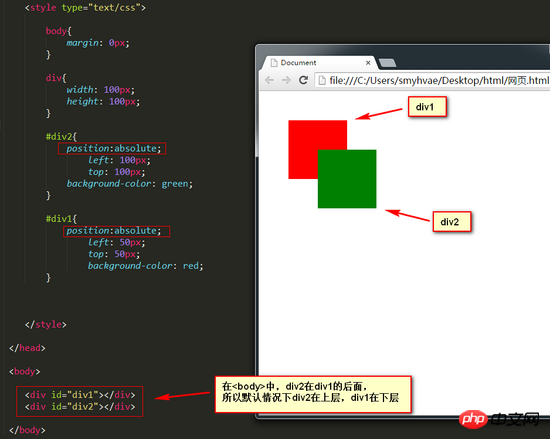
(3)如果大家都没有z-index值,或者z-index值一样,那么在HTML代码里写在后面,谁就在上面能压住别人。定位了的元素,永远能够压住没有定位的元素。
(4)只有定位了的元素,才能有z-index值。也就是说,不管相对定位、绝对定位、固定定位,都可以使用z-index值。 而浮动的元素不能用 。
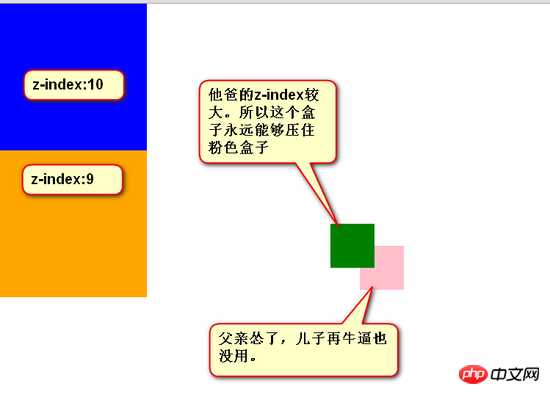
(5)从父现象:父亲怂了,儿子再牛逼也没用。意思是,如果父亲1比父亲2大,那么,即使儿子1比儿子2小,儿子1也能在最上层。
针对(1)(2)(3)条,举例如下:
这是默认情况下的例子:(p2在上层,p1在下层)
现在加一个 z-index 属性,要求效果如下:
第五条分析:
z-index属性的应用还是很广泛的。当好几个已定位的标签出现覆盖的现象时,我们可以用这个z-index属性决定,谁处于最上方。
相信看了本文案例你已经掌握了方法,更多精彩请关注php中文网其它相关文章!
推荐阅读:
The above is the detailed content of Detailed explanation of CSS positioning properties. For more information, please follow other related articles on the PHP Chinese website!


