php 用图片处理函数画一张图
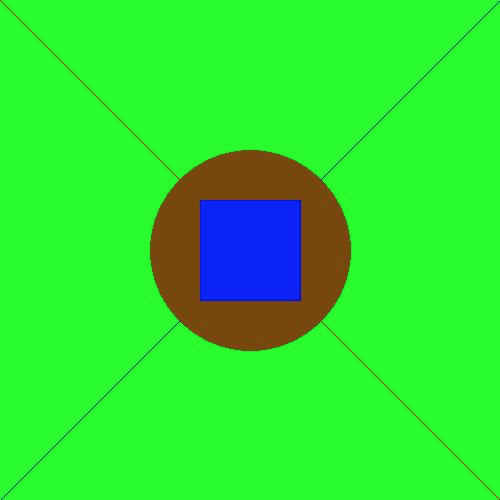
一起来看看下面有一张图:

我们该怎么把这张图给画出来呢。
我们按照步骤能够分析出来:
1.画图
2.准备好画这张图需要的颜色
3.填充背景颜色
4.画两条对角线
5.在上面画一个圆
6.在圆上面画一个矩型
7.保存图片
8.销毁资源
一、我们根据这张图推出出来步骤。我们来分析需要使用到的函数:
//使用imagecreate函数创建图片,返回资源
$img = imagecreate(500,500);
二、图片创建完成我们需要向图片资源填加颜色,需要使用到函数
$颜色变量 = imagecolorallocate ( resource $图片资源 , int $红 , int $绿 , int $蓝 )
红、绿、蓝是计算机里面操作图片的三个基本色。由这三个颜色来组合成我们肉眼所看到的所有颜色。
因此 imagecolorallocate 先输入图片资源,操作这个资源。为这个图片资源准备颜色。
就相当于在画画的时候,先把画布准备好,再准备颜料。
根据这张图,我们需要准备出来的颜色有:
1.绿
2.蓝
3.黑
4.棕
按照计算机的配色原则分配的话,我们下面的颜色分配的代码就要写成下面的样子:
//红
$red = imagecolorallocate($img, 255, 0, 0);
//绿
$green = imagecolorallocate($img, 0, 255, 0);
//蓝
$blue = imagecolorallocate($img, 0, 0, 255);
//棕
$yellow = imagecolorallocate($img, 121, 72, 0);
这中图片中需要用到的几个颜色的色值。
三、 将颜色添加到背景进行填充
imagefilledrectangle ( resource $图片资源 , int $点1x轴, int $点1y轴 , int $点2x轴 , int $点2y轴 , int $color )
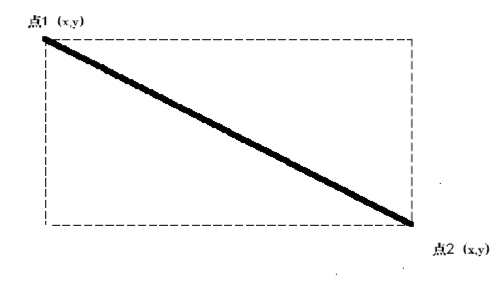
这个函数需要涉及到几何的一点点知识。
1.一个点由x 坐标和y 坐标组成一个点
2.两个点可以组成一个直线
3.这条线如果不是水平或者垂直的线可以组成一个矩形
如下图:

点1和点2,可以变成一个矩形。因此,我们输出两个坐标点,可以对画布进行填充。
如果要填充整个画布的话:
点1 为x轴为画布的0位置,点1的y轴也为画布的0位置。
点2 为x轴为画布的500位置,点2的y轴也为画布的500位置。
四、画两条对角线
画一条对角线,对角线是红色。
第一条对角线的坐标为0和0,500和500
第二条对角线的坐标为500和0,0和500
imageline($img, 0, 0, 500, 500, $red);
imageline($img, 500, 0, 0, 500, $blue);
五、在上面画一个圆
bool imagefilledellipse ( resource $图片资源 , int $圆心x , int $圆心y , int $圆的宽 , int $圆的高 , int $圆的颜色 )
imagefilledellipse($img, 250, 250, 200, 200, $yellow);
操作这个资源,写上圆心的坐标。然后写上长和宽。如果长宽一致为正圆,不一致则为椭圆。
六、在圆上面画一个矩型
imagefilledrectangle($img, 200, 200, 300, 300, $blue);
这个我们在上面一个中讲过,我们就不细说了。
七、保存图片
bool imagejpeg ( resource $image [, string $filename])
八、销毁图片资源
imagedestroy($img);
我们来看一下最终组合出来的代码:
<?php
//创建图片
$img = imagecreatetruecolor(500, 500);

//分配颜色
$red = imagecolorallocate($img, 255, 0, 0);

$green = imagecolorallocate($img, 0, 255, 0);

$blue = imagecolorallocate($img, 0, 0, 255);

$pur = imagecolorallocate($img, 255, 0, 255);

$yellow = imagecolorallocate($img, 121, 72, 0);


//填充背景
imagefilledrectangle($img, 0, 0, 500, 500, $green);

//画对角线
imageline($img, 0, 0, 500, 500, $red);
imageline($img, 500, 0, 0, 500, $blue);

//画圆
imagefilledellipse($img, 250, 250, 200, 200, $yellow);

//圆中间画矩形
imagefilledrectangle($img, 200, 200, 300, 300, $blue);


//保存图片,图片名为haha.jpg
imagejpeg($img, 'haha.jpg');

//销毁资源
imagedestroy($img);

?>


