
 Web-Frontend
HTML-Tutorial
TinyEditor ist ein einfacher und benutzerfreundlicher HTML-WYSIWYG-Editor_HTML/Xhtml_Webseitenproduktion
Web-Frontend
HTML-Tutorial
TinyEditor ist ein einfacher und benutzerfreundlicher HTML-WYSIWYG-Editor_HTML/Xhtml_Webseitenproduktion
TinyEditor ist ein einfacher und benutzerfreundlicher HTML-WYSIWYG-Editor_HTML/Xhtml_Webseitenproduktion

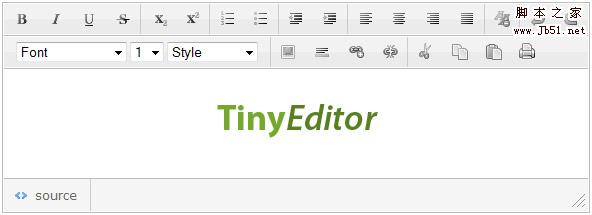
Vor ein paar Tagen habe ich Ihnen einen inländischen XHTML-Editor vorgestellt. Der TinyEditor ist ein einfacher und benutzerfreundlicher HTML-WYSIWYG-Editor_HTML/Xhtml_Webseitenproduktion, den ich Ihnen heute empfehlen möchte, ist ein bekannter ausländischer Webdesign-Blog leigeber.comEin einfacher und benutzerfreundlicher HTML-WYSIWYG-Editor wurde gerade veröffentlicht.
TinyEditor ist ein einfacher und benutzerfreundlicher HTML-WYSIWYG-Editor_HTML/Xhtml_Webseitenproduktion verfügt über die folgenden Funktionen
- Es ist in Javascript geschrieben und hängt nicht von anderen Bibliotheken ab
- Dies ist ein kompakter Editor, die aufzurufende Datei ist nur 8 KB groß
- Es kann die meisten HTML-Formatierungsanforderungen erfüllen und die integrierten Funktionen machen das generierte Markup so prägnant wie möglich
- Die im Editor verwendeten kleinen Symbole nutzen die CSS-Sprite-Technologie, um http-Verbindungen zu reduzieren
- Getestet und bestanden in Mainstream-Browsern
- Kann in persönlichen oder kommerziellen Projekten unter der Creative Commons-Lizenz verwendet werden
So verwenden Sie es:
- Referenzieren Sie die von TinyEditor ist ein einfacher und benutzerfreundlicher HTML-WYSIWYG-Editor_HTML/Xhtml_Webseitenproduktion bereitgestellten JS- und CSS-Dateien in der Webseitendatei
- Fügen Sie die vom Editor benötigten Tags wie folgt in die Webseitendatei ein, bei der es sich eigentlich um einen Textbereich handelt
<span style="COLOR: #009900"><<span style="FONT-WEIGHT: bold; COLOR: #000000">textarea</span> <span style="COLOR: #000066">id</span><span style="COLOR: #66cc66">=</span><span style="COLOR: #ff0000">"input"</span> <span style="COLOR: #000066">style</span><span style="COLOR: #66cc66">=</span><span style="COLOR: #ff0000">"width:400px; height:200px"</span>><<span style="COLOR: #66cc66">/</span><span style="FONT-WEIGHT: bold; COLOR: #000000">textarea</span>></span>
Nach dem Login kopierenBeachten Sie, dass die im Textbereich definierte Länge und Breite auch der Größe des Editors entspricht.
- Initialisieren Sie den Editor über Skripte und konfigurieren Sie verschiedene Parameter wie folgt:
<span style="FONT-WEIGHT: bold; COLOR: #003366">new</span> TINY.<span style="COLOR: #660066">editor</span>.<span style="COLOR: #660066">edit</span><span style="COLOR: #009900">(</span><span style="COLOR: #3366cc">'editor'</span><span style="COLOR: #339933">,</span><span style="COLOR: #009900">{</span>
	id<span style="COLOR: #339933">:</span><span style="COLOR: #3366cc">'input'</span><span style="COLOR: #339933">,</span>
<span style="COLOR: #006600; FONT-STYLE: italic">// (必须)上面第二步中定义的textarea的id</span>
	width<span style="COLOR: #339933">:</span><span style="COLOR: #cc0000">584</span><span style="COLOR: #339933">,</span>
<span style="COLOR: #006600; FONT-STYLE: italic">// (选填) 编辑器宽度</span>
	height<span style="COLOR: #339933">:</span><span style="COLOR: #cc0000">175</span><span style="COLOR: #339933">,</span>
 <span style="COLOR: #006600; FONT-STYLE: italic">// (选填) 编辑器高度</span>
	cssclass<span style="COLOR: #339933">:</span><span style="COLOR: #3366cc">'te'</span><span style="COLOR: #339933">,</span>
 <span style="COLOR: #006600; FONT-STYLE: italic">// (选填) 编辑器的class,用来通过css控制样式</span>
	controlclass<span style="COLOR: #339933">:</span><span style="COLOR: #3366cc">'tecontrol'</span><span style="COLOR: #339933">,</span>
 <span style="COLOR: #006600; FONT-STYLE: italic">// (选填) 编辑器上按钮的class</span>
	rowclass<span style="COLOR: #339933">:</span><span style="COLOR: #3366cc">'teheader'</span><span style="COLOR: #339933">,</span>
 <span style="COLOR: #006600; FONT-STYLE: italic">// (选填) 编辑器按钮行的class</span>
	dividerclass<span style="COLOR: #339933">:</span><span style="COLOR: #3366cc">'tedivider'</span><span style="COLOR: #339933">,</span>
<span style="COLOR: #006600; FONT-STYLE: italic">// (选填) 编辑器按钮间分割线的样式</span>
	controls<span style="COLOR: #339933">:</span><span style="COLOR: #009900">[</span><span style="COLOR: #3366cc">'bold'</span><span style="COLOR: #339933">,</span> <span style="COLOR: #3366cc">'italic'</span><span style="COLOR: #339933">,</span> <span style="COLOR: #3366cc">'underline'</span><span style="COLOR: #339933">,</span> <span style="COLOR: #3366cc">'strikethrough'</span><span style="COLOR: #339933">,</span> <span style="COLOR: #3366cc">'|'</span><span style="COLOR: #339933">,</span> <span style="COLOR: #3366cc">'subscript'</span><span style="COLOR: #339933">,</span> <span style="COLOR: #3366cc">'superscript'</span><span style="COLOR: #339933">,</span> <span style="COLOR: #3366cc">'|'</span><span style="COLOR: #339933">,</span> <span style="COLOR: #3366cc">'orderedlist'</span><span style="COLOR: #339933">,</span> <span style="COLOR: #3366cc">'unorderedlist'</span><span style="COLOR: #339933">,</span> <span style="COLOR: #3366cc">'|'</span> <span style="COLOR: #339933">,</span><span style="COLOR: #3366cc">'outdent'</span> <span style="COLOR: #339933">,</span><span style="COLOR: #3366cc">'indent'</span><span style="COLOR: #339933">,</span> <span style="COLOR: #3366cc">'|'</span><span style="COLOR: #339933">,</span> <span style="COLOR: #3366cc">'leftalign'</span><span style="COLOR: #339933">,</span> <span style="COLOR: #3366cc">'centeralign'</span><span style="COLOR: #339933">,</span> <span style="COLOR: #3366cc">'rightalign'</span><span style="COLOR: #339933">,</span> <span style="COLOR: #3366cc">'blockjustify'</span><span style="COLOR: #339933">,</span> <span style="COLOR: #3366cc">'|'</span><span style="COLOR: #339933">,</span> <span style="COLOR: #3366cc">'unformat'</span><span style="COLOR: #339933">,</span> <span style="COLOR: #3366cc">'|'</span><span style="COLOR: #339933">,</span> <span style="COLOR: #3366cc">'undo'</span><span style="COLOR: #339933">,</span> <span style="COLOR: #3366cc">'redo'</span><span style="COLOR: #339933">,</span> <span style="COLOR: #3366cc">'n'</span><span style="COLOR: #339933">,</span> <span style="COLOR: #3366cc">'font'</span><span style="COLOR: #339933">,</span> <span style="COLOR: #3366cc">'size'</span><span style="COLOR: #339933">,</span> <span style="COLOR: #3366cc">'style'</span><span style="COLOR: #339933">,</span> <span style="COLOR: #3366cc">'|'</span><span style="COLOR: #339933">,</span> <span style="COLOR: #3366cc">'image'</span><span style="COLOR: #339933">,</span> <span style="COLOR: #3366cc">'hr'</span><span style="COLOR: #339933">,</span> <span style="COLOR: #3366cc">'link'</span><span style="COLOR: #339933">,</span> <span style="COLOR: #3366cc">'unlink'</span><span style="COLOR: #339933">,</span> <span style="COLOR: #3366cc">'|'</span><span style="COLOR: #339933">,</span> <span style="COLOR: #3366cc">'cut'</span><span style="COLOR: #339933">,</span> <span style="COLOR: #3366cc">'copy'</span><span style="COLOR: #339933">,</span> <span style="COLOR: #3366cc">'paste'</span><span style="COLOR: #339933">,</span> <span style="COLOR: #3366cc">'print'</span><span style="COLOR: #009900">]</span><span style="COLOR: #339933">,</span>
 <span style="COLOR: #006600; FONT-STYLE: italic">// (必须) 要根据需要在编辑器上添加按钮控件, 其中'|'代表功能按钮间的竖分割线,'n'代表按钮行间的分割线</span>
	footer<span style="COLOR: #339933">:</span><span style="FONT-WEIGHT: bold; COLOR: #003366">true</span><span style="COLOR: #339933">,</span>
<span style="COLOR: #006600; FONT-STYLE: italic">// (选填) 是否显示编辑器底部</span>
	fonts<span style="COLOR: #339933">:</span><span style="COLOR: #009900">[</span><span style="COLOR: #3366cc">'Verdana'</span><span style="COLOR: #339933">,</span><span style="COLOR: #3366cc">'Arial'</span><span style="COLOR: #339933">,</span><span style="COLOR: #3366cc">'Georgia'</span><span style="COLOR: #339933">,</span><span style="COLOR: #3366cc">'Trebuchet MS'</span><span style="COLOR: #009900">]</span><span style="COLOR: #339933">,</span>
<span style="COLOR: #006600; FONT-STYLE: italic">// (选填) 编辑器中可选择的字体</span>
	xhtml<span style="COLOR: #339933">:</span><span style="FONT-WEIGHT: bold; COLOR: #003366">true</span><span style="COLOR: #339933">,</span>
<span style="COLOR: #006600; FONT-STYLE: italic">// (选填) 编辑器生成xhtml还是html标记</span>
	cssfile<span style="COLOR: #339933">:</span><span style="COLOR: #3366cc">'style.css'</span><span style="COLOR: #339933">,</span>
<span style="COLOR: #006600; FONT-STYLE: italic">// (选填) 要为编辑器附加的外部css文件</span>
	content<span style="COLOR: #339933">:</span><span style="COLOR: #3366cc">'starting content'</span><span style="COLOR: #339933">,</span>
<span style="COLOR: #006600; FONT-STYLE: italic">// (选填) 设置编辑器编辑区域中的初始内容</span>
	css<span style="COLOR: #339933">:</span><span style="COLOR: #3366cc">'body{background-color:#ccc}'</span><span style="COLOR: #339933">,</span>
 <span style="COLOR: #006600; FONT-STYLE: italic">// (选填) 设置编辑器编辑区域背景</span>
	bodyid<span style="COLOR: #339933">:</span><span style="COLOR: #3366cc">'editor'</span><span style="COLOR: #339933">,</span>
<span style="COLOR: #006600; FONT-STYLE: italic">// (选填) 设置编辑区域ID</span>
	footerclass<span style="COLOR: #339933">:</span><span style="COLOR: #3366cc">'tefooter'</span><span style="COLOR: #339933">,</span>
<span style="COLOR: #006600; FONT-STYLE: italic">// (选填) 设置编辑器底部class</span>
	toggle<span style="COLOR: #339933">:</span><span style="COLOR: #009900">{</span>text<span style="COLOR: #339933">:</span><span style="COLOR: #3366cc">'源代码'</span><span style="COLOR: #339933">,</span>activetext<span style="COLOR: #339933">:</span><span style="COLOR: #3366cc">'可视化'</span><span style="COLOR: #339933">,</span>cssclass<span style="COLOR: #339933">:</span><span style="COLOR: #3366cc">'toggle'</span><span style="COLOR: #009900">}</span><span style="COLOR: #339933">,</span>
 <span style="COLOR: #006600; FONT-STYLE: italic">// (选填) 设置源代码浏览切换文字,及切换按钮的class</span>
	resize<span style="COLOR: #339933">:</span><span style="COLOR: #009900">{</span>cssclass<span style="COLOR: #339933">:</span><span style="COLOR: #3366cc">'resize'</span><span style="COLOR: #009900">}</span>
<span style="COLOR: #006600; FONT-STYLE: italic">// (选填) 设置编辑器大小调整按钮的class</span>
<span style="COLOR: #009900">}</span><span style="COLOR: #009900">)</span><span style="COLOR: #339933">;</span>
Nach dem Login kopierenMan kann sagen, dass es hochgradig konfigurierbar ist und die Konfigurationselemente relativ klar sind.
Bei der eigentlichen Anwendung von TinyEditor ist ein einfacher und benutzerfreundlicher HTML-WYSIWYG-Editor_HTML/Xhtml_Webseitenproduktion ist zu beachten, dass vor dem Absenden des Editorinhalts die Funktion „instance.post()“ aufgerufen werden muss, um sicherzustellen, dass der neueste visuelle Inhalt im Bearbeitungsbereich in markierten Text umgewandelt wird.
Beispiel ansehen: http://sandbox.leigeber.com/tinyeditor/
Download: TinyEditor ist ein einfacher und benutzerfreundlicher HTML-WYSIWYG-Editor_HTML/Xhtml_Webseitenproduktion-Quellcode und Beispieldateien

Heiße KI -Werkzeuge

Undresser.AI Undress
KI-gestützte App zum Erstellen realistischer Aktfotos

AI Clothes Remover
Online-KI-Tool zum Entfernen von Kleidung aus Fotos.

Undress AI Tool
Ausziehbilder kostenlos

Clothoff.io
KI-Kleiderentferner

AI Hentai Generator
Erstellen Sie kostenlos Ai Hentai.

Heißer Artikel
Heiße Werkzeuge

Notepad++7.3.1
Einfach zu bedienender und kostenloser Code-Editor

SublimeText3 chinesische Version
Chinesische Version, sehr einfach zu bedienen

Senden Sie Studio 13.0.1
Leistungsstarke integrierte PHP-Entwicklungsumgebung

Dreamweaver CS6
Visuelle Webentwicklungstools

SublimeText3 Mac-Version
Codebearbeitungssoftware auf Gottesniveau (SublimeText3)
Heiße Themen
 1378
1378
 52
52

 Wie erzielt man mit reinem CSS3 einen Welleneffekt? (Codebeispiel)
Jun 28, 2022 pm 01:39 PM
Wie erzielt man mit reinem CSS3 einen Welleneffekt? (Codebeispiel)
Jun 28, 2022 pm 01:39 PM
Wie erzielt man mit reinem CSS3 einen Welleneffekt? In diesem Artikel erfahren Sie, wie Sie mit SVG- und CSS-Animationen Welleneffekte erstellen.
 Verwenden Sie CSS geschickt, um verschiedene seltsam geformte Schaltflächen zu realisieren (mit Code).
Jul 19, 2022 am 11:28 AM
Verwenden Sie CSS geschickt, um verschiedene seltsam geformte Schaltflächen zu realisieren (mit Code).
Jul 19, 2022 am 11:28 AM
Dieser Artikel zeigt Ihnen, wie Sie mithilfe von CSS auf einfache Weise verschiedene seltsam geformte Schaltflächen realisieren können, die häufig vorkommen. Ich hoffe, dass er Ihnen hilfreich sein wird!
 So verstecken Sie Elemente in CSS, ohne Platz zu beanspruchen
Jun 01, 2022 pm 07:15 PM
So verstecken Sie Elemente in CSS, ohne Platz zu beanspruchen
Jun 01, 2022 pm 07:15 PM
Zwei Methoden: 1. Fügen Sie mit dem Anzeigeattribut einfach den Stil „display:none;“ zum Element hinzu. 2. Verwenden Sie die Attribute „position“ und „top“, um die absolute Positionierung des Elements festzulegen, um das Element auszublenden. Fügen Sie dem Element einfach den Stil „position:absolute;top:-9999px;“ hinzu.
 So implementieren Sie Spitzenränder in CSS3
Sep 16, 2022 pm 07:11 PM
So implementieren Sie Spitzenränder in CSS3
Sep 16, 2022 pm 07:11 PM
In CSS können Sie das Attribut „border-image“ verwenden, um einen Spitzenrand zu erzielen. Das Attribut „border-image“ kann Bilder zum Erstellen von Rändern verwenden, d. h. zum Hinzufügen eines Hintergrundbilds zum Rand. Sie müssen lediglich das Hintergrundbild als Spitzenstil angeben Bildrandbreite nach innen. Ob der Anfang wiederholt wird;".
 Es zeigt sich, dass Textkarussell und Bildkarussell auch mit reinem CSS realisierbar sind!
Jun 10, 2022 pm 01:00 PM
Es zeigt sich, dass Textkarussell und Bildkarussell auch mit reinem CSS realisierbar sind!
Jun 10, 2022 pm 01:00 PM
Wie erstelle ich ein Textkarussell und ein Bildkarussell? Das erste, woran jeder denkt, ist die Verwendung von js. Tatsächlich können Textkarussell und Bildkarussell auch einen Blick auf die Implementierungsmethode werfen.
 So vergrößern Sie das Bild durch Klicken mit der Maus in CSS3
Apr 25, 2022 pm 04:52 PM
So vergrößern Sie das Bild durch Klicken mit der Maus in CSS3
Apr 25, 2022 pm 04:52 PM
Implementierungsmethode: 1. Verwenden Sie den Selektor „:active“, um den Status des Mausklicks auf das Bild auszuwählen. 2. Verwenden Sie das Transformationsattribut und die Funktion „scale()“, um den Bildvergrößerungseffekt zu erzielen. Die Syntax „img:active {transform : Skala(x-Achsen-Vergrößerung, y-Achsen-Vergrößerung);}".
 So legen Sie die Rotationsgeschwindigkeit der Animation in CSS3 fest
Apr 28, 2022 pm 04:32 PM
So legen Sie die Rotationsgeschwindigkeit der Animation in CSS3 fest
Apr 28, 2022 pm 04:32 PM
In CSS3 können Sie das Attribut „animation-timing-function“ verwenden, um die Rotationsgeschwindigkeit der Animation festzulegen. Dieses Attribut wird verwendet, um anzugeben, wie die Animation einen Zyklus abschließt und die Geschwindigkeitskurve der Animation festlegt. Animation-Timing-Funktion: Geschwindigkeitsattributwert;}".
 Hat der CSS3-Animationseffekt eine Verformung?
Apr 28, 2022 pm 02:20 PM
Hat der CSS3-Animationseffekt eine Verformung?
Apr 28, 2022 pm 02:20 PM
Der Animationseffekt in CSS3 verfügt über eine Verformung. Sie können „Animation: Animationsattribut @keyframes ..{..{transform: Transformationsattribut}}“ verwenden, um den Animationsstil festzulegen Das Transformationsattribut wird zum Festlegen des Verformungsstils verwendet.
