

Heute geht es nicht um Theorie oder Einsteigerprojekte. Wir erstellen in einem Tutorial unsere allererste eigene Oats~i-Web-App.
Wenn Sie dies zum ersten Mal lesen, schauen Sie sich kurz den Anfang der Reihe „Build a Web with Oats~i“ an, um zu erfahren, was Oats~i ist, wie es funktioniert und wie man es einstellt in Ihrer Frontend-Entwicklungsumgebung.
In diesem Tutorial erstellen wir unsere eigene Oats~i-Web-App, die zwei Seiten hat, eine, auf der wir zufällige Katzenbilder zeigen, und eine andere, auf der wir Filme basierend auf Titeln suchen und anzeigen. alle nutzen öffentlich verfügbare APIs.
Da es jedoch so viel zu lernen gibt, werden wir die Dinge Schritt für Schritt angehen. In Lektion 1 besteht unser Ziel also darin, unser Routing und unsere Fragmente einzurichten und zu zeigen, wie man eine Standardroute einrichtet.
Unser letztes Projekt für die heutige Lektion wird in etwa so aussehen.
Hinweis:
Wenn Sie den endgültigen Code ausführen möchten, bevor wir beginnen, oder direkt mitmachen möchten, finden Sie den Quellcode hier: https://github.com/Ian-Cornelius/Oats-i-Lesson-1-- -Fragments-Routes-and-Default-Route
Klonen Sie das Repo, navigieren Sie zum Stammordner des Projekts, öffnen Sie das Terminal und führen Sie es aus
npm install
Warten Sie, bis die Installation abgeschlossen ist, und führen Sie sie dann aus
npm run dev
Öffnen Sie die im Terminal angegebene URL in Ihrem Browser, navigieren Sie herum und folgen Sie dann den Anweisungen.
Außerdem gehe ich in dieser ganzen Serie davon aus, dass Sie mit HTML und CSS im Allgemeinen vertraut sind, um sicherzustellen, dass wir uns beim Erstellen einer Oats~i-Webanwendung nur auf die Codeteile beschränken, die wichtig sind. Für den Einstieg in Oats~i sind keine fortgeschrittenen HTML- oder CSS-Kenntnisse erforderlich. Nur das Wesentliche.
Außerdem gehe ich davon aus, dass Sie Node und NPM bereits installiert haben.
Jetzt lasst uns eintauchen!
Wir richten unser Projekt schnell mit der Oats~i-CLI ein. Erstellen Sie einen neuen Ordner, in dem Sie Oats~i ausführen möchten, navigieren Sie dorthin, öffnen Sie das Terminal und führen Sie dann
aus
npx oats-i-cli
Folgen Sie den Anweisungen und warten Sie, bis die Installation abgeschlossen ist.
Sie haben gerade eine vollständige Oats~i-Entwicklungsumgebung eingerichtet. Kommen wir nun zum Löschen und Bearbeiten der Dateien im Starterprojekt, die wir nicht benötigen.
Navigieren Sie zunächst zu src -> App -> Index -> Assets und löschen Sie alle Dateien in diesem Ordner.
Navigieren Sie dann zu src -> App -> Fragmente und löschen Sie die About- und Home-Ordner.
Oats~i rendert Ansichten oder Seiten hauptsächlich über ein Fragmentsystem. Ein Fragment ist im Grunde eine Ansichtseinheit, die aus Komponenten oder Elementen besteht, die zum Anzeigen visueller Details oder Daten erforderlich sind.
Nehmen wir den Fall unseres Tutorialprojekts.
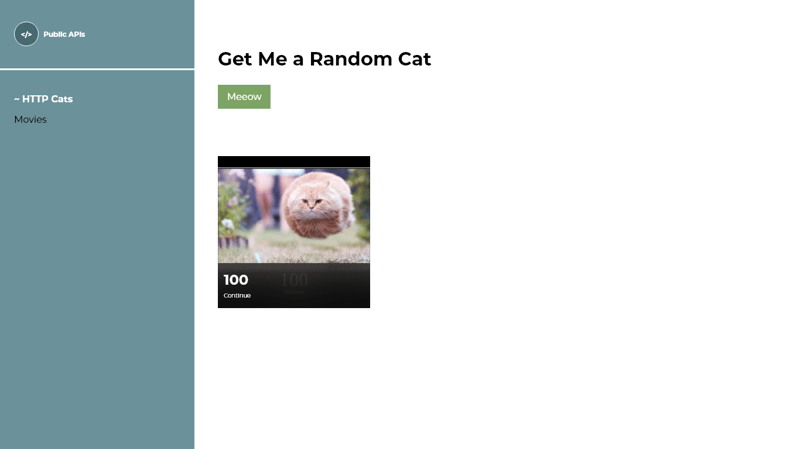
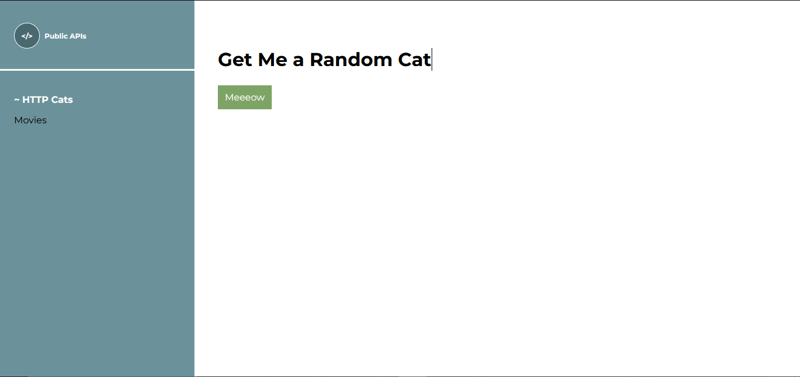
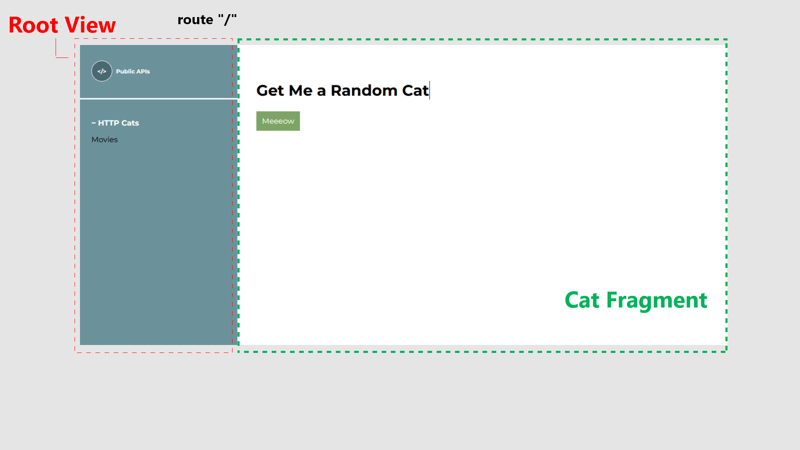
Wir werden eine Seite haben, auf der ein Benutzer auf eine Schaltfläche klicken und sich mithilfe der http-cat-API zufällige Katzenbilder basierend auf zufällig ausgewählten http-Codes anzeigen lassen kann. Dies wird die Startseite oder „/“-Route sein.
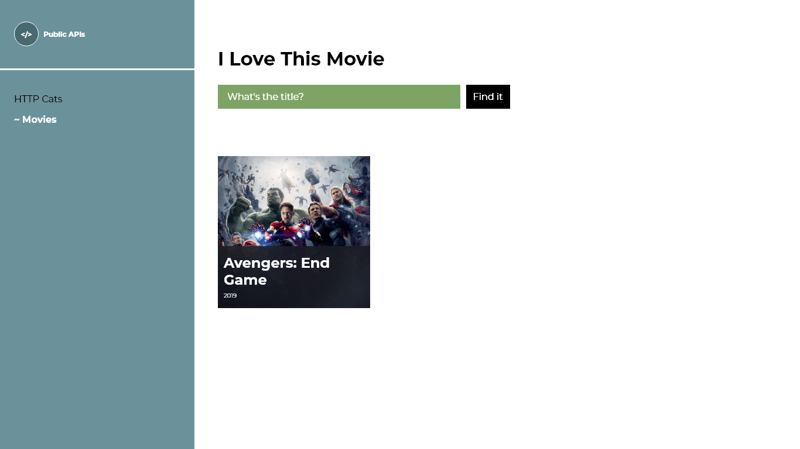
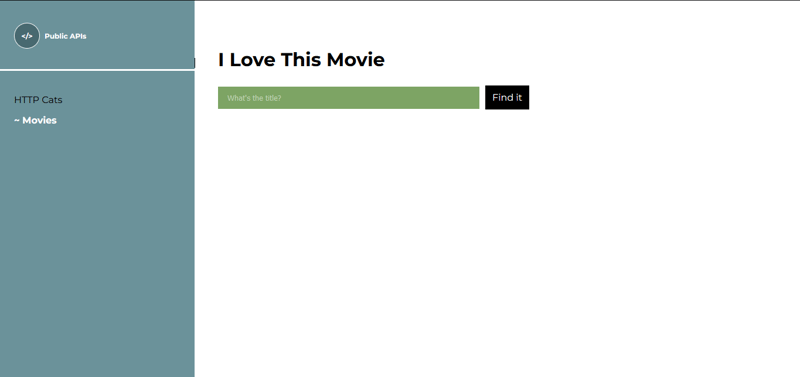
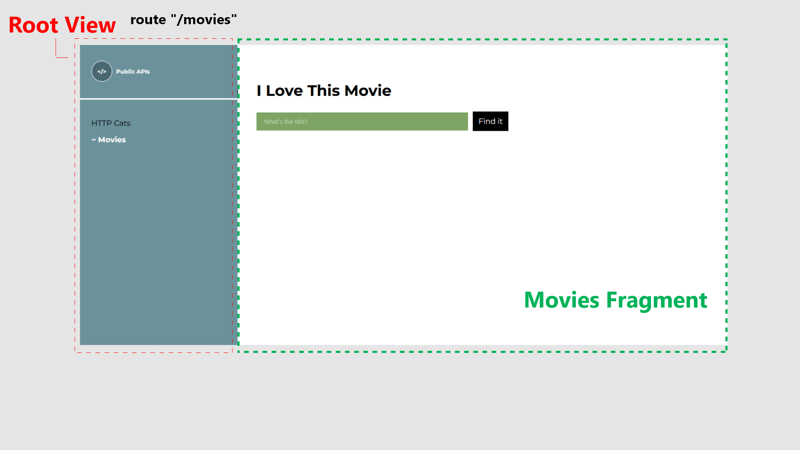
Auf der anderen Seite stehen dem Benutzer eine Suchleiste und eine Schaltfläche zur Verfügung, über die er einen Filmtitel eingeben und mithilfe der Film-API danach suchen kann. Dies ist die Filmseite oder „/movies“-Route.
Wir möchten, dass der Benutzer zwischen diesen beiden Seiten navigieren kann, wobei die rechte Ansicht angezeigt wird, wenn er sich auf der Startseite oder auf der „/“-Route und auf der Filmseite oder auf der „/movies“-Route befindet.
Diese Ansichten sind unsere Fragmente. Hier ist eine Visualisierung, um dieses Konzept klarer zu machen.
Nach dieser Logik wird unsere Oats~i-Web-App für dieses Projekt zwei Fragmente haben. Lassen Sie uns diese beiden erstellen, wobei jeder seinen eigenen Ordner hat, in dem der vollständige Code enthalten ist.
Navigieren Sie zu src -> App -> Fragmente erstellen dann einen neuen Ordner mit dem Namen „http-cats“. Dieser Ordner enthält den Quellcode für das http-cats-Fragment in unserer Oats~i-App, der angezeigt wird, wenn der Benutzer zu
navigiert
„/“-Route.
Inside the “http-cats” folder, create new folders named views, styles, assets, and scripts.
The views folder will hold the view templates for our http-cats fragment. The styles folder will hold the css files, the assets folder will hold the asset files (images, etc), and the scripts folder will hold our javascript files.
Note: These folder structures are not a strict enforcement by Oats~i but rather a logical project structure that I find to work best for most cases.
Now, let’s write the JavaScript source file that will actually render our http-cats fragment.
Inside the scripts folder, create a new file named http_cats_main_fragment.js. Paste the following code inside it:
//@ts-check
//import styles
import "../styles/http_cats.css";

import AppFragmentBuilder from "oats-i/fragments/builder/AppFragmentBuilder";
import AppMainFragment from "oats-i/fragments/AppMainFragment"

class HTTPCatsMainFragment extends AppMainFragment{

    async initializeView(cb){

        //@ts-expect-error cannot find module (for view)
        const uiTemplate = require("../views/http_cats_fragment.hbs")();
        this.onViewInitSuccess(uiTemplate, cb);
    }
}

const httpCatsMainFragmentBuilder = new AppFragmentBuilder(HTTPCatsMainFragment, {

    localRoutingInfos: null,
    viewID: "http-cats-main-fragment",
});
export default httpCatsMainFragmentBuilder;
Now, let’s break it down.
The first line imports our css file, used to style our http-cats fragment view. Webpack handles loading this file into our final HTML file using the css loader, style loader, and html webpack plugin we’d configured before.
The next lines import the AppMainFragment class and the AppFragmentBuilder class.
When building Oats~i fragments, you’ll be extending from either of two fragment classes. These are the main fragment or child fragment class.
The main fragment is the parent fragment view of your page or route. Its content is encapsulated within a div element, given the id passed in as the viewID when instantiating the AppFragmentBuilder class. This content is then placed inside the tag which you put inside the tag.
There can only be one main fragment per route or page. Any other view that will be rendered by a fragment afterwards must be from a child fragment. You can picture it this way using a HTML markup tree.
<app-root>
    <main-fragment>
        <div id=”{viewID}”
            <!-- main fragment content -->
            <child-fragment id=”{childFragmentID}”>
                <div id=”{viewID (childfragment)}”>
                </div>
            </child-fragment>
        </div>
    </main-fragment>
</app-root>
That’s why, as you’ll observe later when looking at setting up routes, we define a target which builds a main fragment, then supply nested child fragments which build child fragments in order of their rendering in the HTML tree, from the main-fragment.
This way, Oats~i can sequentially render your fragments and therefore views, without conflict, and swap them easily based on their position in the tree.
We’ll add a child fragment to this project later. For now, let’s just grasp the base concept of a fragment.
What you’ll learn here and in more tutorials involving fragments will be exactly how you’ll implement any fragment class, regardless of whether it’s inherited from a main or child fragment class.
In our example, we’re only interested in overriding one method:
async initializeView(cb)
This method is called by Oats~i when it’s building a fragment to retrieve its view template as a html string. In our case, we require our view template file for the http-cats fragment using the line:
const uiTemplate = require("../views/http_cats_fragment.hbs")();
The view file is a handlebars template. We’ll create and implement it shortly.
After templating our view into a html string, we now pass it to the internal method
this.onViewInitSuccess(uiTemplate, cb);
Calling this method informs the fragment that we’ve completed templating our view and it can proceed to the next build phase.
And for our purposes in this tutorial, that’s just about it. Our fragment now has a view to attach, and we don’t have any buttons or listeners to bind yet. We’ll handle that in our next tutorial. But for now, this fragment is set to go.
Except for one tiny step.
Oats~i builds fragments by first instantiating them when they’re needed for a specific route. It does this through the AppFragmentBuilder class.
We instantiate this class with the class definition of our fragment and it’s constructor arguments that will be passed to it on instantiation.
Therefore, in our project, we create an instance of AppFragmentBuilder, passing in the HttpCatsMainFragment class, and constructor arguments including localRoutingInfos and viewID.
const httpCatsMainFragmentBuilder = new AppFragmentBuilder(HTTPCatsMainFragment, {

    localRoutingInfos: null,
    viewID: "http-cats-main-fragment",
});
The constructor argument you should pay attention to for now is the viewID.
As mentioned before, the view you render from initializeView() is wrapped inside a parent div element, which is assigned this viewID as its id. Doing this makes it easier for Oats~i to track whether your fragment’s view has been loaded, and remove it from the DOM when the fragment is being destroyed.
Finally, we export this builder, as that is what will be passed as the target, and in the case of a child fragment, one of the nested child fragments when providing the app’s routing info.
export default httpCatsMainFragmentBuilder;
Now, let’s implement the view template file we imported as the view for our http-cats fragment. Oats~i uses handlebars by default for templating view files. However, since Oats~i only cares about the view being provided as a html string, you can modify the templating engine to whichever suits you and your project, as long as it can be used with webpack.
In the http-cats folder, open the views folder and create a new file named http_cats_fragment.hbs.
Open the file and paste the following code:
<section class="section">
    <h1 class="frag-header mont-txt"><span>Get Me a Random Cat</span></h1>
    <button class="b-cta mont-txt" id="get-cat">Meeeow</button>
</section>
Now lets implement the styling for the http-cats fragment’s view we’ve just templated.
Inside the http-cats folder, navigate to styles and create a file named http_cats.css. Paste the following code inside it:
.section {

    padding: 0 40px;
}

.frag-header {

    font-size: 32px !important;
    font-weight: 700 !important;
    display: flex;
    flex-direction: column;
    justify-content: end;
    min-height: 120px;
}

.b-cta {

    padding: 11px 12px;
    background-color: #7da464;
    border: none;
    cursor: pointer;
    color: white !important;
}

#get-cat {

    margin-top: 25px;
}
With these files set up, our imported files in the http-cats main fragment, specifically the styling and views, have now been implemented.
You might be probably itching to see how the web app looks like already. So, instead of implementing our second fragment, let’s just put everything together and see what our current web app looks like.
From our previous part of this series, where we talked about starting an Oats~i app, I mentioned that Oats~i expects that you give it a template for the app root view or have it already implemented in your main html file before it can start rendering your route and fragments.
This app root view is basically the primary view of your entire web app, encapsulating bits of it that will never change.
In our case, we’ll write this in our main html file, that is the home.sv.hbs file that is always served by the server whenever the web app is initially loaded.
Navigate to src -> server -> home and open the home.sv.hbs file. Delete its content and replace it with the following code:
<!DOCTYPE html>
<html lang="en">
<head>
<meta charset="UTF-8">
<meta name="viewport" content="width=device-width, initial-scale=1.0">
<title>Build a Web App with Oats~i: Lesson 1</title>
</head>
<body>
<app-root id="my-app">
<div id="nav">
<div id="logo"><p class="mont-txt"><span></></span>Public APIs</p></div>
<div id="links">
<a href="/" class="nav-link mont-txt http-cats-link">HTTP Cats</a>
<a href="/movies" class="nav-link mont-txt movies-link">Movies</a>
</div>
</div>
<main-fragment>
</main-fragment>
</app-root>
</body>
</html>
Most of this code looks like your typical html markup. However, pay close attention to the start and end of the tag.
Oats~i app root view begins with the app-root tag. Within it, you can markup bits of your view that will never change. In our instance, this is the navigation that will be rendered at the left of the screen. Then, we finally include a single tag and leave it as is.
This is where Oats~i will start loading our fragments, starting with the main fragment then its children.
Now, navigate to src -> app -> index -> styles -> index.css and let’s code the styling for our app root view.
Before doing that, delete the adjacent index_responsive.css file. That was for the starter project that comes in default with Oats~i, so we don’t need it.
Now, for our index.css file, I’ve put the styling in that folder because it more represents the base or “index” styling of the app. You can always place this file wherever it suits you best as long as the import is right.
Open the index.css file, delete its content, and replace it with the following:
@import url('https://fonts.googleapis.com/css2?family=Archivo+Black&family=Montserrat:ital,wght@0,100..900;1,100..900&family=Mulish:ital@0;1&family=Open+Sans:ital,wght@0,300..800;1,300..800&display=swap');

/* Crucial styling to allow specially structured A links to still have clicks intercepted by router. */
/* Carry over to your project */
a *:not([click-override=true]){

    pointer-events: none
}

body {

    margin: 0;
    background-color: white;
    box-sizing: border-box;
    overflow-x: hidden;
    --body-padding: 24px;
    --color-primary: #6b929a;
}

.mont-txt {

    font-family: "Montserrat", sans-serif;
    font-weight: 400;
    font-style: normal;
    color: black;
    margin: 0;
    font-size: 16px;
}

#my-app {

    position: relative;
    display: grid;
    grid-template-columns: auto 1fr;
}

#nav {

    box-sizing: border-box;
    height: 100lvh;
    background: var(--color-primary);
    min-width: 332px;
    width: max-content;
}

#logo {

    padding-left: var(--body-padding);
    min-height: 120px;
    width: 100%;
    position: relative;
    display: flex;
    flex-direction: row;
    align-items: center;
}

#logo::before {

    content: "";
    position: absolute;
    bottom: 0;
    left: 0;
    width: 100%;
    height: 3px;
    background-color: white;
}

#logo > p {

    color: white;
    font-weight: 700;
    font-size: 12px;
    display: flex;
    flex-direction: row;
    align-items: center;
    gap: 8px;
}

#logo > p > span {

    display: inline-block;
    width: 42px;
    height: 42px;
    border: 1px white solid;
    background-color: #486970;
    border-radius: 500px;
    display: flex;
    flex-direction: row;
    align-items: center;
    justify-content: center;
}

#links {

    margin: 40px var(--body-padding);
    display: flex;
    flex-direction: column;
    gap: 16px;
}

.nav-link {

    text-decoration: none;
    color: black;
    font-weight: 400;
}

.nav-link[navigation-state=active] {

    font-weight: 700;
    color: white;
}

.nav-link[navigation-state=active]::before {

    content: "~ ";
}
Most of this code is just project-specific, so unrelated to how Oats~i works. Except for a few directives.
a *:not([click-override=true]){

    pointer-events: none
}
As mentioned in the previous part of this series, this directive ensures you can write unique markup inside your A tags and have Oats~i still intercept its clicks correctly. This is just a quirk with how events bubble in js.
Also, another directive that I want you to pay attention to is this:
.nav-link[navigation-state=active] {

    font-weight: 700;
    color: white;
}
The above directive, and its counterpart that immediately follows for the pseudoelement ::before, allows us to change the look of our links or navigation buttons when Oats~i has detected we’ve clicked on it and the requested routing has been initiated.
As mentioned in the previous part of the series, Oats~i uses an array of navigation info to know which elements are the main navigational buttons or links in your app, automatically attach listeners to them, and tell you when each is active.
Therefore, in this case, our work is to only apply unique styling to our navigational links when they’re active, using the attribute navigation-state=”active”, which adds a tilde, increases the font weight, and changes the color to white for our specific link.
The only thing left to ensure Oats~i updates this attribute is to just supply the right main navigation info, which we’ll do shortly.
Now, let’s implement the index.js file where we start our Oats~i app, create our routing info, and main navigation info.
Our Oats~i app starts at the index.js file. If you’re familiar with webpack configuration, you’ll notice that this is our entry point for our configuration and the chunk we inject into the home.sv.hbs file when emitting it as a hbs file using html webpack plugin.
Navigate to src -> app -> index -> scripts, and open the index.js file. Delete all content and replace it with this:
//@ts-check
import AppStateManager from "oats-i/base-history/app_state_manager";
import appRoot from "oats-i/bin/app_root"
import AppRoutingInfo from "./routing-info/app_routing_info";
import MainRouter from "oats-i/router/main_router";
import AppMainNavInfo from "./routing-info/app_main_nav_info";

//import styles
import "../styles/index.css";

function initApp(){

    const appStateManager = new AppStateManager(AppRoutingInfo);
    appRoot.initApp(appStateManager, new MainRouter(AppRoutingInfo, appStateManager, (args) => {}, "", async (url) => {

        return {

            canAccess: true,
            fallbackRoute: "/"
        }
    }), { template: null, mainNavInfos: AppMainNavInfo }, "");
}

initApp();
Most of what’s happening here was explained in the previous part of this series, so I once again encourage you to read it if you haven’t. The only important line of code here is the style import:
import "../styles/index.css";
Again, we’re just simply importing our styling file for index or more specifically, our app root view, and our css loaders and html webpack plugin will take care of packaging it in our final view template (home.hbs).
The other crucial bits of this code are the AppRoutingInfo and AppMainNavInfo imports. From the previous part of the series, I explained that these two provide the routing information for the web app and the main navigation info.
Let’s implement them specifically for our project.
Navigate to src -> app -> index -> scripts -> routing-info and open the app_routing_info.js file. Delete its content and paste the following code:
//@ts-check
import RoutingInfoUtils from "oats-i/router/utils/routing-info/routing_info_utils";
import AppMainNavInfo from "./app_main_nav_info";
import httpCatsMainFragmentBuilder from "../../../fragments/http-cats/scripts/http_cats_main_fragment";

const AppRoutingInfo = RoutingInfoUtils.buildMainRoutingInfo([

    {
        route: "/",
        target: httpCatsMainFragmentBuilder,
        nestedChildFragments: null
    }

], AppMainNavInfo);

export default AppRoutingInfo;
Most of what you see here was previously explained in the previous part of this series. What I’ll touch on are the specific routing info we provide.
In this case, we only have one routing info provided as:
{
        route: "/",
        target: httpCatsMainFragmentBuilder,
        nestedChildFragments: null
    }
This directs Oats~i that for the route “/” or our home page, we start building from the target or main fragment provided by httpCatsMainFragmentBuilder. Our nestedChildFragments is null, meaning Oats~i will not render any child fragments inside the main fragment because they’re not provided.
So, when the user navigates to “/”, or the page loads from “/”, Oats~i will match this routing info, emit an instance of the HttpCatsMainFragment from its builder, the httpCatsMainFragmentBuilder, and render it by invoking its rendering functions, initializeView() being one of them.
We’ll add routing info for our movies fragment later on. For now, let’s implement the AppMainNavInfo.
Inside the routing-info folder, open the app_main_nav_info.js file. Delete the content and paste the following code:
//@ts-check
import MainNavigationInfoBuilder from "oats-i/router/utils/nav-info/main_nav_info_builder";

const AppMainNavInfo = MainNavigationInfoBuilder.buildMainNavigationInfo([

    {
        selector: "http-cats-link",
        defaultRoute: "/",
        baseActiveRoute: "/",
    }
]);

export default AppMainNavInfo;
Most of this code had been explained in the previous part of the series. What’s of importance here is the nav info we provide for our app at this stage.
{
        selector: "http-cats-link",
        defaultRoute: "/",
        baseActiveRoute: "/",
    }
Oats~i interprets this as our navigation button or link is identified by the dot selector http-cats-link (therefore has the class attribute of the same) and it should navigate to the defaultRoute “/” and it will be labelled as active for the base route “/” and any that starts with it, as long as it’s the best match/fit.
We’d already templated our nav link with this selector and route in the app root view.
<a href="/" class="nav-link mont-txt http-cats-link">HTTP Cats</a>
That’s just about it.
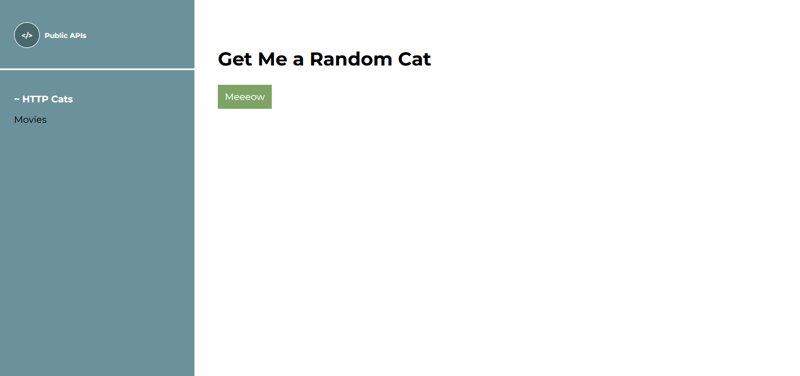
Let’s test what our app looks like now.
Open the terminal, ensure you are at the project’s root folder, and run:
npm run dev
Open the address shown in the terminal in your browser (often is localhost:8080) and look at your first Oats~i web app in action. You should have a view like this:
Now, to experience routing and fragments switching in action, let’s quickly implement the movies fragment. This should be faster because you now understand what’s happening.
Navigate to src -> app -> fragments and create a new folder named movies. Inside the movies folder, create new folders named exactly as in the http-cats folder, that is assets, scripts, styles, and views.
Open the scripts folder, and create a file named movies_main_fragment.js. Paste the following code inside it:
//@ts-check
//import styles
import "../styles/movies.css";

import AppFragmentBuilder from "oats-i/fragments/builder/AppFragmentBuilder";
import AppMainFragment from "oats-i/fragments/AppMainFragment"

class MoviesMainFragment extends AppMainFragment{

    async initializeView(cb){

        //@ts-expect-error cannot find module (for view)
        const uiTemplate = require("../views/movies_fragment.hbs")();
        this.onViewInitSuccess(uiTemplate, cb);
    }
}

const moviesMainFragmentBuilder = new AppFragmentBuilder(MoviesMainFragment, {

    localRoutingInfos: null,
    viewID: "movies-main-fragment",
});

export default moviesMainFragmentBuilder;
Navigate back to the movies folder, open the views folder, create a file named movies_fragment.hbs and paste the following code:
<section class="section logo-section">
    <h1 class="frag-header mont-txt"><span>I Love This Movie</span></h1>
    <form class="mont-txt" id="movie-form">
        <input type="text" id="movie-search" placeholder="What's the title?">
        <button class="b-cta mont-txt" id="find-movie">Find it</button>
    </form>
</section>
Finally, navigate back to the movies folder, open the styles folder and create a movies.css file. Paste the following code:
#movie-form {

    display: flex;
    flex-direction: row;
    align-items: center;
    gap: 10px;
    margin-top: 25px;
}

#movie-search {

    padding: 11px 16px;
    background-color: #7da464;
    width: 414px;
    color: white !important;
    border: none;
}

#find-movie {

    background-color: black;
}
Our movies fragment is done. We have the JavaScript source file, our view template, and its styling, all of which have been imported in our source file. Now, we just have to add a new routing info and main nav info for these, rerun the app, and see our complete project.
Open the app_routing_info.js file and add the following bits of code.
At the top of the file, just under the current imports, import our exported builder for the movies main fragment.
import moviesMainFragmentBuilder from "../../../fragments/movies/scripts/movies_main_fragment";
Finally, inside the array of routing infos, add the info for our movies fragment. It will be for the route “/movies”, matching the link we’ve used in our navigational link that initiates the routing.
{
        route: "/movies",
        target: moviesMainFragmentBuilder,
        nestedChildFragments: null
    }
PS: Don’t forget the comma separating the two ?
Now, let’s finalize by updating our AppMainNavInfo, so that our navigational link for movies is styled correctly when we’re in that route.
Open the app_main_nav_info.js file and add the following nav info inside the array:
{
        selector: "movies-link",
        defaultRoute: "/movies",
        baseActiveRoute: "/movies",
    }
PS: Remember that comma. Saving you some hairs ?
Remember, our navigation link matches this selector and default route, as we described it inside our home.sv.hbs file.
<a href="/movies" class="nav-link mont-txt movies-link">Movies</a>
And that’s it. If you’d stopped the app, just run npm run dev again.
If not, webpack would have automatically picked up the changes and refreshed the browser. So just give the web app a look.
You should now be able to navigate between the http-cat route “/” and the movies route “/movies” with our nav links updating based on which one is currently active.
Here’s a bonus that might help you curate your Oats~i web app experiences in your future projects.
In the previous part of the series, I talked about how Oats~i allows you to define a default route that the app should launch in in case the initial route is not a validly defined option in the routing info.
For our project as is, the home route “/”, which is the base route our app will load in first, is already defined in our routing info. But what if we wanted to start at the route “/http-cats”, which will now define the build for the http-cats main fragment?
We can change the routing info entry for http-cats to have the route as “/http-cats” then in the startup script, provide that route as the default route.
Your updated routing info should look like:
{
        route: "/http-cats",
        target: httpCatsMainFragmentBuilder,
        nestedChildFragments: null
    }
And the startup script should be updated to look as follows:
appRoot.initApp(appStateManager, new MainRouter(AppRoutingInfo, appStateManager, (args) => {}, "", async (url) => {

        return {

            canAccess: true,
            fallbackRoute: "/"
        }
    }), { template: null, mainNavInfos: AppMainNavInfo }, "/http-cats"); //note the change from “” to “/http-cats”
Now, if you run the app and load it from the home route “/”, Oats~i will attempt to find a matching route info for the route, which it will fail, then fallback to the default, and update the address to our defined default, which is “/http-cats”.
So, our web app will now default to /http-cats whenever its loaded from home or a url that is not explicitly defined in the web app’s routing info. (So, not just home “/” but even “/someRandomUrl”)
That’s it for lesson 1. Quite some concepts to learn and grasp but I hope it was exciting nonetheless. In the next lesson and part of this series, we’ll actually implement these APIs and add data management and reactivity to our Oats~i app.
If you have any questions, feel free to comment them below. Also, consider supporting with a like, follow, or donation.
See you in the next one.
Support Oats~i
You can support the development of Oats~i through Patreon*** or buy me a coffee.
Das obige ist der detaillierte Inhalt vonErstellen Sie eine Web-App mit Oats~i – Lektionsfragmente, Routing und Standardrouten. Für weitere Informationen folgen Sie bitte anderen verwandten Artikeln auf der PHP chinesischen Website!
 Vor- und Nachteile kostenloser Website-Server im Ausland
 Was soll ich tun, wenn die sekundäre Webseite nicht geöffnet werden kann?
 App-Testtools
 So konfigurieren Sie das Standard-Gateway
 was ist ed
 Quellcode der Website
 Detaillierte Erläuterung des Java-Verschiebungsoperators
 So verwenden Sie den MySQL-Cursor
 Was zeigt die andere Partei, nachdem sie auf WeChat blockiert wurde?


![[Web-Frontend] Node.js-Schnellstart](https://img.php.cn/upload/course/000/000/067/662b5d34ba7c0227.png)


