

Wasp: Die JavaScript-Antwort auf Django für die Webentwicklung

Wasp vs. Django: Das Erstellen einer Full-Stack-Anwendung ist jetzt viel einfacher
Hey, ich bin Sam, ein Backend-Ingenieur mit viel Erfahrung mit Django. Ich wollte den Sprung wagen und etwas Frontend für eine Full-Stack-App lernen. Ich erlebte schnell, wie mühsam ein React-with-Django-Projekt ist, und dachte, der Aufwand sei nur ein Teil des Entwicklungsprozesses. Allerdings bin ich auf ein sehr cooles neues Full-Stack-Framework namens Wasp gestoßen.
Wasp ist ein erstaunliches Entwicklungstool für Full-Stack-Anwendungen. Durch die Kombination von Dingen wie React, Node.js und Prisma ermöglicht Wasp eine Beschleunigung der Entwicklung auf noch nie dagewesene Weise.
In diesem Artikel werde ich die Erstellung einer Full-Stack-Anwendung in Django im Vergleich zu Wasp durchgehen, um die Einfachheit von Wasp im Vergleich zu einer sehr konventionellen Full-Stack-Technologie zu beweisen. Ich werde auch ein React-Frontend erstellen, das mit Django verbunden ist. Es geht darum, die Ineffizienzen, Schwierigkeiten und Probleme hervorzuheben, die mit Django/react auftreten können (und werden), die durch
erheblich vereinfacht werdenDieser Artikel ist nicht als Anleitung gedacht, aber ich stelle einige Codes zur Verfügung, um den umfassenden Charakter einer Django-App hervorzuheben.

Teil 1: Es werde Licht!
Lassen Sie uns einige Projekte erstellen und die Dinge einrichten
Dieser Teil ist ungefähr der einzige Teil, bei dem es signifikante Überschneidungen zwischen Django und Wasp gibt. Lassen Sie uns beide ausgehend vom Terminal eine einfache Aufgaben-App erstellen (ich gehe davon aus, dass Sie Django und Wasp installiert und in Ihrem Pfad haben).
Django ?
django-admin startproject
python manage.py starapp Todo
Wespe ?
wasp new Todo
wasp start
Jetzt startet Wasp von Anfang an. Schauen Sie sich das Menü an, das Ihnen unten angezeigt wird. Wasp kann entweder eine Basis-App für Sie starten oder Sie können aus einer Vielzahl vorgefertigter Vorlagen auswählen (einschließlich einer voll funktionsfähigen SaaS-App) oder sogar eine KI-generierte App basierend auf Ihrer Beschreibung verwenden!

Mittlerweile arbeitet Django als Projekt mit Apps innerhalb des Projekts (auch dies gilt im Wesentlichen nur für Backend-Vorgänge) und es können viele Apps zu einem Django-Projekt gehören. Daher müssen Sie jede App in den Django-Projekteinstellungen registrieren.
python `manage.py` startapp todo
settings.py:
INSTALLED_APPS [
...
'Todo'
]
Datenbankzeit
Jetzt brauchen wir also eine Datenbank, und das ist ein weiterer Bereich, in dem Wasp wirklich glänzt. Mit Django müssen wir ein Modell in der Datei models.py erstellen. Wasp hingegen verwendet Prisma als ORM, was uns ermöglicht, notwendige Felder klar zu definieren und die Datenbankerstellung auf leicht verständliche Weise zu vereinfachen.
Django ?
models.py:
from django.db import models

class Task(models.Model):
    title = models.CharField(max_length=200)
    completed = models.BooleanField(default=False)

    def __str__(self):
        return self.title
Wespe ?
schema.prisma:
model Task {
    id          Int     @id @default(autoincrement())
    description String
    isDone      Boolean @default(false)
}
Django und Wasp nutzen ähnliche Methoden zum Migrieren von Datenbanken:
Django ?
python manage.py makemigrations
python manage.py migrate
Wespe ?
wasp db migrate-dev
Aber mit Wasp können Sie auch einige ziemlich raffinierte Datenbankaufgaben erledigen, die Django nicht kann.
Im Moment verwenden wir SQLite, aber wie wäre es mit der sofortigen Einrichtung einer Posgres-Entwicklungsdatenbank? Wasp kann das tun mit:
wasp db start
Das ist es! Damit verfügen Sie über einen Docker-Container, auf dem eine Postgres-Instanz ausgeführt wird, und dieser ist sofort mit Ihrer Wasp-App verbunden. ?
Oder was ist, wenn Sie Ihre Datenbank in Echtzeit über die Datenbankstudio-Benutzeroberfläche von Prisma sehen möchten, was ohne Erweiterungen von Drittanbietern mit Django nicht möglich ist. Führen Sie dazu einfach Folgendes aus:
wasp db studio
Verstehst du jetzt, was ich meine?
Routen
Routen in Django und Wasp folgen einem ziemlich ähnlichen Muster. Wenn Sie jedoch mit React vertraut sind, ist das System von Wasp weitaus überlegen.
Django arbeitet über das Backend (views.py, auf das ich später in diesem Artikel eingehen werde), das alle CRUD-Operationen ausführt. Diese Ansichtsfunktionen sind einer bestimmten Route innerhalb einer App innerhalb eines Projekts zugeordnet (ich weiß, viele davon), und es kann komplizierter werden, wenn Sie anfangen, Primärschlüssel und IDs zu verwenden. Sie müssen eine urls.py-Datei erstellen und Ihre spezifischen Ansichtsdateien und Funktionen an eine Route weiterleiten. Diese App-URLs werden dann mit den Projekt-URLs verbunden. Puh.
Wasp's Way: Definieren Sie eine Route und leiten Sie sie zu einer Komponente.
Django ?
todo/urls.py:
from django.urls import path
from . import views

urlpatterns = [
    path('', views.index, name='index'),
    path('update/<str:pk>/', views.updateTask, name='update_task'),
    path('delete/<str:pk>/', views.deleteTask, name='delete_task'),
]
./urls.py:
from django.contrib import admin
from django.urls import path, include

urlpatterns = [
    path('admin/', admin.site.urls),
    path('', include('todo.urls')),
]
Wespe ?
main.wasp:
route TaskRoute { path: "/", to: TaskPage }
page TaskPage {
  component: import { TaskPage } from "@src/TaskPage"
}
CRUD
Ok, hier werden die Vorteile von Wasp noch deutlicher.
Firstly, I am going to revisit the views.py file. This is where magic is going to happen for Django backend. Here is a simple version of what the create, update, and delete functions could look like for our Task/Todo example:
Django ?
todo/views.py:
from django.shortcuts import render, redirect
from .models import Task
from .forms import TaskForm

def index(request):
    tasks = Task.objects.all()
    form = TaskForm()
    if request.method == 'POST':
        form = TaskForm(request.POST)
        if form.is_valid():
            form.save()
        return redirect('/')
    context = {'tasks': tasks, 'form': form}
    return render(request, 'todo/index.html', context)

def updateTask(request, pk):
    task = Task.objects.get(id=pk)
    form = TaskForm(instance=task)
    if request.method == 'POST':
        form = TaskForm(request.POST, instance=task)
        if form.is_valid():
            form.save()
        return redirect('/')
    context = {'form': form}
    return render(request, 'todo/update_task.html', context)

def deleteTask(request, pk):
    task = Task.objects.get(id=pk)
    if request.method == 'POST':
        task.delete()
        return redirect('/')
    context = {'task': task}
    return render(request, 'todo/delete.html', context)
app/forms.py:
from django import forms
from .models import Task

class TaskForm(forms.ModelForm):
    class Meta:
        model = Task
        fields = ['title', 'completed']
Wasp ?
main.wasp:
query getTasks {
  fn: import { getTasks } from "@src/operations",
  // Tell Wasp that this operation affects the `Task` entity. Wasp will automatically
  // refresh the client (cache) with the results of the operation when tasks are modified.
  entities: [Task]
}

action updateTask {
  fn: import { updateTask } from "@src/operations",
  entities: [Task]
}

action deleteTask {
  fn: import { deleteTask } from "@src/operations",
  entities: [Task]
}
operations.js:
export const getTasks = async (args, context) => {
  return context.entities.Task.findMany({
    orderBy: { id: 'asc' },
  })
}

export const updateTask = async ({ id, data }, context) => {
  return context.entities.Task.update({
    where: { id },
    data
  })
}

export const deleteTask = async ({ id }, context) => {
  return context.entities.Task.delete({
    where: { id }
  })
}
So right now, Wasp has a fully functioning backend with middleware configured for you. At this point we can create some React components, and then import and call these operations from the client. That is not the case with Django, unfortunately there is still a lot we need to do to configure React in our app and get things working together, which we will look at below.
Part 2: So you want to use React with Django?

At this point we could just create a simple client with HTML and CSS to go with our Django app, but then this wouldn't be a fair comparison, as Wasp is a true full-stack framework and gives you a managed React-NodeJS-Prisma app out-of-the-box. So let's see what we'd have to do to get the same thing set up with Django.
Note that this section is going to highlight Django, so keep in mind that you can skip all the following steps if you just use Wasp. :)
Django ?
First thing’s first. Django needs a REST framework and CORS (Cross Origin Resource Sharing):
pip install djangorestframework
pip install django-cors-headers
Include Rest Framework and Cors Header as installed apps, CORS headers as middleware, and then also set a local host for the react frontend to be able to communicate with the backend (Django) server (again, there is no need to do any of this initial setup in Wasp as it's all handled for you).
settings.py:
INSTALLED_APPS = [
    ...
    'corsheaders',
]

MIDDLEWARE = [
    ...
    'corsheaders.middleware.CorsMiddleware',
    ...
]

CORS_ALLOWED_ORIGINS = [
    'http://localhost:3000',
]
And now a very important step, which is to serialize all the data from Django to be able to work in json format for React frontend.
app/serializers.py:
from rest_framework import serializers
from .models import Task

class TaskSerializer(serializers.ModelSerializer):
    class Meta:
        model = Task
        fields = '__all__'
Now, since we are handling CRUD on the React side, we can change the views.py file:
from rest_framework import viewsets
from .models import Task
from .serializers import TaskSerializer

class TaskViewSet(viewsets.ModelViewSet):
    queryset = Task.objects.all()
    serializer_class = TaskSerializer
And now we need to change both app and project URLS since we have a frontend application on a different url than our backend.
urls.py:
from django.contrib import admin
from django.urls import path, include

urlpatterns = [
    path('admin/', admin.site.urls),
    path('api/', include('todo.urls')),  # Add this line
]
from django.urls import path, include
from rest_framework.routers import DefaultRouter
from .views import TaskViewSet

router = DefaultRouter()
router.register(r'tasks', TaskViewSet)

urlpatterns = [
    path('', include(router.urls)),
]
By now you should be understanding why I've made the switch to using Wasp when building full-stack apps. Anyways, now we are actually able to make a react component with a Django backend ?
React time
Ok, so now we can actually get back to comparing Wasp and Django.
Django ?
To start, lets create our React app in our Django project:
npx create-react-app frontend
Finally, we can make a component in React. A few things:
I am using axios in the Django project here. Wasp comes bundled with React-Query (aka Tanstack Query), so the execution of (CRUD) operations is a lot more elegant and powerful.
The api call is to my local server, obviously this will change in development.
You can make this many different ways, I tried to keep it simple.
main.jsx:
import React, { useEffect, useState } from 'react';
import axios from 'axios';

const TaskList = () => {
  const [tasks, setTasks] = useState([]);
  const [newTask, setNewTask] = useState('');
  const [editingTask, setEditingTask] = useState(null);

  useEffect(() => {
      fetchTasks();
  }, []);

  const fetchTasks = () => {
    axios.get('http://127.0.0.1:8000/api/tasks/')
      .then(response => {
        setTasks(response.data);
      })
      .catch(error => {
        console.error('There was an error fetching the tasks!', error);
      });
  };

  const handleAddTask = () => {
    if (newTask.trim()) {
      axios.post('http://127.0.0.1:8000/api/tasks/', { title: newTask, completed: false })
        .then(() => {
          setNewTask('');
          fetchTasks();
        })
        .catch(error => {
          console.error('There was an error adding the task!', error);
        });
    }
  };

  const handleUpdateTask = (task) => {
    axios.put(`http://127.0.0.1:8000/api/tasks/${task.id}/`, task)
      .then(() => {
        fetchTasks();
        setEditingTask(null);
      })
      .catch(error => {
        console.error('There was an error updating the task!', error);
      });
  };

  const handleDeleteTask = (taskId) => {
    axios.delete(`http://127.0.0.1:8000/api/tasks/${taskId}/`)
      .then(() => {
        fetchTasks();
      })
      .catch(error => {
        console.error('There was an error deleting the task!', error);
      });
  };

  const handleEditTask = (task) => {
    setEditingTask(task);
  };

  const handleChange = (e) => {
    setNewTask(e.target.value);
  };

  const handleEditChange = (e) => {
    setEditingTask({ ...editingTask, title: e.target.value });
  };

  const handleEditCompleteToggle = () => {
    setEditingTask({ ...editingTask, completed: !editingTask.completed });
  };

  return (
    <div>
      <h1>To-Do List</h1>
      <input type="text" value={newTask} onChange={handleChange} placeholder="Add new task" />
      <button onClick={handleAddTask}>Add Task</button>
      <ul>
        {tasks.map(task => (
          <li key={task.id}>
            {editingTask && editingTask.id === task.id ? (
              <div>
                <input type="text" value={editingTask.title} onChange={handleEditChange} />
                <button onClick={() => handleUpdateTask(editingTask)}>Save</button>
                <button onClick={() => setEditingTask(null)}>Cancel</button>
                <button onClick={handleEditCompleteToggle}>
                  {editingTask.completed ? 'Mark Incomplete' : 'Mark Complete'}
                </button>
              </div>
          ) : (
            <div>
              {task.title} - {task.completed ? 'Completed' : 'Incomplete'}
              <button onClick={() => handleEditTask(task)}>Edit</button>
              <button onClick={() => handleDeleteTask(task.id)}>Delete</button>
            </div>
            )}
          </li>
        ))}
      </ul>
    </div>
  );
};

export default TaskList;
Wasp ?
And here's the Wasp React client for comparison. Take note how we're able to import the operations we defined earlier and call them here easily on the client with less configuration than the Django app. We also get the built-in caching power of the useQuery hook, as well as the ability to pass in our authenticated user as a prop (we'll get into this more below).
Main.jsx:
import React, { FormEventHandler, FormEvent } from "react";
import { type Task } from "wasp/entities";
import { type AuthUser, getUsername } from "wasp/auth";
import { logout } from "wasp/client/auth";
import { createTask, updateTask, deleteTasks, useQuery, getTasks } from "wasp/client/operations";
import waspLogo from "./waspLogo.png";

import "./Main.css";

export const MainPage = ({ user }) => {
  const { data: tasks, isLoading, error } = useQuery(getTasks);

  if (isLoading) return "Loading...";
  if (error) return "Error: " + error;

  const completed = tasks?.filter((task) => task.isDone).map((task) => task.id);

  return (
    <main>
      <img src={waspLogo} alt="wasp logo" />
      {user && user.identities.username && (
        <h1>
          {user.identities.username.id}
          {`'s tasks :)`}
        </h1>
      )}
      <NewTaskForm />
      {tasks && <TasksList tasks={tasks} />}
      <div className="buttons">
        <button
          className="logout"
          onClick={() => deleteTasks(completed ?? [])}
        >
          Delete completed
        </button>
        <button className="logout" onClick={logout}>
          Logout
        </button>
      </div>
    </main>
  );
};

function Todo({ id, isDone, description }) {
  const handleIsDoneChange = async (
    event
  ) => {
    try {
      await updateTask({
        id,
        isDone: event.currentTarget.checked,
      });
    } catch (err: any) {
      window.alert("Error while updating task " + err?.message);
    }
  };

  return (
    <li>
      <span className="todo-item">
        <input
          type="checkbox"
          id={id.toString()}
          checked={isDone}
          onChange={handleIsDoneChange}
        />
        <span>{description}</span>
        <button onClick={() => void deleteTasks([id])}>Delete</button>
      </span>
    </li>
  );
}

function TasksList({ tasks }) {
  if (tasks.length === 0) return <p>No tasks yet.</p>;
  return (
    <ol className="tasklist">
      {tasks.map((task, idx) => (
        <Todo {...task} key={idx} />
      ))}
    </ol>
  );
}

function NewTaskForm() {
  const handleSubmit = async (event) => {
    event.preventDefault();

    try {
      const description = event.currentTarget.description.value;
      console.log(description);
      event.currentTarget.reset();
      await createTask({ description });
    } catch (err: any) {
      window.alert("Error: " + err?.message);
    }
  };

  return (
    <form onSubmit={handleSubmit}>
      <input name="description" type="text" defaultValue="" />
      <input type="submit" value="Create task" />
    </form>
  );
}
Very nice! In the Wasp app you can see how much easier it is to call the server-side code via Wasp operations. Plus, Wasp gives you the added benefit of refreshing the client-side cache for the Entity that's referenced in the operation definition (in this case Task). And the cherry on top is how easy it is to pass the authenticated user to the component, something we haven't even touched on in the Django app, and which we will talk about more below.
Part 3: Auth with Django? No way, José

So we already started to get a feel in the above code for how simple it is to pass an authenticated user around in Wasp. But how do we actually go about implementing full-stack Authentication in Wasp and Django.
This is one of Wasp’s biggest advantages. It couldn't be easier or more intuitive. On the other hand, the Django implementation is so long and complicated I'm not going to even bother showing you the code and I'll just list out the stps instead;
Wasp ?
main.wasp:
app TodoApp {
  wasp: {
    version: "^0.14.0"
  },

  title: "Todo App",

  auth: {
    userEntity: User,
    methods: {
      usernameAndPassword: {}
    }
  }

  //...
And that's all it takes to implement full-stack Auth with Wasp! But that's just one example, you can also add other auth methods easily, like google: {}, gitHub: {} and discord: {} social auth, after configuring the apps and adding your environment variables.
Wasp allows you to get building without worrying about so many things. I don’t need to worry about password hashing, multiple projects and apps, CORS headers, etc. I just need to add a couple lines of code.
Wasp just makes sense.

Django ?
Let's check out what it takes to add a simple username and password auth implementation to a Django app (remember, this isn't even the code, just a checklist!):
Install Necessary Packages:
- Use pip to install djangorestframework, djoser, and djangorestframework-simplejwt for Django.
- Use npm to install axios and jwt-decode for React.
Update Django Settings:
- Add required apps (rest_framework, djoser, corsheaders, and your Django app) to INSTALLED_APPS.
- Configure middleware to include CorsMiddleware.
- Set up Django REST Framework settings for authentication and permissions.
- Configure SimpleJWT settings for token expiration and authorization header types.
Set Up URL Routing:
- Include the djoser URLs for authentication and JWT endpoints in Django’s urls.py.
Implement Authentication Context in React:
- Create an authentication context in React to manage login state and tokens.
- Provide methods for logging in and out, and store tokens in local storage.
Create Login Component in React:
- Build a login form component in React that allows users to enter their credentials and authenticate using the Django backend.
Protect React Routes and Components:
- Use React Router to protect routes that require authentication.
- Ensure that API requests include the JWT token for authenticated endpoints.
Implement Task Update and Delete Functionality:
- Add methods in the React components to handle updating and deleting tasks.
- Use axios to make PUT and DELETE requests to the Django API.
Add Authentication to Django Views:
- Ensure that Django views and endpoints require authentication.
- Use Django REST Framework permissions to protect API endpoints.
One Final Thing
I just want to highlight one more aspect of Wasp that I really love. In Django, we're completely responsible for dealing with all the boilerplate code when setting up a new app. In other words, we have to set up new apps from scratch every time (even if it's been done before a million times by us and other devs). But with Wasp we can scaffold a new app template in a number of ways to really jump start the development process.
Let's check out these other ways to get a full-stack app started in Wasp.
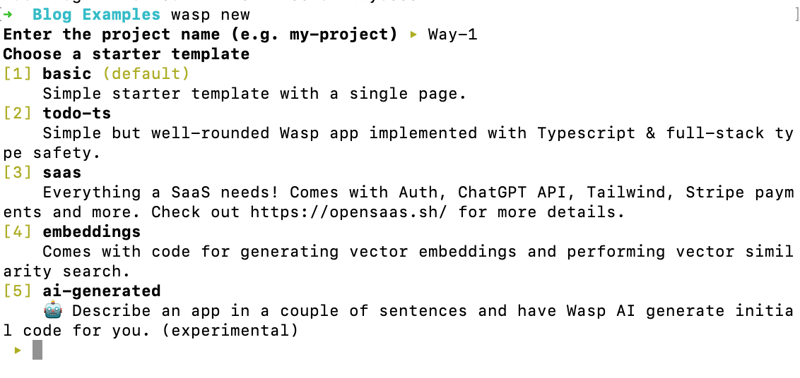
Way #1: Straight Outta Terminal
A simple wasp new in the terminal shows numerous starting options and app templates. If I really want to make a todo app for example, well there you have it, option 2.
Right out of the box you have a to-do application with authentication, CRUD functionality, and some basic styling. All of this is ready to be amended for your specific use case.
Or what if you want to turn code into money? Well, you can also get a fully functioning SaaS app. Interested in the latest AI offereings? You also have a vector embeddings template, or an AI full-stack app protoyper! 5 options that save you from having to write a ton of boilerplate code.
Way #2: Mage.ai (Free!)
Just throw a name, prompt, and select a few of your desired settings and boom, you get a fully functioning prototype app. From here you can use other other AI tools, like Cursor's AI code editor, to generate new features and help you debug!
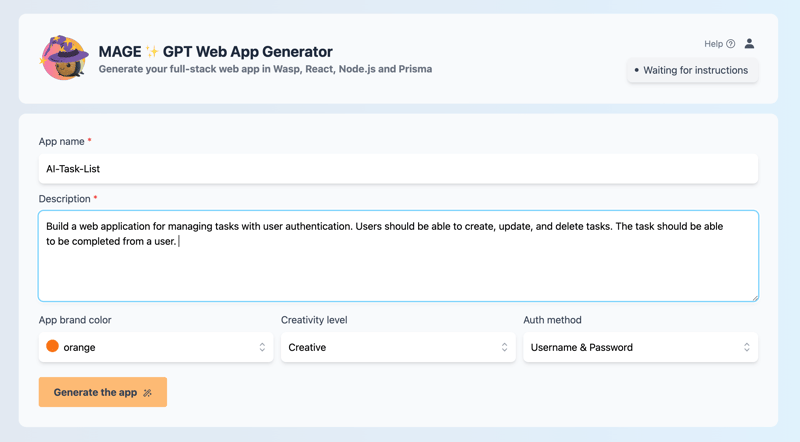
? Note that the Mage functionality is also achievable via the terminal ("ai-generated"), but you need to provide your own open-ai api key for it to work.
Können Sie uns Ihre Unterstützung zeigen?

Sind Sie an weiteren Inhalten dieser Art interessiert? Melden Sie sich für unseren Newsletter an und geben Sie uns einen Stern auf GitHub! Wir brauchen Ihre Unterstützung, um unsere Projekte weiter voranzutreiben ?
⭐️ Star Wasp auf GitHub?
Abschluss
Da haben Sie es also. Wie ich eingangs sagte, war ich, als ich von Django kam, erstaunt, wie einfach es war, Full-Stack-Apps mit Wasp zu erstellen, was mich dazu inspirierte, diesen Artikel zu schreiben.
Hoffentlich konnte ich Ihnen zeigen, warum die Abkehr von Django zugunsten von Wasp in Bezug auf Zeit, Energie und Emotionen von Vorteil sein kann.
Das obige ist der detaillierte Inhalt vonWasp: Die JavaScript-Antwort auf Django für die Webentwicklung. Für weitere Informationen folgen Sie bitte anderen verwandten Artikeln auf der PHP chinesischen Website!

Heiße KI -Werkzeuge

Undresser.AI Undress
KI-gestützte App zum Erstellen realistischer Aktfotos

AI Clothes Remover
Online-KI-Tool zum Entfernen von Kleidung aus Fotos.

Undress AI Tool
Ausziehbilder kostenlos

Clothoff.io
KI-Kleiderentferner

Video Face Swap
Tauschen Sie Gesichter in jedem Video mühelos mit unserem völlig kostenlosen KI-Gesichtstausch-Tool aus!

Heißer Artikel
Heiße Werkzeuge

Notepad++7.3.1
Einfach zu bedienender und kostenloser Code-Editor

SublimeText3 chinesische Version
Chinesische Version, sehr einfach zu bedienen

Senden Sie Studio 13.0.1
Leistungsstarke integrierte PHP-Entwicklungsumgebung

Dreamweaver CS6
Visuelle Webentwicklungstools

SublimeText3 Mac-Version
Codebearbeitungssoftware auf Gottesniveau (SublimeText3)
Heiße Themen
 1676
1676
 14
1429
52
1333
25
1278
29
1257
24
14
1429
52
1333
25
1278
29
1257
24

 Python vs. JavaScript: Die Lernkurve und Benutzerfreundlichkeit
Apr 16, 2025 am 12:12 AM
Python vs. JavaScript: Die Lernkurve und Benutzerfreundlichkeit
Apr 16, 2025 am 12:12 AM
Python eignet sich besser für Anfänger mit einer reibungslosen Lernkurve und einer kurzen Syntax. JavaScript ist für die Front-End-Entwicklung mit einer steilen Lernkurve und einer flexiblen Syntax geeignet. 1. Python-Syntax ist intuitiv und für die Entwicklung von Datenwissenschaften und Back-End-Entwicklung geeignet. 2. JavaScript ist flexibel und in Front-End- und serverseitiger Programmierung weit verbreitet.
 JavaScript und das Web: Kernfunktionalität und Anwendungsfälle
Apr 18, 2025 am 12:19 AM
JavaScript und das Web: Kernfunktionalität und Anwendungsfälle
Apr 18, 2025 am 12:19 AM
Zu den Hauptanwendungen von JavaScript in der Webentwicklung gehören die Interaktion der Clients, die Formüberprüfung und die asynchrone Kommunikation. 1) Dynamisches Inhaltsaktualisierung und Benutzerinteraktion durch DOM -Operationen; 2) Die Kundenüberprüfung erfolgt vor dem Einreichung von Daten, um die Benutzererfahrung zu verbessern. 3) Die Aktualisierung der Kommunikation mit dem Server wird durch AJAX -Technologie erreicht.
 JavaScript in Aktion: Beispiele und Projekte in realer Welt
Apr 19, 2025 am 12:13 AM
JavaScript in Aktion: Beispiele und Projekte in realer Welt
Apr 19, 2025 am 12:13 AM
Die Anwendung von JavaScript in der realen Welt umfasst Front-End- und Back-End-Entwicklung. 1) Zeigen Sie Front-End-Anwendungen an, indem Sie eine TODO-Listanwendung erstellen, die DOM-Operationen und Ereignisverarbeitung umfasst. 2) Erstellen Sie RESTFUFFUPI über Node.js und express, um Back-End-Anwendungen zu demonstrieren.
 Verständnis der JavaScript -Engine: Implementierungsdetails
Apr 17, 2025 am 12:05 AM
Verständnis der JavaScript -Engine: Implementierungsdetails
Apr 17, 2025 am 12:05 AM
Es ist für Entwickler wichtig, zu verstehen, wie die JavaScript -Engine intern funktioniert, da sie effizientere Code schreibt und Leistungs Engpässe und Optimierungsstrategien verstehen kann. 1) Der Workflow der Engine umfasst drei Phasen: Parsen, Kompilieren und Ausführung; 2) Während des Ausführungsprozesses führt die Engine dynamische Optimierung durch, wie z. B. Inline -Cache und versteckte Klassen. 3) Zu Best Practices gehören die Vermeidung globaler Variablen, die Optimierung von Schleifen, die Verwendung von const und lass und die Vermeidung übermäßiger Verwendung von Schließungen.
 Python gegen JavaScript: Community, Bibliotheken und Ressourcen
Apr 15, 2025 am 12:16 AM
Python gegen JavaScript: Community, Bibliotheken und Ressourcen
Apr 15, 2025 am 12:16 AM
Python und JavaScript haben ihre eigenen Vor- und Nachteile in Bezug auf Gemeinschaft, Bibliotheken und Ressourcen. 1) Die Python-Community ist freundlich und für Anfänger geeignet, aber die Front-End-Entwicklungsressourcen sind nicht so reich wie JavaScript. 2) Python ist leistungsstark in Bibliotheken für Datenwissenschaft und maschinelles Lernen, während JavaScript in Bibliotheken und Front-End-Entwicklungsbibliotheken und Frameworks besser ist. 3) Beide haben reichhaltige Lernressourcen, aber Python eignet sich zum Beginn der offiziellen Dokumente, während JavaScript mit Mdnwebdocs besser ist. Die Wahl sollte auf Projektbedürfnissen und persönlichen Interessen beruhen.
 Python vs. JavaScript: Entwicklungsumgebungen und Tools
Apr 26, 2025 am 12:09 AM
Python vs. JavaScript: Entwicklungsumgebungen und Tools
Apr 26, 2025 am 12:09 AM
Sowohl Python als auch JavaScripts Entscheidungen in Entwicklungsumgebungen sind wichtig. 1) Die Entwicklungsumgebung von Python umfasst Pycharm, Jupyternotebook und Anaconda, die für Datenwissenschaft und schnelles Prototyping geeignet sind. 2) Die Entwicklungsumgebung von JavaScript umfasst Node.JS, VSCODE und WebPack, die für die Entwicklung von Front-End- und Back-End-Entwicklung geeignet sind. Durch die Auswahl der richtigen Tools nach den Projektbedürfnissen kann die Entwicklung der Entwicklung und die Erfolgsquote der Projekte verbessert werden.
 Die Rolle von C/C bei JavaScript -Dolmetschern und Compilern
Apr 20, 2025 am 12:01 AM
Die Rolle von C/C bei JavaScript -Dolmetschern und Compilern
Apr 20, 2025 am 12:01 AM
C und C spielen eine wichtige Rolle in der JavaScript -Engine, die hauptsächlich zur Implementierung von Dolmetschern und JIT -Compilern verwendet wird. 1) C wird verwendet, um JavaScript -Quellcode zu analysieren und einen abstrakten Syntaxbaum zu generieren. 2) C ist für die Generierung und Ausführung von Bytecode verantwortlich. 3) C implementiert den JIT-Compiler, optimiert und kompiliert Hot-Spot-Code zur Laufzeit und verbessert die Ausführungseffizienz von JavaScript erheblich.
 Python gegen JavaScript: Anwendungsfälle und Anwendungen verglichen
Apr 21, 2025 am 12:01 AM
Python gegen JavaScript: Anwendungsfälle und Anwendungen verglichen
Apr 21, 2025 am 12:01 AM
Python eignet sich besser für Datenwissenschaft und Automatisierung, während JavaScript besser für die Entwicklung von Front-End- und Vollstapel geeignet ist. 1. Python funktioniert in Datenwissenschaft und maschinellem Lernen gut und unter Verwendung von Bibliotheken wie Numpy und Pandas für die Datenverarbeitung und -modellierung. 2. Python ist prägnant und effizient in der Automatisierung und Skripten. 3. JavaScript ist in der Front-End-Entwicklung unverzichtbar und wird verwendet, um dynamische Webseiten und einseitige Anwendungen zu erstellen. 4. JavaScript spielt eine Rolle bei der Back-End-Entwicklung durch Node.js und unterstützt die Entwicklung der Vollstapel.
