
 Web-Frontend
js-Tutorial
So erstellen Sie einen einfachen Chatbot mit TensorFlow und JavaScript
Web-Frontend
js-Tutorial
So erstellen Sie einen einfachen Chatbot mit TensorFlow und JavaScript
So erstellen Sie einen einfachen Chatbot mit TensorFlow und JavaScript

We all come across chatbots when visiting various sites, while some of them operate behind real-human interaction, others are powered by AI.
In this article, we'll walk through building a simple AI-powered chatbot using TensorFlow and JavaScript. The chatbot will recognize user commands and respond with predefined answers.
Step-by-Step Guide
Setting Up Our Project
First, we create a new directory for our project and initialize it with npm, ensure you have Node.js installed on your system before starting this step.
mkdir chatbot
cd chatbot
npm init -y
Install necessary packages
We would be using the following npm packages for our simple project:
- tensorflow/tfjs: TensorFlow.js library for machine learning.
- tensorflow-models/universal-sentence-encoder: Pre-trained Universal Sentence Encoder model for intent recognition.
npm install @tensorflow/tfjs @tensorflow-models/universal sentence-encoder
-
Create intents
Create a file named intents.js to store intents/commands, These are categories of user inputs that the chatbot will recognize (e.g., greetings, product inquiries, order status).
// intents.js
const intents = {
  greeting: ["hello", "hi", "hey", "good morning", "good evening", "howdy"],
  goodbye: ["bye", "goodbye", "see you later", "farewell", "catch you later"],
  thanks: ["thank you", "thanks", "much appreciated", "thank you very much"],
  product_inquiry: ["tell me about your products", "what do you sell?", "product information", "what can I buy?", "show me your products"],
  order_status: ["where is my order?", "order status", "track my order", "order tracking", "order update"],
  shipping_info: ["shipping information", "how do you ship?", "shipping methods", "delivery options", "how long does shipping take?"],
  return_policy: ["return policy", "how to return?", "return process", "can I return?", "returns"],
  payment_methods: ["payment options", "how can I pay?", "payment methods", "available payments"],
  support_contact: ["contact support", "how to contact support?", "customer support contact", "support info", "customer service contact"],
  business_hours: ["business hours", "working hours", "when are you open?", "opening hours", "store hours"]
};

module.exports = { intents }
Nach dem Login kopieren -
Create responses
Create another file named responses.js to store predefined responses, These are the predefined responses the chatbot will give based on the recognized intent.
// responses.js
const responses = {
  greeting: "Hello! How can I help you today?",
  goodbye: "Goodbye! Have a great day!",
  thanks: "You're welcome! If you have any other questions, feel free to ask.",
  product_inquiry: "We offer a variety of products including electronics, books, clothing, and more. How can I assist you further?",
  order_status: "Please provide your order ID, and I will check the status for you.",
  shipping_info: "We offer various shipping methods including standard, express, and next-day delivery. Shipping times depend on the method chosen and your location.",
  return_policy: "Our return policy allows you to return products within 30 days of purchase. Please visit our returns page for detailed instructions.",
  payment_methods: "We accept multiple payment methods including credit/debit cards, PayPal, and bank transfers. Please choose the method that suits you best at checkout.",
  support_contact: "You can contact our support team via email at support@example.com or call us at 1-800-123-4567.",
  business_hours: "Our business hours are Monday to Friday, 9 AM to 5 PM. We are closed on weekends and public holidays."
};

module.exports = { responses };
Nach dem Login kopieren -
Loading TensorFlow and the Sentence Encoder
Create a main script file named chatbot.js and load the necessary libraries and models, we load the universal sentence encoder model asynchronously and start the chatbot once the model is loaded.
// chatbot.js
const tf = require('@tensorflow/tfjs');
const use = require('@tensorflow-models/universal-sentence-encoder');
const { intents } = require('./intents');
const { responses } = require('./responses');
const readline = require('readline');

// Load the Universal Sentence Encoder model
let model;
use.load().then((loadedModel) => {
  model = loadedModel;
  console.log("Model loaded");
  startChatbot();
});
Nach dem Login kopieren -
Implementing Intent Recognition
Add a function to recognize the intent of the user's input, we embed the user input into a high-dimensional vector using the universal encoder and then track the highest similarity score based on the intent.
async function recognizeIntent(userInput) {
  const userInputEmb = await model.embed([userInput]);
  let maxScore = -1;
  let recognizedIntent = null;

  for (const [intent, examples] of Object.entries(intents)) {
    // Embedding the example phrases for each intent & Calculating similarity scores between the user input embedding and the example embeddings
    const examplesEmb = await model.embed(examples);
    const scores = await tf.matMul(userInputEmb, examplesEmb, false, true).data();
    const maxExampleScore = Math.max(...scores);
    if (maxExampleScore > maxScore) {
      maxScore = maxExampleScore;
      recognizedIntent = intent;
    }
  }
  return recognizedIntent;
}
Nach dem Login kopieren -
Generating Responses
Add a function to generate responses based on the recognized intent:
async function generateResponse(userInput) {
  const intent = await recognizeIntent(userInput);
  if (intent && responses[intent]) {
    return responses[intent];
  } else {
    return "I'm sorry, I don't understand that. Can you please rephrase?";
  }
}
Nach dem Login kopieren -
Implementing Chatbot Interaction
Finally, implement the interaction loop with the chatbot by setting up the interface for reading user input from the command line, prompting the user for input and generating responses accordingly:
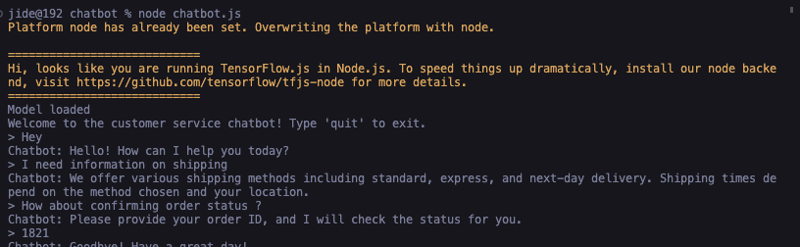
function startChatbot() {
  const rl = readline.createInterface({
    input: process.stdin,
    output: process.stdout
  });

  console.log("Welcome to the customer service chatbot! Type 'quit' to exit.");
  rl.prompt();

  rl.on('line', async (line) => {
    const userInput = line.trim();
    if (userInput.toLowerCase() === 'quit') {
      console.log("Chatbot: Goodbye!");
      rl.close();
      return;
    }

    const response = await generateResponse(userInput);
    console.log(`Chatbot: ${response}`);
    rl.prompt();
  });
}
Nach dem Login kopierenHere is the completed code for chatbot.js :
// chatbot.js

const tf = require('@tensorflow/tfjs');
const use = require('@tensorflow-models/universal-sentence-encoder');
const { intents } = require('./intents');
const { responses } = require('./responses');
const readline = require('readline');

// Load the Universal Sentence Encoder model
let model;
use.load().then((loadedModel) => {
  model = loadedModel;
  console.log("Model loaded");
  startChatbot();
});

async function recognizeIntent(userInput) {
  const userInputEmb = await model.embed([userInput]);
  let maxScore = -1;
  let recognizedIntent = null;

  for (const [intent, examples] of Object.entries(intents)) {
    const examplesEmb = await model.embed(examples);
    const scores = await tf.matMul(userInputEmb, examplesEmb, false, true).data();
    const maxExampleScore = Math.max(...scores);
    if (maxExampleScore > maxScore) {
      maxScore = maxExampleScore;
      recognizedIntent = intent;
    }
  }

  return recognizedIntent;
}

async function generateResponse(userInput) {
  const intent = await recognizeIntent(userInput);
  if (intent && responses[intent]) {
    return responses[intent];
  } else {
    return "I'm sorry, I don't understand that. Can you please rephrase?";
  }
}

function startChatbot() {
  const rl = readline.createInterface({
    input: process.stdin,
    output: process.stdout
  });

  console.log("Welcome to the customer service chatbot! Type 'quit' to exit.");
  rl.prompt();

  rl.on('line', async (line) => {
    const userInput = line.trim();
    if (userInput.toLowerCase() === 'quit') {
      console.log("Chatbot: Goodbye!");
      rl.close();
      return;
    }

    const response = await generateResponse(userInput);
    console.log(`Chatbot: ${response}`);
    rl.prompt();
  });
}
Nach dem Login kopieren -
To run the chatbot, execute the chatbot.js file:
node chatbot.js
Nach dem Login kopieren
Voila! Our command output should have the chatbot running:
Conclusion
In this article, we've built a simple customer service chatbot using TensorFlow and JavaScript. While this implementation is basic, it provides a solid foundation for building more sophisticated chatbots. You can expand this project by integrating APIs using AXIOS, adding more intents and responses, or deploying it on a web platform.
Happy coding!
?? Learn more about me
?? Connect on LinkedIn
?? Subscribe to my blog
Das obige ist der detaillierte Inhalt vonSo erstellen Sie einen einfachen Chatbot mit TensorFlow und JavaScript. Für weitere Informationen folgen Sie bitte anderen verwandten Artikeln auf der PHP chinesischen Website!

Heiße KI -Werkzeuge

Undresser.AI Undress
KI-gestützte App zum Erstellen realistischer Aktfotos

AI Clothes Remover
Online-KI-Tool zum Entfernen von Kleidung aus Fotos.

Undress AI Tool
Ausziehbilder kostenlos

Clothoff.io
KI-Kleiderentferner

Video Face Swap
Tauschen Sie Gesichter in jedem Video mühelos mit unserem völlig kostenlosen KI-Gesichtstausch-Tool aus!

Heißer Artikel
Heiße Werkzeuge

Notepad++7.3.1
Einfach zu bedienender und kostenloser Code-Editor

SublimeText3 chinesische Version
Chinesische Version, sehr einfach zu bedienen

Senden Sie Studio 13.0.1
Leistungsstarke integrierte PHP-Entwicklungsumgebung

Dreamweaver CS6
Visuelle Webentwicklungstools

SublimeText3 Mac-Version
Codebearbeitungssoftware auf Gottesniveau (SublimeText3)
Heiße Themen


 Was soll ich tun, wenn ich auf den Codendruck auf Kleidungsstücke für Front-End-Thermalpapier-Quittungen stoße?
Apr 04, 2025 pm 02:42 PM
Was soll ich tun, wenn ich auf den Codendruck auf Kleidungsstücke für Front-End-Thermalpapier-Quittungen stoße?
Apr 04, 2025 pm 02:42 PM
Häufig gestellte Fragen und Lösungen für das Ticket-Ticket-Ticket-Ticket in Front-End im Front-End-Entwicklungsdruck ist der Ticketdruck eine häufige Voraussetzung. Viele Entwickler implementieren jedoch ...
 Entmystifizieren JavaScript: Was es tut und warum es wichtig ist
Apr 09, 2025 am 12:07 AM
Entmystifizieren JavaScript: Was es tut und warum es wichtig ist
Apr 09, 2025 am 12:07 AM
JavaScript ist der Eckpfeiler der modernen Webentwicklung. Zu den Hauptfunktionen gehören eine ereignisorientierte Programmierung, die Erzeugung der dynamischen Inhalte und die asynchrone Programmierung. 1) Ereignisgesteuerte Programmierung ermöglicht es Webseiten, sich dynamisch entsprechend den Benutzeroperationen zu ändern. 2) Die dynamische Inhaltsgenerierung ermöglicht die Anpassung der Seiteninhalte gemäß den Bedingungen. 3) Asynchrone Programmierung stellt sicher, dass die Benutzeroberfläche nicht blockiert ist. JavaScript wird häufig in der Webinteraktion, der einseitigen Anwendung und der serverseitigen Entwicklung verwendet, wodurch die Flexibilität der Benutzererfahrung und die plattformübergreifende Entwicklung erheblich verbessert wird.
 Wer bekommt mehr Python oder JavaScript bezahlt?
Apr 04, 2025 am 12:09 AM
Wer bekommt mehr Python oder JavaScript bezahlt?
Apr 04, 2025 am 12:09 AM
Es gibt kein absolutes Gehalt für Python- und JavaScript -Entwickler, je nach Fähigkeiten und Branchenbedürfnissen. 1. Python kann mehr in Datenwissenschaft und maschinellem Lernen bezahlt werden. 2. JavaScript hat eine große Nachfrage in der Entwicklung von Front-End- und Full-Stack-Entwicklung, und sein Gehalt ist auch beträchtlich. 3. Einflussfaktoren umfassen Erfahrung, geografische Standort, Unternehmensgröße und spezifische Fähigkeiten.
 Ist JavaScript schwer zu lernen?
Apr 03, 2025 am 12:20 AM
Ist JavaScript schwer zu lernen?
Apr 03, 2025 am 12:20 AM
JavaScript zu lernen ist nicht schwierig, aber es ist schwierig. 1) Verstehen Sie grundlegende Konzepte wie Variablen, Datentypen, Funktionen usw. 2) Beherrschen Sie die asynchrone Programmierung und implementieren Sie sie durch Ereignisschleifen. 3) Verwenden Sie DOM -Operationen und versprechen Sie, asynchrone Anfragen zu bearbeiten. 4) Vermeiden Sie häufige Fehler und verwenden Sie Debugging -Techniken. 5) Die Leistung optimieren und Best Practices befolgen.
 Wie kann man Parallax -Scrolling- und Element -Animationseffekte wie die offizielle Website von Shiseido erzielen?
oder:
Wie können wir den Animationseffekt erzielen, der von der Seite mit der Seite mit der offiziellen Website von Shiseido begleitet wird?
Apr 04, 2025 pm 05:36 PM
Wie kann man Parallax -Scrolling- und Element -Animationseffekte wie die offizielle Website von Shiseido erzielen?
oder:
Wie können wir den Animationseffekt erzielen, der von der Seite mit der Seite mit der offiziellen Website von Shiseido begleitet wird?
Apr 04, 2025 pm 05:36 PM
Diskussion über die Realisierung von Parallaxe -Scrolling- und Elementanimationseffekten in diesem Artikel wird untersuchen, wie die offizielle Website der Shiseeido -Website (https://www.shiseeido.co.jp/sb/wonderland/) ähnlich ist ...
 Die Entwicklung von JavaScript: Aktuelle Trends und Zukunftsaussichten
Apr 10, 2025 am 09:33 AM
Die Entwicklung von JavaScript: Aktuelle Trends und Zukunftsaussichten
Apr 10, 2025 am 09:33 AM
Zu den neuesten Trends im JavaScript gehören der Aufstieg von Typenkripten, die Popularität moderner Frameworks und Bibliotheken und die Anwendung der WebAssembly. Zukunftsaussichten umfassen leistungsfähigere Typsysteme, die Entwicklung des serverseitigen JavaScript, die Erweiterung der künstlichen Intelligenz und des maschinellen Lernens sowie das Potenzial von IoT und Edge Computing.
 Wie fusioniere ich Arrayelemente mit derselben ID mit JavaScript in ein Objekt?
Apr 04, 2025 pm 05:09 PM
Wie fusioniere ich Arrayelemente mit derselben ID mit JavaScript in ein Objekt?
Apr 04, 2025 pm 05:09 PM
Wie fusioniere ich Array -Elemente mit derselben ID in ein Objekt in JavaScript? Bei der Verarbeitung von Daten begegnen wir häufig die Notwendigkeit, dieselbe ID zu haben ...
 Der Unterschied in der Konsole.log -Ausgabeergebnis: Warum unterscheiden sich die beiden Anrufe?
Apr 04, 2025 pm 05:12 PM
Der Unterschied in der Konsole.log -Ausgabeergebnis: Warum unterscheiden sich die beiden Anrufe?
Apr 04, 2025 pm 05:12 PM
Eingehende Diskussion der Ursachen des Unterschieds in der Konsole.log-Ausgabe. In diesem Artikel wird die Unterschiede in den Ausgabeergebnissen der Konsolenfunktion in einem Code analysiert und die Gründe dafür erläutert. � ...
