

Drag-and-Drop in HTML

Der folgende Artikel bietet eine Übersicht über Drag & Drop in HTML. Drag and Drop ist die neueste Funktion, die aufgrund ihres praktischen Funktionsmusters für die manuelle Eingabe in Webseiten bekannt ist. Die Drag-and-Drop-Methode kann als der Prozess beschrieben werden, bei dem ein Benutzer bestimmte Daten/Optionen aus der Liste der Elemente im Quellfeld auswählt, diese per Drag-and-Drop in das Zielfeld zieht. Es wird mithilfe des Document Object Model zusammen mit mehreren Mausereignissen von der HTML-Webseite implementiert. Die verschiedenen in dieser Funktion verwendeten Ereignisse sind Drag, Dragstart, Dragleave, Dragenter, Dragover, Drop, Dragend und Drag Exit.
Ereignisse für Drag and Drop
In der neuesten Drag-and-Drop-Funktion (DND) sind mehrere Ereignisse enthalten. Sehen wir uns die einzelnen Schritte wie folgt an:
| Sr. No | Events | Details Description |
| 1 | Drag | To drag entity(element or text) when the mouse is moved with the element to be dragged. |
| 2 | Dragstart | The very first step in drag and drop is dragstart. It gets executed when the user is going to start with dragging the object to the required location. |
| 3 | Dragenter | Dragenter event is used when the mouse is getting hover on the target element. |
| 4 | Dragleave | This event is used when the user releases a mouse from an element. |
| 5 | Dragover | This event occurs when a mouse is used to over an element. |
| 6 | Drop | This event is used at the end of the drag and drop process for drop element operation. |
| 7 | Dragend | This is one of the most important event in this process for releasing the mouse button from the element to complete the drag procedure. |
| 8 | Dragexit | This event status that the element is no longer in the drag process of urgent target selection of element. |
Let’s see some data attributes on which Drag and drop operation going to happen:
- dataTransfer.dropEffect [ = value ]: This attribute is used to show which operation is currently going on. One can set it to replace the already selected operation. The values included in it like a copy, link, none or move.
- dataTransfer.effectAllowed [ = value ]: Whichever operations are allowed will be returned through this attribute. It’s also possible to set to changing an already selected operation.
- dataTransfer.files: This data attribute is used to get fileList of the files which are going to be dragged.
- dataTransfer.addElement(element): It’s used to insert the already existing element into a list of other elements that are useful to render the drag feedback.
- dataTransfer.setDragImage(element, x, y): This attribute is a little bit the same as above for updating drag feedback and help to change already existed feedback
- dataTransfer.clearData ( [ format ] ): It helps the user to remove data from the already defined format. If the user omitted the argument, the IT would remove all the data.
- dataTransfer.setData(format, data): It’s one of the popular attributes used to add specified data.
- data = dataTransfer.getData(format): This attribute in Drag and Drag operation is used to extract specified data. If there is no same data as it, it will return to the empty string.
Syntax of Drag and Drop in HTML
Here are a few steps defining the syntax for drag and drop:
Select the object to be a drag: Set attribute true to it.
<element draggable="true">
Start dragging object:
function dragStart(ev){}Drop the object:
function dragDrop(ev){}Examples of Drag and Drop in HTML
The following example will show how exactly the drag and drop operation will perform in HTML.
Example #1
Code:
<html>
<head>
<title>Drag and Drop Demo</title>
<script>
function allowDrop(ev) {
ev.preventDefault();
}
function dragStart(ev) {
ev.dataTransfer.setData("text", ev.target.id);
}
function dragDrop(ev) {
ev.preventDefault();
var data = ev.dataTransfer.getData("text");
ev.target.appendChild(document.getElementById(data));
}
</script>
<style>
#box {
margin: auto;
width: 30%;
width: 21%;
height:150px;
border: 2px solid blue;
padding: 2px;
}
#square1, #square2, #square3 {
float: left;
margin: 5px;
padding: 10px;
}
#square1 {
width: 30px;
height: 30px;
background-color: #BEA7CC;
}
#square2 {
width: 60px;
height: 60px;
background-color: #B5D5F5;
}
#square3 {
width: 90px;
height: 90px;
background-color:#F5B5C5 ;
}
h2 {
font-size:20px;
font-weight:bold;
text-align:center;
}
</style>
</head>
<body>
<h2>HTML DRAG AND DROP DEMO</h2>
<div id = "box">
<div id="square1" draggable="true"ondragstart="dragStart(event)"></div>
<div id="square2" draggable="true"ondragstart="dragStart(event)"></div>
<div id="square3" ondrop="dragDrop(event)" ondragover="allowDrop(event)"></div>
</div>
</body>
</html>Output:
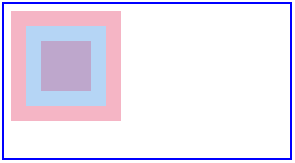
Before drag and drop, option output will be as shown below:

After performing the Drag and Drop operation, the output will be as follows:
Example #2
Here we are going to see another example in which we will move the image from one location to another specified location as shown below code.
Code:
<!DOCTYPE HTML>
<html>
<head>
<script>
function allowDrop(ev) {
ev.preventDefault();
}
function dragStart(ev) {
ev.dataTransfer.setData("text", ev.target.id);
}
function dragDrop(ev) {
ev.preventDefault();
var data = ev.dataTransfer.getData("text");
ev.target.appendChild(document.getElementById(data));
}
</script>
<style>
.divfirst {
width: 250px;
height: 150px;
padding: 10px;
border: 1px solid black;
background-color: #F5F5F5;
}
p {
font-size:20px;
font-weight:bold;
}
</style>
</head>
<body>
<p>Image Drag and Drop Demo</p>
<div class="divfirst" ondrop="dragDrop(event)" ondragover="allowDrop(event)">
<img id="drag1"
src="Jerry.jpeg" draggable="true"
ondragstart="dragStart(event)" width="250" height="150"></div>
<br>
<div     class= "divfirst"ondrop="dragDrop(event)"
ondragover="allowDrop(event)"></div>
</body>
</html>Output:
Before drag and drop operation, the output is:

After the drag and drop operation is completed, it will look like this:

Example #3
In this example, we are going to see how to drag and drop file at the specified location:
Code:
<body>
<div id="filedemo" style="min-height: 150px; border: 1px solid black;"
ondragenter="document.getElementById('output').textContent = ''; event.stopPropagation(); event.preventDefault();"
ondragover="event.stopPropagation(); event.preventDefault();"
ondrop="event.stopPropagation(); event.preventDefault();
dodrop(event);">
DROP FILES HERE...
</div>
<script>
function dodrop(event)
{
var dt = event.dataTransfer;
var files = dt.files;
for (var i = 0; i < files.length; i++) {
output(" File " + i + ":\n(" + (typeof files[i]) + ") : <" + files[i] + " > " +
files[i].name + " " );
}
}
function output(text)
{
document.getElementById("filedemo").textContent += text;
}
</script>
</body>Output:

Conclusion
HTML drag and drop is one of the most important user interface entities that will use for different purposes like copying, deleting, or recording. It works on different events and attributes, as listed above. It performs the operation when you pick some object and then drop it at a specified location.
Das obige ist der detaillierte Inhalt vonDrag-and-Drop in HTML. Für weitere Informationen folgen Sie bitte anderen verwandten Artikeln auf der PHP chinesischen Website!

Heiße KI -Werkzeuge

Undresser.AI Undress
KI-gestützte App zum Erstellen realistischer Aktfotos

AI Clothes Remover
Online-KI-Tool zum Entfernen von Kleidung aus Fotos.

Undress AI Tool
Ausziehbilder kostenlos

Clothoff.io
KI-Kleiderentferner

Video Face Swap
Tauschen Sie Gesichter in jedem Video mühelos mit unserem völlig kostenlosen KI-Gesichtstausch-Tool aus!

Heißer Artikel
Heiße Werkzeuge

Notepad++7.3.1
Einfach zu bedienender und kostenloser Code-Editor

SublimeText3 chinesische Version
Chinesische Version, sehr einfach zu bedienen

Senden Sie Studio 13.0.1
Leistungsstarke integrierte PHP-Entwicklungsumgebung

Dreamweaver CS6
Visuelle Webentwicklungstools

SublimeText3 Mac-Version
Codebearbeitungssoftware auf Gottesniveau (SublimeText3)
Heiße Themen


 Tabellenrahmen in HTML
Sep 04, 2024 pm 04:49 PM
Tabellenrahmen in HTML
Sep 04, 2024 pm 04:49 PM
Anleitung zum Tabellenrahmen in HTML. Hier besprechen wir verschiedene Möglichkeiten zum Definieren von Tabellenrändern anhand von Beispielen für den Tabellenrand in HTML.
 Verschachtelte Tabelle in HTML
Sep 04, 2024 pm 04:49 PM
Verschachtelte Tabelle in HTML
Sep 04, 2024 pm 04:49 PM
Dies ist eine Anleitung für verschachtelte Tabellen in HTML. Hier diskutieren wir anhand der entsprechenden Beispiele, wie man eine Tabelle innerhalb der Tabelle erstellt.
 HTML-Rand links
Sep 04, 2024 pm 04:48 PM
HTML-Rand links
Sep 04, 2024 pm 04:48 PM
Anleitung zum HTML-Rand links. Hier besprechen wir einen kurzen Überblick über HTML margin-left und seine Beispiele sowie seine Code-Implementierung.
 HTML-Tabellenlayout
Sep 04, 2024 pm 04:54 PM
HTML-Tabellenlayout
Sep 04, 2024 pm 04:54 PM
Leitfaden zum HTML-Tabellenlayout. Hier besprechen wir die Werte des HTML-Tabellenlayouts zusammen mit den Beispielen und Ausgaben im Detail.
 HTML-Eingabeplatzhalter
Sep 04, 2024 pm 04:54 PM
HTML-Eingabeplatzhalter
Sep 04, 2024 pm 04:54 PM
Leitfaden für HTML-Eingabeplatzhalter. Hier besprechen wir die Beispiele für HTML-Eingabeplatzhalter zusammen mit den Codes und Ausgaben.
 HTML-geordnete Liste
Sep 04, 2024 pm 04:43 PM
HTML-geordnete Liste
Sep 04, 2024 pm 04:43 PM
Leitfaden zur HTML-geordneten Liste. Hier besprechen wir auch die Einführung von HTML-geordneten Listen und Typen sowie deren Beispiele
 HTML-Onclick-Button
Sep 04, 2024 pm 04:49 PM
HTML-Onclick-Button
Sep 04, 2024 pm 04:49 PM
Anleitung zum HTML-OnClick-Button. Hier diskutieren wir deren Einführung, Funktionsweise, Beispiele und Onclick-Events in verschiedenen Veranstaltungen.
 Text in HTML verschieben
Sep 04, 2024 pm 04:45 PM
Text in HTML verschieben
Sep 04, 2024 pm 04:45 PM
Anleitung zum Verschieben von Text in HTML. Hier besprechen wir eine Einführung, wie Marquee-Tags funktionieren, mit Syntax und Beispielen für die Implementierung.
