

Angular State Management mit NgRx beherrschen

Zustandsverwaltung in Angular stellt sicher, dass Daten konsistent und effizient über alle Teile einer Anwendung hinweg geteilt werden. Anstatt dass jede Komponente ihre eigenen Daten verwaltet, speichert ein zentraler Speicher den Status.
Diese Zentralisierung stellt sicher, dass bei Datenänderungen alle Komponenten automatisch den aktualisierten Status widerspiegeln, was zu konsistentem Verhalten und einfacherem Code führt. Außerdem ist die App einfacher zu warten und zu skalieren, da der Datenfluss von einer einzigen Quelle der Wahrheit aus verwaltet wird.
In diesem Artikel erfahren Sie, wie Sie mithilfe von NgRx die Zustandsverwaltung in Angular implementieren, indem Sie eine einfache Warenkorbanwendung erstellen. Wir behandeln die Kernkonzepte von NgRx, wie zum Beispiel Store, Actions, Reducers, Selectors und Effects, und zeigen, wie diese Teile zusammenpassen, um den Status Ihrer Anwendung zu verwalten effektiv.
Status bezieht sich in Angular auf die Daten, die Ihre App verwalten und anzeigen muss, wie z. B. den Inhalt eines Warenkorbs.
Warum Sie State Management brauchen
1. Konsistenz: Es stellt sicher, dass die Daten über alle Komponenten hinweg einheitlich sind. Wenn sich Daten an einem Ort ändern, aktualisiert der zentrale Speicher automatisch alle relevanten Komponenten und verhindert so Inkonsistenzen.
2. Vereinfachter Datenfluss:Anstatt Daten manuell zwischen Komponenten zu übertragen, ermöglicht die Statusverwaltung jeder Komponente, direkt aus dem zentralen Speicher auf Daten zuzugreifen oder diese zu aktualisieren, wodurch der Datenfluss der App einfacher zu verwalten und zu verstehen ist.
3. Einfachere Wartung und Skalierbarkeit: Durch die Zentralisierung der Datenverwaltung reduziert die Statusverwaltung die Codeduplizierung und -komplexität. Dadurch lässt sich die App einfacher warten, debuggen und skalieren, wenn sie wächst.
4. Leistungsoptimierung:Zustandsverwaltungslösungen verfügen häufig über Tools zur Leistungsoptimierung, z. B. die selektive Aktualisierung nur der Komponenten, die auf eine Zustandsänderung reagieren müssen, anstatt die gesamte Anwendung neu zu rendern.
Wie NgRx funktioniert
NgRx ist eine Statusverwaltungsbibliothek für Angular, die dabei hilft, den Status Ihrer Anwendung auf vorhersehbare Weise zu verwalten und aufrechtzuerhalten.
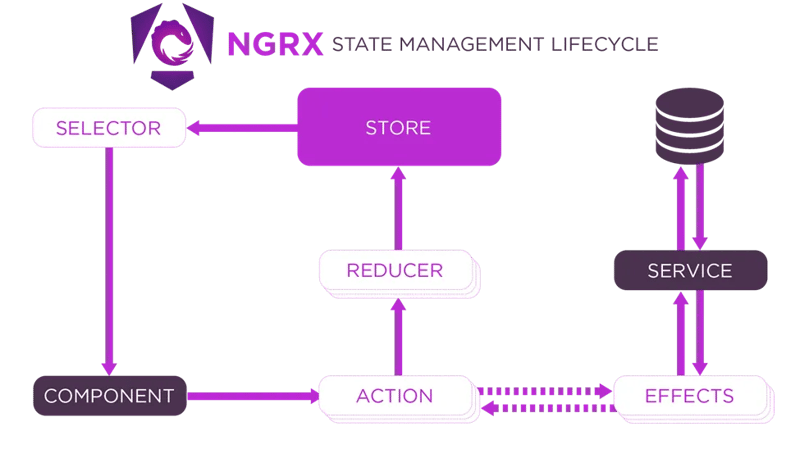
1. Komponente
In der Komponente interagiert der Benutzer mit Ihrer App. Es kann sich um eine Schaltfläche zum Hinzufügen eines Artikels zum Warenkorb handeln.
Komponenten und Dienste sind getrennt und kommunizieren nicht direkt miteinander, stattdessen werden Dienste innerhalb von Effekten verwendet, wodurch eine Anwendungsstruktur entsteht, die sich von einer herkömmlichen Angular-App unterscheidet.
2. Aktion
Eine Aktion beschreibt, was passiert ist und enthält alle erforderlichen Nutzdaten (Daten).
3. Reduzierer
Aktualisiert den Status basierend auf der Aktion.
4. Speichern
Der Store ist ein zentraler Ort, der den gesamten Status Ihrer Bewerbung speichert.
5. Selektor
Extrahiert Daten aus dem Speicher für Komponenten.
6. Effekte
Bei Effekten handelt es sich um Logik, die nicht in den Reduzierer gehört, wie etwa API-Aufrufe.
7. Service
Dienste führen die eigentliche Geschäftslogik oder API-Aufrufe aus. Effekte nutzen häufig Dienste, um Aufgaben wie das Abrufen von Daten von einem Server auszuführen.
Wann sollte NgRx verwendet werden?
Verwenden Sie NgRx, wenn die Komplexität Ihrer App dies rechtfertigt, aber bleiben Sie bei einfachen Apps bei einfacheren Methoden zur Zustandsverwaltung. Angulars Dienste, Signale und @Input/@Output-Bindungen zwischen Komponenten reichen normalerweise für die Zustandsverwaltung in weniger komplexen Anwendungen aus.
Beispiel: Erstellen einer Funktion zum Hinzufügen zum Warenkorb mit NgRx
1.Erstellen Sie ein neues Angular-Projekt:
ng new shopping-cart
2. Installieren Sie NGRX und Effekte
Um NGRX und Effekte zu installieren, führen Sie den folgenden Befehl in Ihrem Terminal aus:
ng add @ngrx/store@latest

ng add @ngrx/effects
3. Definieren Sie das Produktmodell
Erstellen Sie im Verzeichnis src/app eine Datei mit dem Namen product.model.ts
Definieren Sie die Schnittstelle Produkt, um die Struktur eines Produkts darzustellen:
export interface Product {
    id: string;
    name: string;
    price: number;
    quantity: number;
}
4. Statusverwaltung einrichten
Schritt 1: Erstellen Sie den Statusordner im Verzeichnis src/app
Schritt 2: Warenkorbaktionen definieren
Erstellen Sie cart.actions.ts im Statusordner.
import { createActionGroup, emptyProps, props } from '@ngrx/store';
import { Product } from '../product.model';

export const CartActions = createActionGroup({
  source: 'Cart',
  events: {
    'Add Product': props<{ product: Product }>(),
    'Remove Product': props<{ productId: string }>(),
    'Update Quantity': props<{ productId: string; quantity: number }>(),
    'Load Products': emptyProps,
  },
});

export const CartApiActions = createActionGroup({
  source: 'Cart API',
  events: {
    'Load Products Success': props<{ products: Product[] }>(),
    'Load Products Failure': props<{ error: string }>(),
  },
});
Schritt 3: Reduzierer erstellen
Erstellen Sie cart.reducer.ts im Ordner state.
import { createReducer, on } from '@ngrx/store';
import { Product } from '../product.model';
import { CartActions, CartApiActions } from './cart.actions';

// Initial state for products and cart
export const initialProductsState: ReadonlyArray<Product> = [];
export const initialCartState: ReadonlyArray<Product> = [];

// Reducer for products (fetched from API)
export const productsReducer = createReducer(
  initialProductsState,
  on(CartApiActions.loadProductsSuccess, (_state, { products }) => products)
);

// Reducer for cart (initially empty)
export const cartReducer = createReducer(
  initialCartState,
  on(CartActions.addProduct, (state, { product }) => {
    const existingProduct = state.find(p => p.id === product.id);
    if (existingProduct) {
      return state.map(p =>
        p.id === product.id ? { ...p, quantity: p.quantity + product.quantity } : p
      );
    }
    return [...state, product];
  }),
  on(CartActions.removeProduct, (state, { productId }) =>
    state.filter(p => p.id !== productId)
  ),
  on(CartActions.updateQuantity, (state, { productId, quantity }) =>
    state.map(p =>
      p.id === productId ? { ...p, quantity } : p
    )
  )
);
Schritt 4: Selektoren erstellen
Erstellen Sie im Ordner state cart.selectors.ts
import { createSelector, createFeatureSelector } from '@ngrx/store';
import { Product } from '../product.model';

export const selectProducts = createFeatureSelector<ReadonlyArray<Product>>('products');

export const selectCart = createFeatureSelector<ReadonlyArray<Product>>('cart');

export const selectCartTotal = createSelector(selectCart, (cart) =>
  cart.reduce((total, product) => total + product.price * product.quantity, 0)
);
Step 5: Create Effects
Create a new file cart.effects.ts in the state folder that listens for the Load Products action, uses the service to fetch products, and dispatches either a success or failure action.
import { Injectable } from '@angular/core';
import { Actions, createEffect, ofType } from '@ngrx/effects';
import { ProductService } from '../product.service';
import { CartActions, CartApiActions } from './cart.actions';
import { catchError, map, mergeMap } from 'rxjs/operators';
import { of } from 'rxjs';

@Injectable()
export class CartEffects {
  loadProducts$ = createEffect(() =>
    this.actions$.pipe(
      ofType(CartActions.loadProducts),
      mergeMap(() =>
        this.productService.getProducts().pipe(
          map(products => CartApiActions.loadProductsSuccess({ products })),
          catchError(error => of(CartApiActions.loadProductsFailure({ error })))
        )
      )
    )
  );

  constructor(
    private actions$: Actions,
    private productService: ProductService
  ) {}
}
5. Connect the State Management to Your App
In a file called app.config.ts, set up configurations for providing the store and effects to the application.
import { ApplicationConfig } from '@angular/core';
import { provideStore } from '@ngrx/store';
import { provideHttpClient } from '@angular/common/http';
import { cartReducer, productsReducer } from './state/cart.reducer';
import { provideEffects } from '@ngrx/effects';
import { CartEffects } from './state/cart.effects';

export const appConfig: ApplicationConfig = {
  providers: [
    provideStore({
      products: productsReducer,
      cart: cartReducer
    }),
    provideHttpClient(),
    provideEffects([CartEffects])
],
};
6. Create a Service to Fetch Products
In the src/app directory create product.service.ts to implement the service to fetch products
import { Injectable } from '@angular/core';
import { Observable, of } from 'rxjs';
import { Product } from './product.model';

@Injectable({ providedIn: 'root' })
export class ProductService {
  getProducts(): Observable<Array<Product>> {
    return of([
      { id: '1', name: 'Product 1', price: 10, quantity: 1 },
      { id: '2', name: 'Product 2', price: 20, quantity: 1 },
    ]);
  }
}
7. Create the Product List Component
Run the following command to generate the component: ng generate component product-list
This component displays the list of products and allows adding them to the cart.
Modify the product-list.component.ts file:
import { Component, OnInit } from '@angular/core';
import { CommonModule } from '@angular/common';
import { Store } from '@ngrx/store';
import { Observable } from 'rxjs';
import { Product } from '../product.model';
import { selectProducts } from '../state/cart.selectors';
import { CartActions } from '../state/cart.actions';

@Component({
  selector: 'app-product-list',
  standalone: true,
  templateUrl: './product-list.component.html',
  styleUrls: ['./product-list.component.css'],
  imports: [CommonModule],
})
export class ProductListComponent implements OnInit {
  products$!: Observable<ReadonlyArray<Product>>;

  constructor(private store: Store) {

  }

  ngOnInit(): void {
    this.store.dispatch(CartActions.loadProducts()); // Dispatch load products action
    this.products$ = this.store.select(selectProducts); // Select products from the store
  }

  onAddToCart(product: Product) {
    this.store.dispatch(CartActions.addProduct({ product }));
  }
}
Modify the product-list.component.html file:
<div *ngIf="products$ | async as products">
  <div class="product-item" *ngFor="let product of products">
    <p>{{product.name}}</p>
    <span>{{product.price | currency}}</span>
    <button (click)="onAddToCart(product)" data-test="add-button">Add to Cart</button>
  </div>
</div>
8. Create the Shopping Cart Component
Run the following command to generate the component: ng generate component shopping-cart
This component displays the products in the cart and allows updating the quantity or removing items from the cart.
Modify the shopping-cart.component.ts file:
import { Component, OnInit } from '@angular/core';
import { CommonModule } from '@angular/common';
import { Store } from '@ngrx/store';
import { Observable } from 'rxjs';
import { Product } from '../product.model';
import { selectCart, selectCartTotal } from '../state/cart.selectors';
import { CartActions } from '../state/cart.actions';

@Component({
  selector: 'app-shopping-cart',
  standalone: true,
  imports: [CommonModule],
  templateUrl: './shopping-cart.component.html',
  styleUrls: ['./shopping-cart.component.css'],
})
export class ShoppingCartComponent implements OnInit {
  cart$: Observable<ReadonlyArray<Product>>;
  cartTotal$: Observable<number>;

  constructor(private store: Store) {
    this.cart$ = this.store.select(selectCart);
    this.cartTotal$ = this.store.select(selectCartTotal);
  }

  ngOnInit(): void {}

  onRemoveFromCart(productId: string) {
    this.store.dispatch(CartActions.removeProduct({ productId }));
  }

  onQuantityChange(event: Event, productId: string) {
    const inputElement = event.target as HTMLInputElement;
    let quantity = parseInt(inputElement.value, 10);

    this.store.dispatch(CartActions.updateQuantity({ productId, quantity }));
  }
}
Modify the shopping-cart.component.html file:
<div *ngIf="cart$ | async as cart">
  <div class="cart-item" *ngFor="let product of cart">
    <p>{{product.name}}</p><span>{{product.price | currency}}</span>
    <input type="number" [value]="product.quantity" (input)="onQuantityChange($event, product.id)" />
    <button (click)="onRemoveFromCart(product.id)" data-test="remove-button">Remove</button>
  </div>
  <div class="total">
    Total: {{cartTotal$ | async | currency}}
  </div>
</div>
Modify the shopping-cart.component.css file:
.cart-item {
  display: flex;
  justify-content: space-between;
  align-items: center;
  margin-bottom: 10px;
}

.cart-item p {
  margin: 0;
  font-size: 16px;
}

.cart-item input {
  width: 50px;
  text-align: center;
}

.total {
  font-weight: bold;
  margin-top: 20px;
}
9. Put Everything Together in the App Component
This component will display the product list and the shopping cart
Modify the app.component.ts file:
import { Component } from '@angular/core';
import { CommonModule } from '@angular/common';
import { ProductListComponent } from './product-list/product-list.component';
import { ShoppingCartComponent } from './shopping-cart/shopping-cart.component';
import { NgIf } from '@angular/common';

@Component({
  selector: 'app-root',
  standalone: true,
  templateUrl: './app.component.html',
  imports: [CommonModule, ProductListComponent, ShoppingCartComponent, NgIf],
})
export class AppComponent {}
Modify the app.component.html file:
<!-- app.component.html -->
<h2>Products</h2>
<app-product-list></app-product-list>

<h2>Shopping Cart</h2>
<app-shopping-cart></app-shopping-cart>
10. Running the Application
Finally, run your application using ng serve.
Now, you can add products to your cart, remove them, or update their quantities.
Conclusion
In this article, we built a simple shopping cart application to demonstrate the core concepts of NgRx, such as the Store, Actions, Reducers, Selectors, and Effects. This example serves as a foundation for understanding how NgRx works and how it can be applied to more complex applications.
As your Angular projects grow in complexity, leveraging NgRx for state management will help you maintain consistency across your application, reduce the likelihood of bugs, and make your codebase easier to maintain.
To get the code for the above project, click the link below:
https://github.com/anthony-kigotho/shopping-cart
Das obige ist der detaillierte Inhalt vonAngular State Management mit NgRx beherrschen. Für weitere Informationen folgen Sie bitte anderen verwandten Artikeln auf der PHP chinesischen Website!

Heiße KI -Werkzeuge

Undresser.AI Undress
KI-gestützte App zum Erstellen realistischer Aktfotos

AI Clothes Remover
Online-KI-Tool zum Entfernen von Kleidung aus Fotos.

Undress AI Tool
Ausziehbilder kostenlos

Clothoff.io
KI-Kleiderentferner

Video Face Swap
Tauschen Sie Gesichter in jedem Video mühelos mit unserem völlig kostenlosen KI-Gesichtstausch-Tool aus!

Heißer Artikel
Heiße Werkzeuge

Notepad++7.3.1
Einfach zu bedienender und kostenloser Code-Editor

SublimeText3 chinesische Version
Chinesische Version, sehr einfach zu bedienen

Senden Sie Studio 13.0.1
Leistungsstarke integrierte PHP-Entwicklungsumgebung

Dreamweaver CS6
Visuelle Webentwicklungstools

SublimeText3 Mac-Version
Codebearbeitungssoftware auf Gottesniveau (SublimeText3)
Heiße Themen
 1655
1655
 14
1414
52
1307
25
1253
29
1227
24
14
1414
52
1307
25
1253
29
1227
24

 Was soll ich tun, wenn ich auf den Codendruck auf Kleidungsstücke für Front-End-Thermalpapier-Quittungen stoße?
Apr 04, 2025 pm 02:42 PM
Was soll ich tun, wenn ich auf den Codendruck auf Kleidungsstücke für Front-End-Thermalpapier-Quittungen stoße?
Apr 04, 2025 pm 02:42 PM
Häufig gestellte Fragen und Lösungen für das Ticket-Ticket-Ticket-Ticket in Front-End im Front-End-Entwicklungsdruck ist der Ticketdruck eine häufige Voraussetzung. Viele Entwickler implementieren jedoch ...
 Entmystifizieren JavaScript: Was es tut und warum es wichtig ist
Apr 09, 2025 am 12:07 AM
Entmystifizieren JavaScript: Was es tut und warum es wichtig ist
Apr 09, 2025 am 12:07 AM
JavaScript ist der Eckpfeiler der modernen Webentwicklung. Zu den Hauptfunktionen gehören eine ereignisorientierte Programmierung, die Erzeugung der dynamischen Inhalte und die asynchrone Programmierung. 1) Ereignisgesteuerte Programmierung ermöglicht es Webseiten, sich dynamisch entsprechend den Benutzeroperationen zu ändern. 2) Die dynamische Inhaltsgenerierung ermöglicht die Anpassung der Seiteninhalte gemäß den Bedingungen. 3) Asynchrone Programmierung stellt sicher, dass die Benutzeroberfläche nicht blockiert ist. JavaScript wird häufig in der Webinteraktion, der einseitigen Anwendung und der serverseitigen Entwicklung verwendet, wodurch die Flexibilität der Benutzererfahrung und die plattformübergreifende Entwicklung erheblich verbessert wird.
 Wer bekommt mehr Python oder JavaScript bezahlt?
Apr 04, 2025 am 12:09 AM
Wer bekommt mehr Python oder JavaScript bezahlt?
Apr 04, 2025 am 12:09 AM
Es gibt kein absolutes Gehalt für Python- und JavaScript -Entwickler, je nach Fähigkeiten und Branchenbedürfnissen. 1. Python kann mehr in Datenwissenschaft und maschinellem Lernen bezahlt werden. 2. JavaScript hat eine große Nachfrage in der Entwicklung von Front-End- und Full-Stack-Entwicklung, und sein Gehalt ist auch beträchtlich. 3. Einflussfaktoren umfassen Erfahrung, geografische Standort, Unternehmensgröße und spezifische Fähigkeiten.
 Wie kann man Parallax -Scrolling- und Element -Animationseffekte wie die offizielle Website von Shiseido erzielen?
oder:
Wie können wir den Animationseffekt erzielen, der von der Seite mit der Seite mit der offiziellen Website von Shiseido begleitet wird?
Apr 04, 2025 pm 05:36 PM
Wie kann man Parallax -Scrolling- und Element -Animationseffekte wie die offizielle Website von Shiseido erzielen?
oder:
Wie können wir den Animationseffekt erzielen, der von der Seite mit der Seite mit der offiziellen Website von Shiseido begleitet wird?
Apr 04, 2025 pm 05:36 PM
Diskussion über die Realisierung von Parallaxe -Scrolling- und Elementanimationseffekten in diesem Artikel wird untersuchen, wie die offizielle Website der Shiseeido -Website (https://www.shiseeido.co.jp/sb/wonderland/) ähnlich ist ...
 Die Entwicklung von JavaScript: Aktuelle Trends und Zukunftsaussichten
Apr 10, 2025 am 09:33 AM
Die Entwicklung von JavaScript: Aktuelle Trends und Zukunftsaussichten
Apr 10, 2025 am 09:33 AM
Zu den neuesten Trends im JavaScript gehören der Aufstieg von Typenkripten, die Popularität moderner Frameworks und Bibliotheken und die Anwendung der WebAssembly. Zukunftsaussichten umfassen leistungsfähigere Typsysteme, die Entwicklung des serverseitigen JavaScript, die Erweiterung der künstlichen Intelligenz und des maschinellen Lernens sowie das Potenzial von IoT und Edge Computing.
 Wie fusioniere ich Arrayelemente mit derselben ID mit JavaScript in ein Objekt?
Apr 04, 2025 pm 05:09 PM
Wie fusioniere ich Arrayelemente mit derselben ID mit JavaScript in ein Objekt?
Apr 04, 2025 pm 05:09 PM
Wie fusioniere ich Array -Elemente mit derselben ID in ein Objekt in JavaScript? Bei der Verarbeitung von Daten begegnen wir häufig die Notwendigkeit, dieselbe ID zu haben ...
 JavaScript -Engines: Implementierungen vergleichen
Apr 13, 2025 am 12:05 AM
JavaScript -Engines: Implementierungen vergleichen
Apr 13, 2025 am 12:05 AM
Unterschiedliche JavaScript -Motoren haben unterschiedliche Auswirkungen beim Analysieren und Ausführen von JavaScript -Code, da sich die Implementierungsprinzipien und Optimierungsstrategien jeder Engine unterscheiden. 1. Lexikalanalyse: Quellcode in die lexikalische Einheit umwandeln. 2. Grammatikanalyse: Erzeugen Sie einen abstrakten Syntaxbaum. 3. Optimierung und Kompilierung: Generieren Sie den Maschinencode über den JIT -Compiler. 4. Führen Sie aus: Führen Sie den Maschinencode aus. V8 Engine optimiert durch sofortige Kompilierung und versteckte Klasse.
 So implementieren Sie die Funktion des Ziell- und Drop-Einstellungsfunktion, ähnlich wie bei VSCODE in der Front-End-Entwicklung?
Apr 04, 2025 pm 02:06 PM
So implementieren Sie die Funktion des Ziell- und Drop-Einstellungsfunktion, ähnlich wie bei VSCODE in der Front-End-Entwicklung?
Apr 04, 2025 pm 02:06 PM
Erforschen Sie die Implementierung der Funktion des Bedien- und Drop-Einstellungsfunktion der Panel ähnlich wie VSCODE im Front-End. In der Front-End-Entwicklung wird VSCODE ähnlich wie VSCODE implementiert ...
